Once, in addition to half a dozen identical chairs, almost every family had one that was clearly different from the other and called respectful: “the grandfather”, “mother’s” or “chair Ivan F.”. As a rule, the role of such a personal chair fulfilled an ancient, inherited from grandmothers and great-grandmothers. But in my time it will happen for all the descendants of such personal thrones! Meanwhile, have a “prestigious” chair, designed for the head or Patriarch of the family, would many.
Today we’ll show you how to make a chair in the style of “retro”. No need to have to do this, the skill of the cabinetmaker. Minimal joinery skills, accuracy and once again accuracy is all that is needed in order for a not too considerable time to make a beautiful, practical chair.
For its production will need a Board thickness of 25-30 mm and preferably of hardwood, such as beech, oak or hornbeam. As well to the birch Board.
To start on a piece of cardboard or heavy paper should be drawn in accordance with our drawings side view rear legs of the chair (note, the size of the cell grid — 25 mm) and a plan of the back. By the way, greatly facilitate the tracing paper or glassine: draws half of the image, the sheet is bent along the axis of symmetry, and represented the second half. Further, the full image of the back is transferred to cardboard or heavy paper and cut out the template. This is the same pattern, it is desirable to make the edge notched rear legs of the chair.
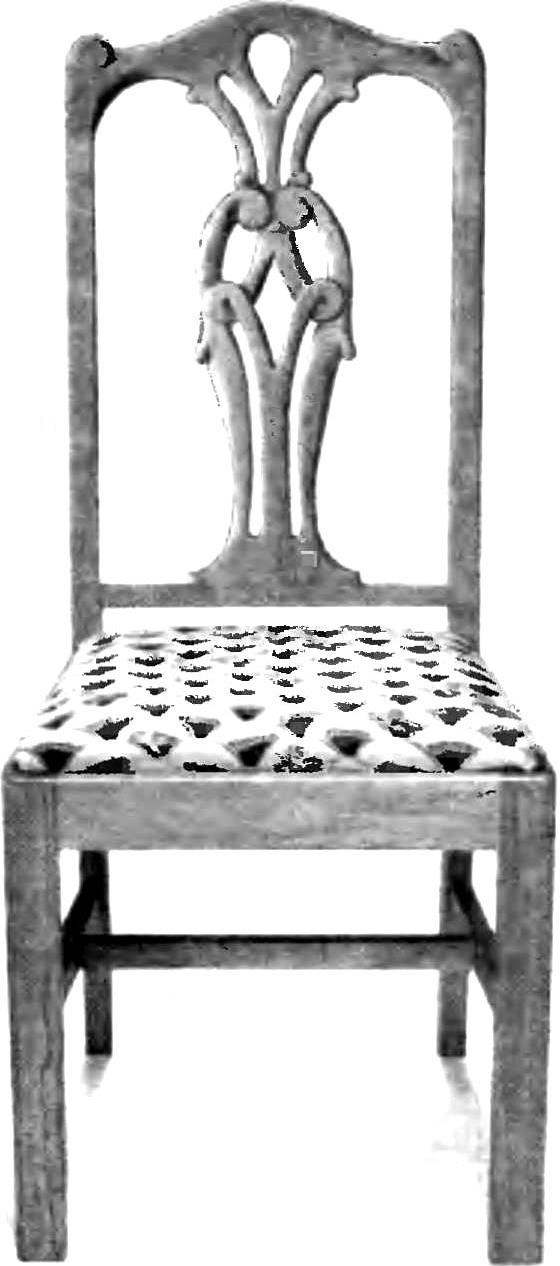
The design and main geometrical parameters of the chair:
A plan of the back of a chair; B — side view of the chair; In the scheme of Assembly of the chair.
You can now proceed directly to carpentry work. Let’s start with cuttings from the 25-mm boards of the rear legs of the chair. This is done using vygruznoy (bow) saws, after which the ends of the workpiece roughened rasp and skins of different grits. When processing follow the mutually perpendicular sides of each of the legs is beveled or littered with planes that will give the chair sloppy “homemade” look. To facilitate this work and make it more professional by using a simple device — a large wooden block, one side of which is protected by cover plate made of hardened sheet steel (e.g. a piece of cloth from the hacksaw). In this case, vyskazyvat each of the legs is possible with glass paper, pasted on a broad flat rail leg when it is pressed against the exposed metal side of the bar, a grinding tool, a protected metal side. Perpendicularity of sides and flatness will be provided.
Device for surface cleaning of workpieces chair.
Then, in accordance with our drawings, cut out items of the back, connected to each other and with the legs on the round plug-in thorns-nails (yet dry, without glue), and the collected workpiece is transferred drawing back. This is done using a template. It also helps in the process to control the shape of the pattern.
Assembly of the elements of the back of the chair.
The configuration of the recesses is quite simple — most of them can be cut all the same vygruznoy saw, pre-drill the grooves in the wood to pass through it by the blade. The sawing pattern should be treated especially carefully: the slightest deviation from symmetry can permanently ruin the look of a chair.
After you cut the end surfaces are processed with the help of our simple device providing a perpendicular sides. To finalize the backrest you’ll need a chisel and graver in various sizes and shapes. When performing this operation be careful — some types of wood are chopped off easily, so use a sharpened to razor sharpness cutting tool and cutting direction choose such that the blade is in any case not raised in the motion of the fiber.
The final processing of the pattern is made by the rasps and different skins. A good grinding tool is obtained from the rails of different sections, covered with glass paper or emery cloth.
Treatment carved backrest.
Translation of the centers of the holes under the spikes-using pins, pointed rods.
Manufacturer seat frame and legs requires the use of special cutting tools — planer with a curved piece of metal (carpenters call it kolevatyh), allowing to remove from wood shaped chamfer. If such a tool you do not, you can at least make a regular plane smooth chamfer. It is, however, somewhat scarce for the appearance of the chair, make it more primitive. There is another way — though quite time consuming. Work on obtaining chamfer complex configuration is divided into two stages. First, remove the smooth facet, which is then brought to the necessary forms tsiklej with scalloped edge. Final finishing of the chamfer — with the help of wooden bars of various shapes, covered with cloth.
Connection of all elements of the chair, as noted above, is made on a round plug-in thorns — pins. It is best to glue with epoxy. The holes for the studs need to serverlimit perhaps more accurately — even small misalignments or misalignment of holes will then be very hard to eliminate. To facilitate the drilling, prepare two steel rods with a point at one end — the diameter should correspond to Nagel. They will help you to translate the centers of the holes (and, moreover, exactly) from one part to another in contact with the first. For this purpose, the holes of one of the mating parts are inserted into steel rods and strongly pressed return the item. As a result, it will be clear markings — cores, which can be to cut the return hole.
When gluing the chair epoxy resin or casein glue be careful not to spill glue on the front surface when treated with stain or varnish will appear trudnoudalimyh spots.
After gluing the chair finally vyshkurivaetsya. Then, you should make an operation to “raise the NAP” is to wet the wood with water and dried, the surface will become rough, and rising the pile will be easy to remove the skin. Now the surfaces are treated with a stain (if the hand is not ready, you can use a strong solution of potassium permanganate or even brown mascara): after it dries, the wood will be smooth. It remains only to cover it with several layers of spirit or oil varnish with subsequent raspolirovki with varnish; or apply three to four layers of nitrocellulose lacquer with midozolam Vykurovanie surfaces.
The chair seat consists of a plywood base with a thickness of 8-10 mm, a foam cushion and a fabric covering attached to the bottom of furniture nails.
According to the magazine “Popular mechanics”, USA
Recommend to read “HEDGEHOG”PUZZLE Not privy to his secret for a long time to turn this wooden "hedgehog" in my hands, trying to figure out how he knows and not full at all if he is so closely connected with each other... FOAM-CASTER Not only the shipbuilders there is a need for one-time, single steel casting of certain parts. In these cases, existing technology has to pre-make a wooden model to receive the outdoor... 
 Once, in addition to half a dozen identical chairs, almost every family had one that was clearly different from the other and called respectful: “the grandfather”, “mother’s” or “chair Ivan F.”. As a rule, the role of such a personal chair fulfilled an ancient, inherited from grandmothers and great-grandmothers. But in my time it will happen for all the descendants of such personal thrones! Meanwhile, have a “prestigious” chair, designed for the head or Patriarch of the family, would many.