The welding apparatus I built is a modernized version of a device that has proven itself well in practice; its description and sketches were published in the magazine Modelist-Konstruktor No. 3, 1966. The main point is that the new “welder” is significantly more powerful than its predecessor, and simpler to build and operate. Without any extra gadgets, it makes it possible to reliably join sheet steel up to 3 mm thick. True, there is only one operating mode so far — the one most needed by the majority of home builders: spot welding.
Current regulation is not provided. The welding process is determined by heating time (that is, the duration current flows) and is controlled either visually (by color) or with a time relay whose delay range is 0.5—5 s.
As the base transformer, a series OSM-1.0 unit rated at 1 kVA is used. Its primary winding is best left unchanged (although if necessary it can be rewound: there are only 200 turns of PEV2-1.9 wire). But the secondary should preferably be replaced with a more “productive” one, made with PEV3-50 wire — two three-turn sections connected in parallel so that their total cross-section is 100 mm2.
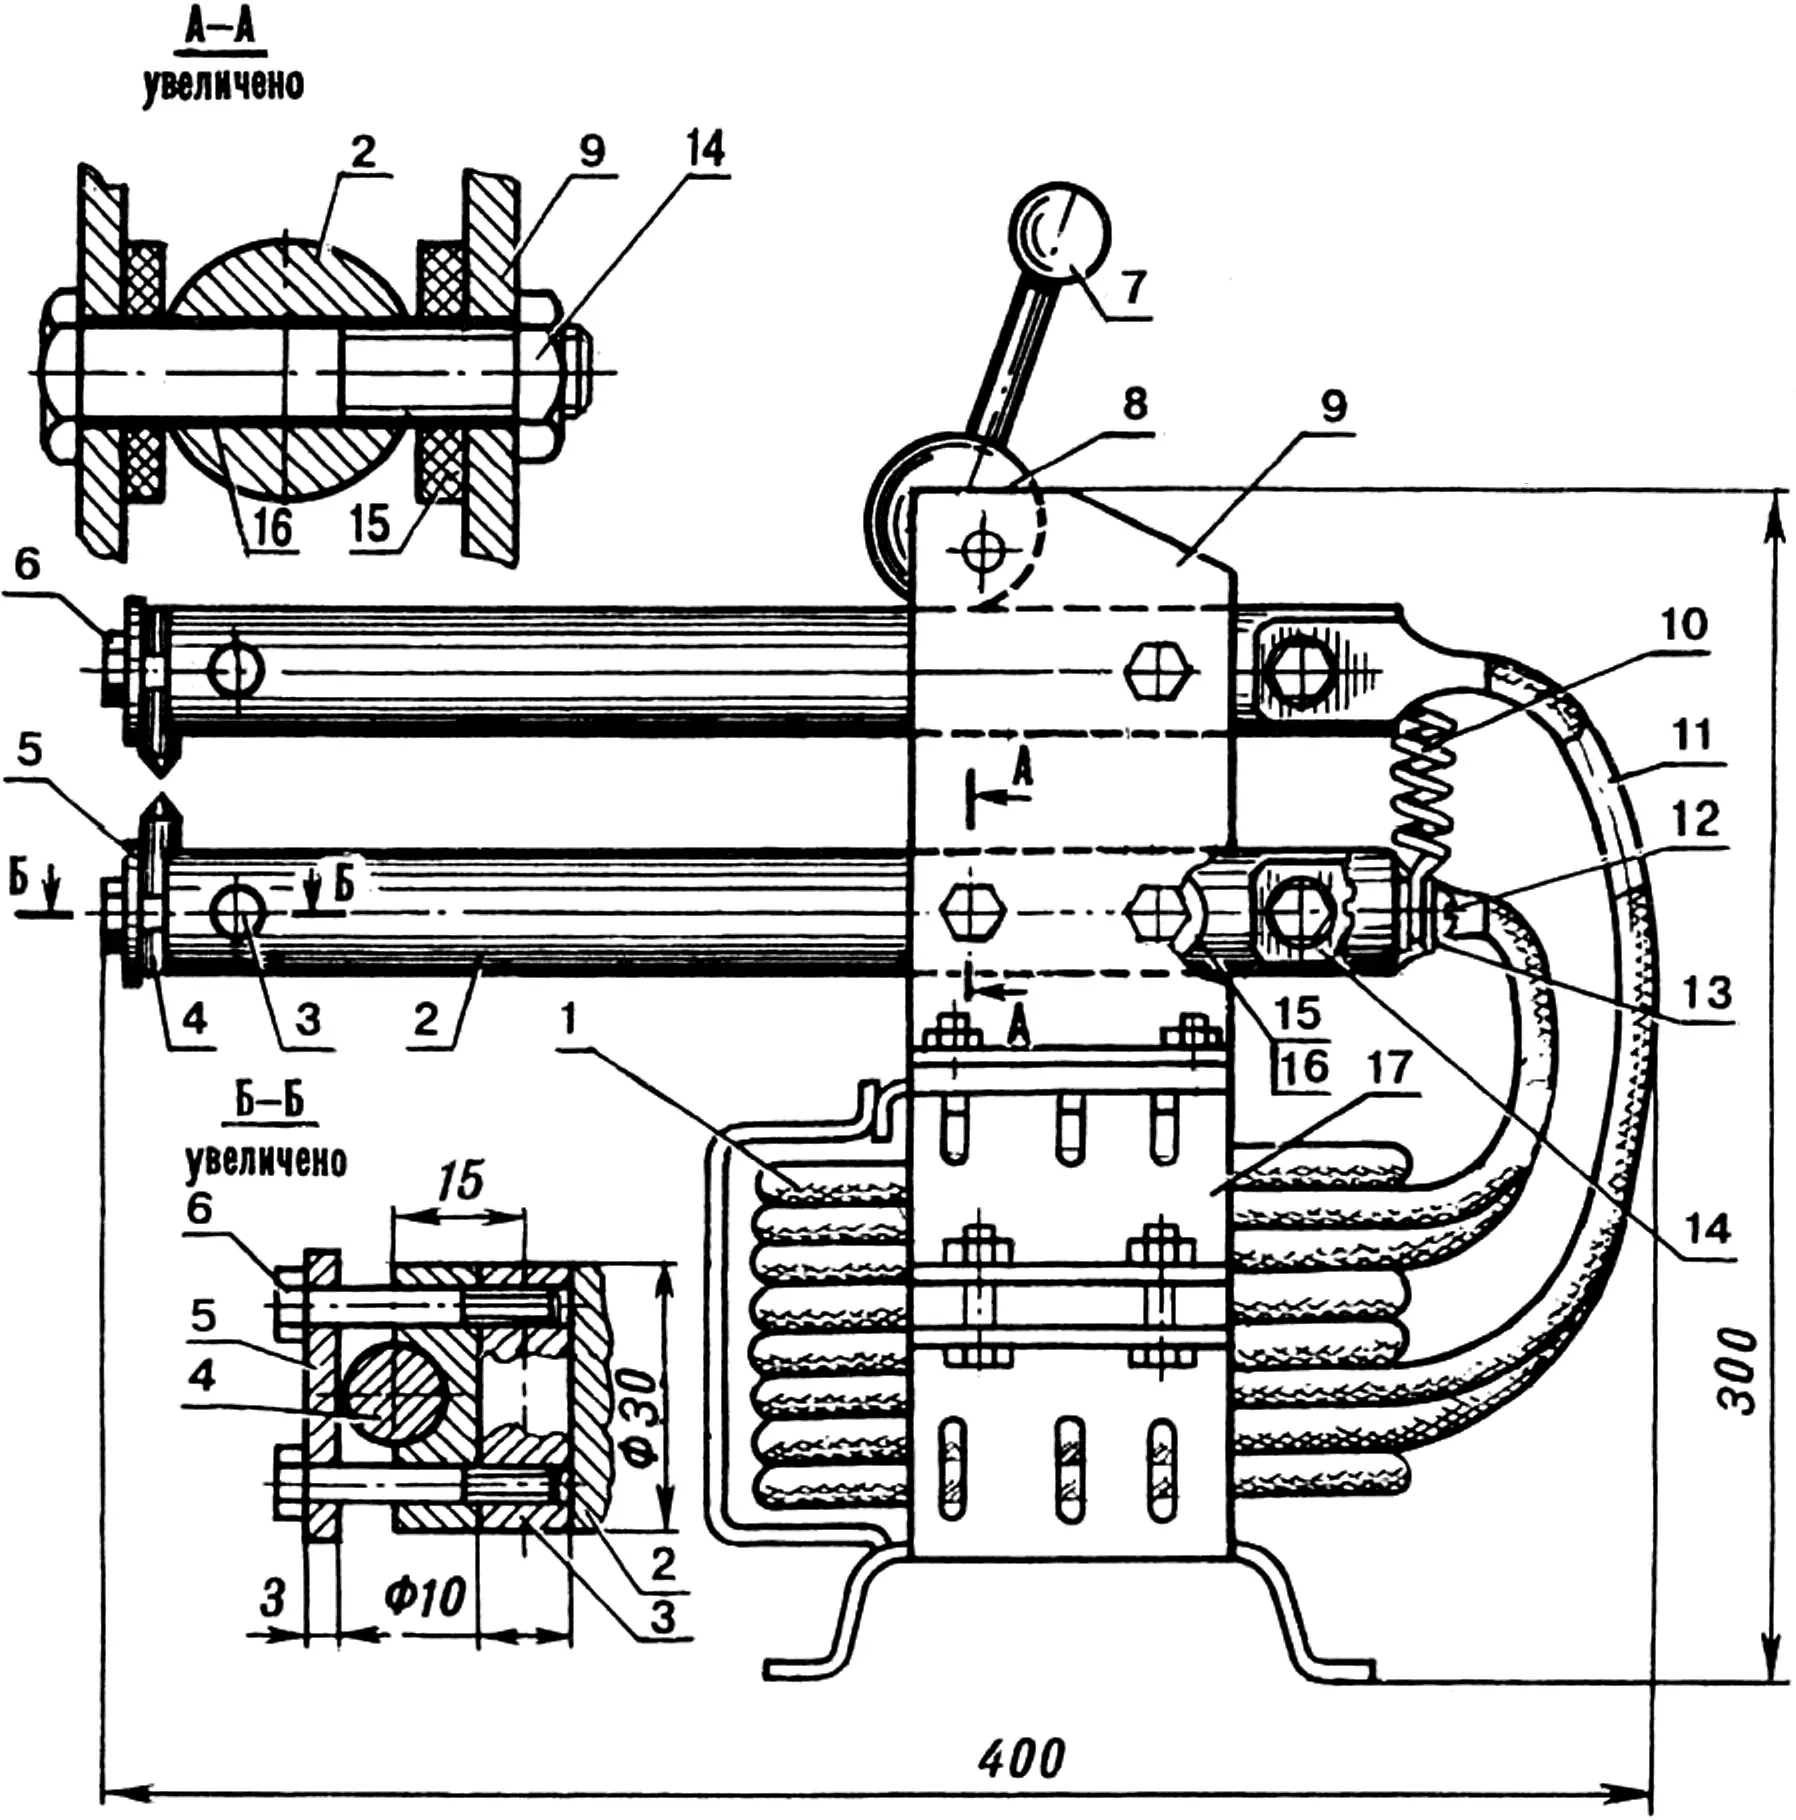
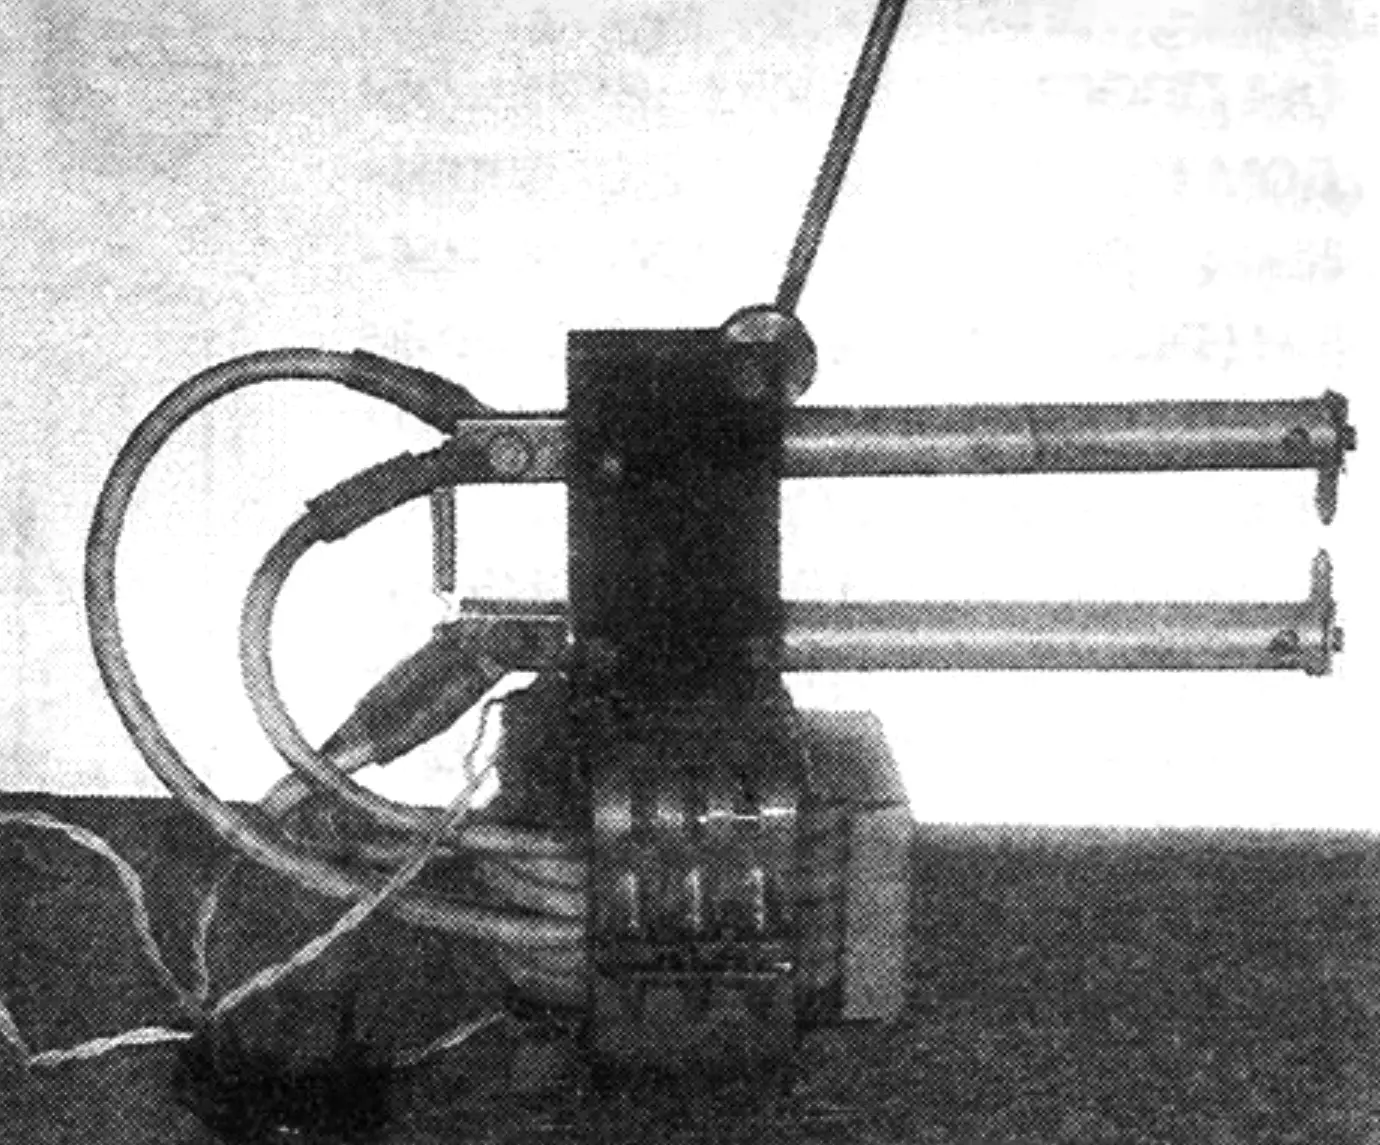
1 — modified OSM-1.0 transformer; 2 — current conductor (duralumin rod Ø30, L300, 2 pcs.); 3 — insert (steel rod Ø10, L30, 2 pcs.); 4 — electrode (copper rod Ø12, L50, 2 pcs.); 5 — brass washer (2 pcs.); 6, 12 — M6 screws; 7 — handle; 8 — eccentric; 9 — cheek (2 pcs.); 10 — spring; 11 — lead of half the secondary winding (4 pcs.); 13 — textolite bushing (with groove for the spring end loop); 14 — M8 bolt (6 pcs.); 15 — textolite washer (4 pcs.); 16 — insulating coating (varnished fabric or protective cloth-based tape, 2 pcs.); 17 — transformer housing.
I recommend making the electrode holders from a 30 mm duralumin rod. In practice, the lower one is best made fixed, insulated from the cheeks with textolite washers, and from the M8 mounting bolts with varnished fabric or protective cotton-based tape. For the electrodes themselves, I advise using copper rods 12 mm in diameter, securing them in the holders with a rectangular brass washer and two M6 screws; corresponding threads have been cut in special steel inserts.
In the initial position, the holders with electrodes are spread apart by a spring of suitable dimensions (for example, from an old folding bed). But care must be taken so that the spring does not create a short circuit on the secondary winding leads while the welding transformer is operating. One quite acceptable technical solution is, in particular, a variant using a separating plastic bushing secured in the end of the fixed electrode holder with an M6 screw. The lower end of the spring is electrically insulated from all other parts of the “welder” under any circumstances, even the most unlikely ones.
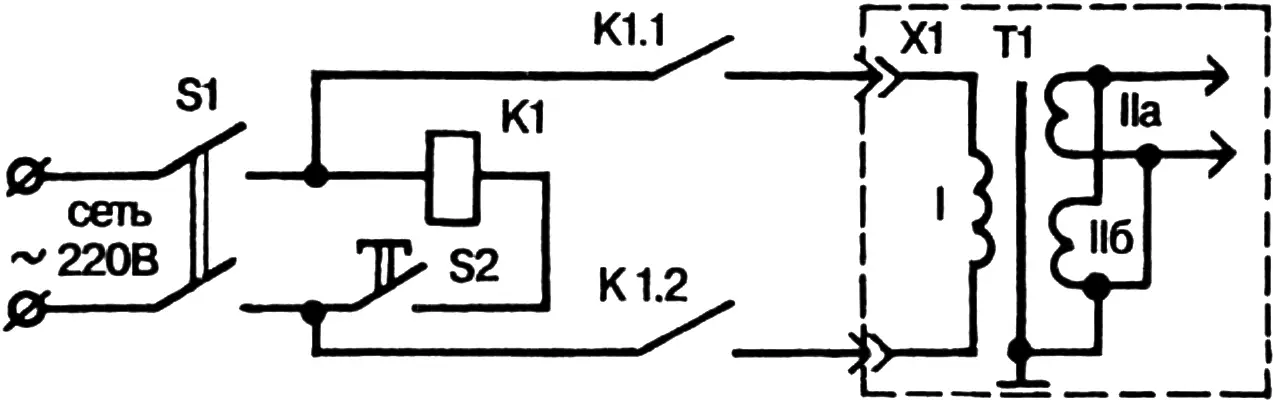
It is best to connect the welding apparatus to the mains using a well-proven schematic electrical diagram (see fig.) through a 20-amp automatic circuit breaker. The electricity meter should also be rated for at least the same current. Direct control of the “welder” is via magnetic starter K1, switched by a pedal with an S2 “mushroom” pushbutton. The housing and the transformer secondary winding must be grounded.
Such a “welder” should be switched on and off only with the electrodes pressed together. Failure to follow this simple rule risks intense sparking, which leads to burning of the electrodes with highly undesirable consequences.
And one more piece of advice verified by practice. Since forced cooling is not provided for either the transformer or the current conductors and electrodes, during welding you should constantly monitor the temperature regime. Take breaks in operation as needed, but under no circumstances allow the equipment to overheat.
Modelist-Konstruktor No. 2’99, G. GAVRILOV, Gomel, Republic of Belarus
Recommend to read
 ENDLESS WATER
Free energy wind has long serve man. Question about using it is urgent and now, especially with the ever increasing shortage of natural fuel. There is a "demand" for it and the private... “LILIES” AGAINST “THE LION”
From the point of view of war at sea the eighteenth century has largely been a century frigates. For over a hundred years three major powers of Europe were engaged in a military...
