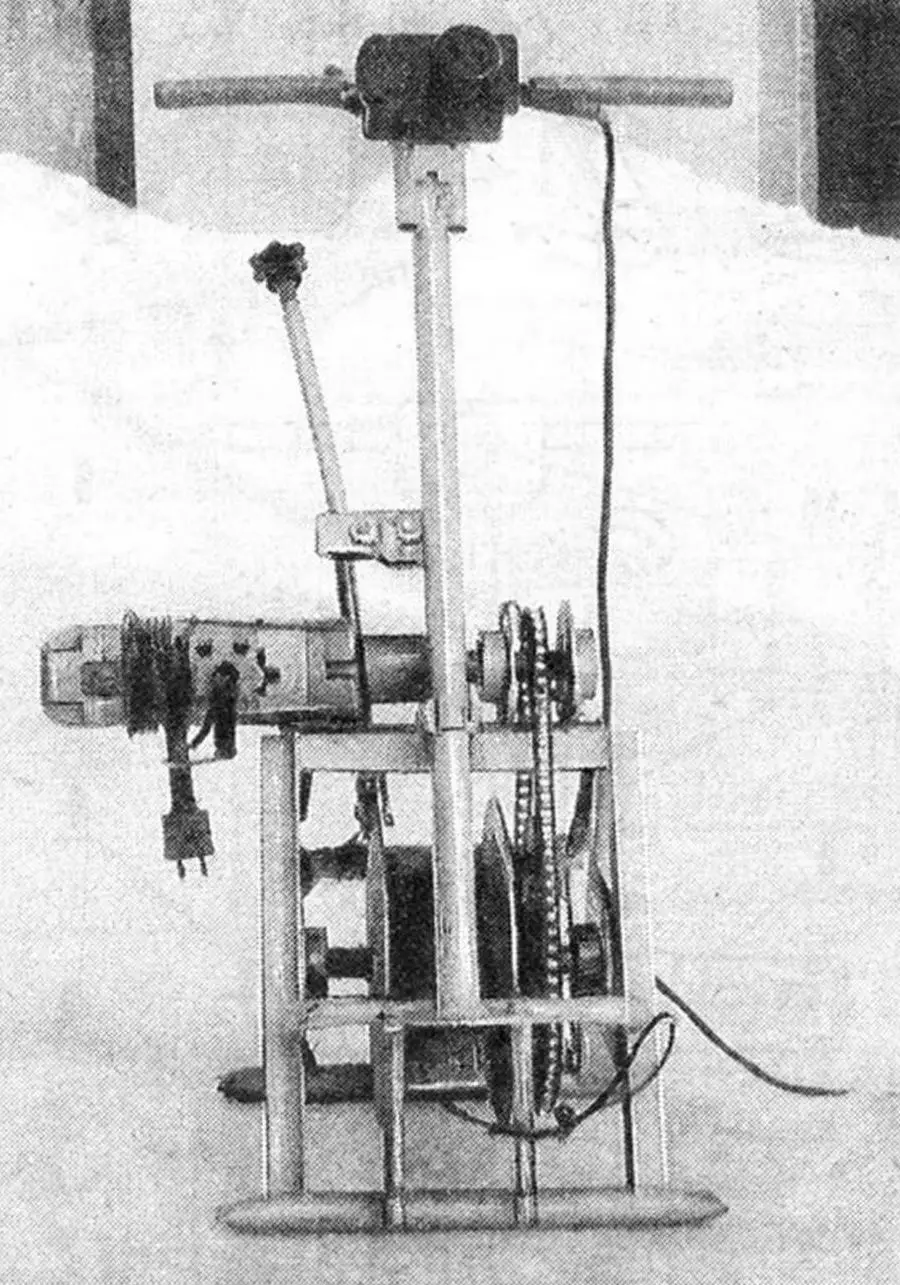
With a fairly powerful compact drive, the electric drill has long become one of the leaders of household tools. And with attachments and all kinds of fixtures, it is quite happy to get ahead in agricultural work: it already mows, threshes, and performs other operations excellently. It becomes a true universal tool! Moreover, thanks to the light hand of a resident of the Leningrad Region, V. Morozov, the drill successfully «masters» even plowing work, which the «Modelist-konstruktor» readers are regularly informed about.
Inspired by such publications and original technical ideas (see No. 9’81, 3’89, 4’94 of the journal), I decided to attach my electric drill instead of the «Sivka-burka» plow. I decided: let the developed complex with a self-propelled plow satisfy to the maximum the requirements that life itself puts forward. And above all — so that the whole design is extremely simple, inexpensive, and light, and the electric drill used in it is not subjected to any modifications.
And what did I get? I suggest that readers pass their verdict by reviewing the description and the provided sketches of the main blocks, assemblies and parts.
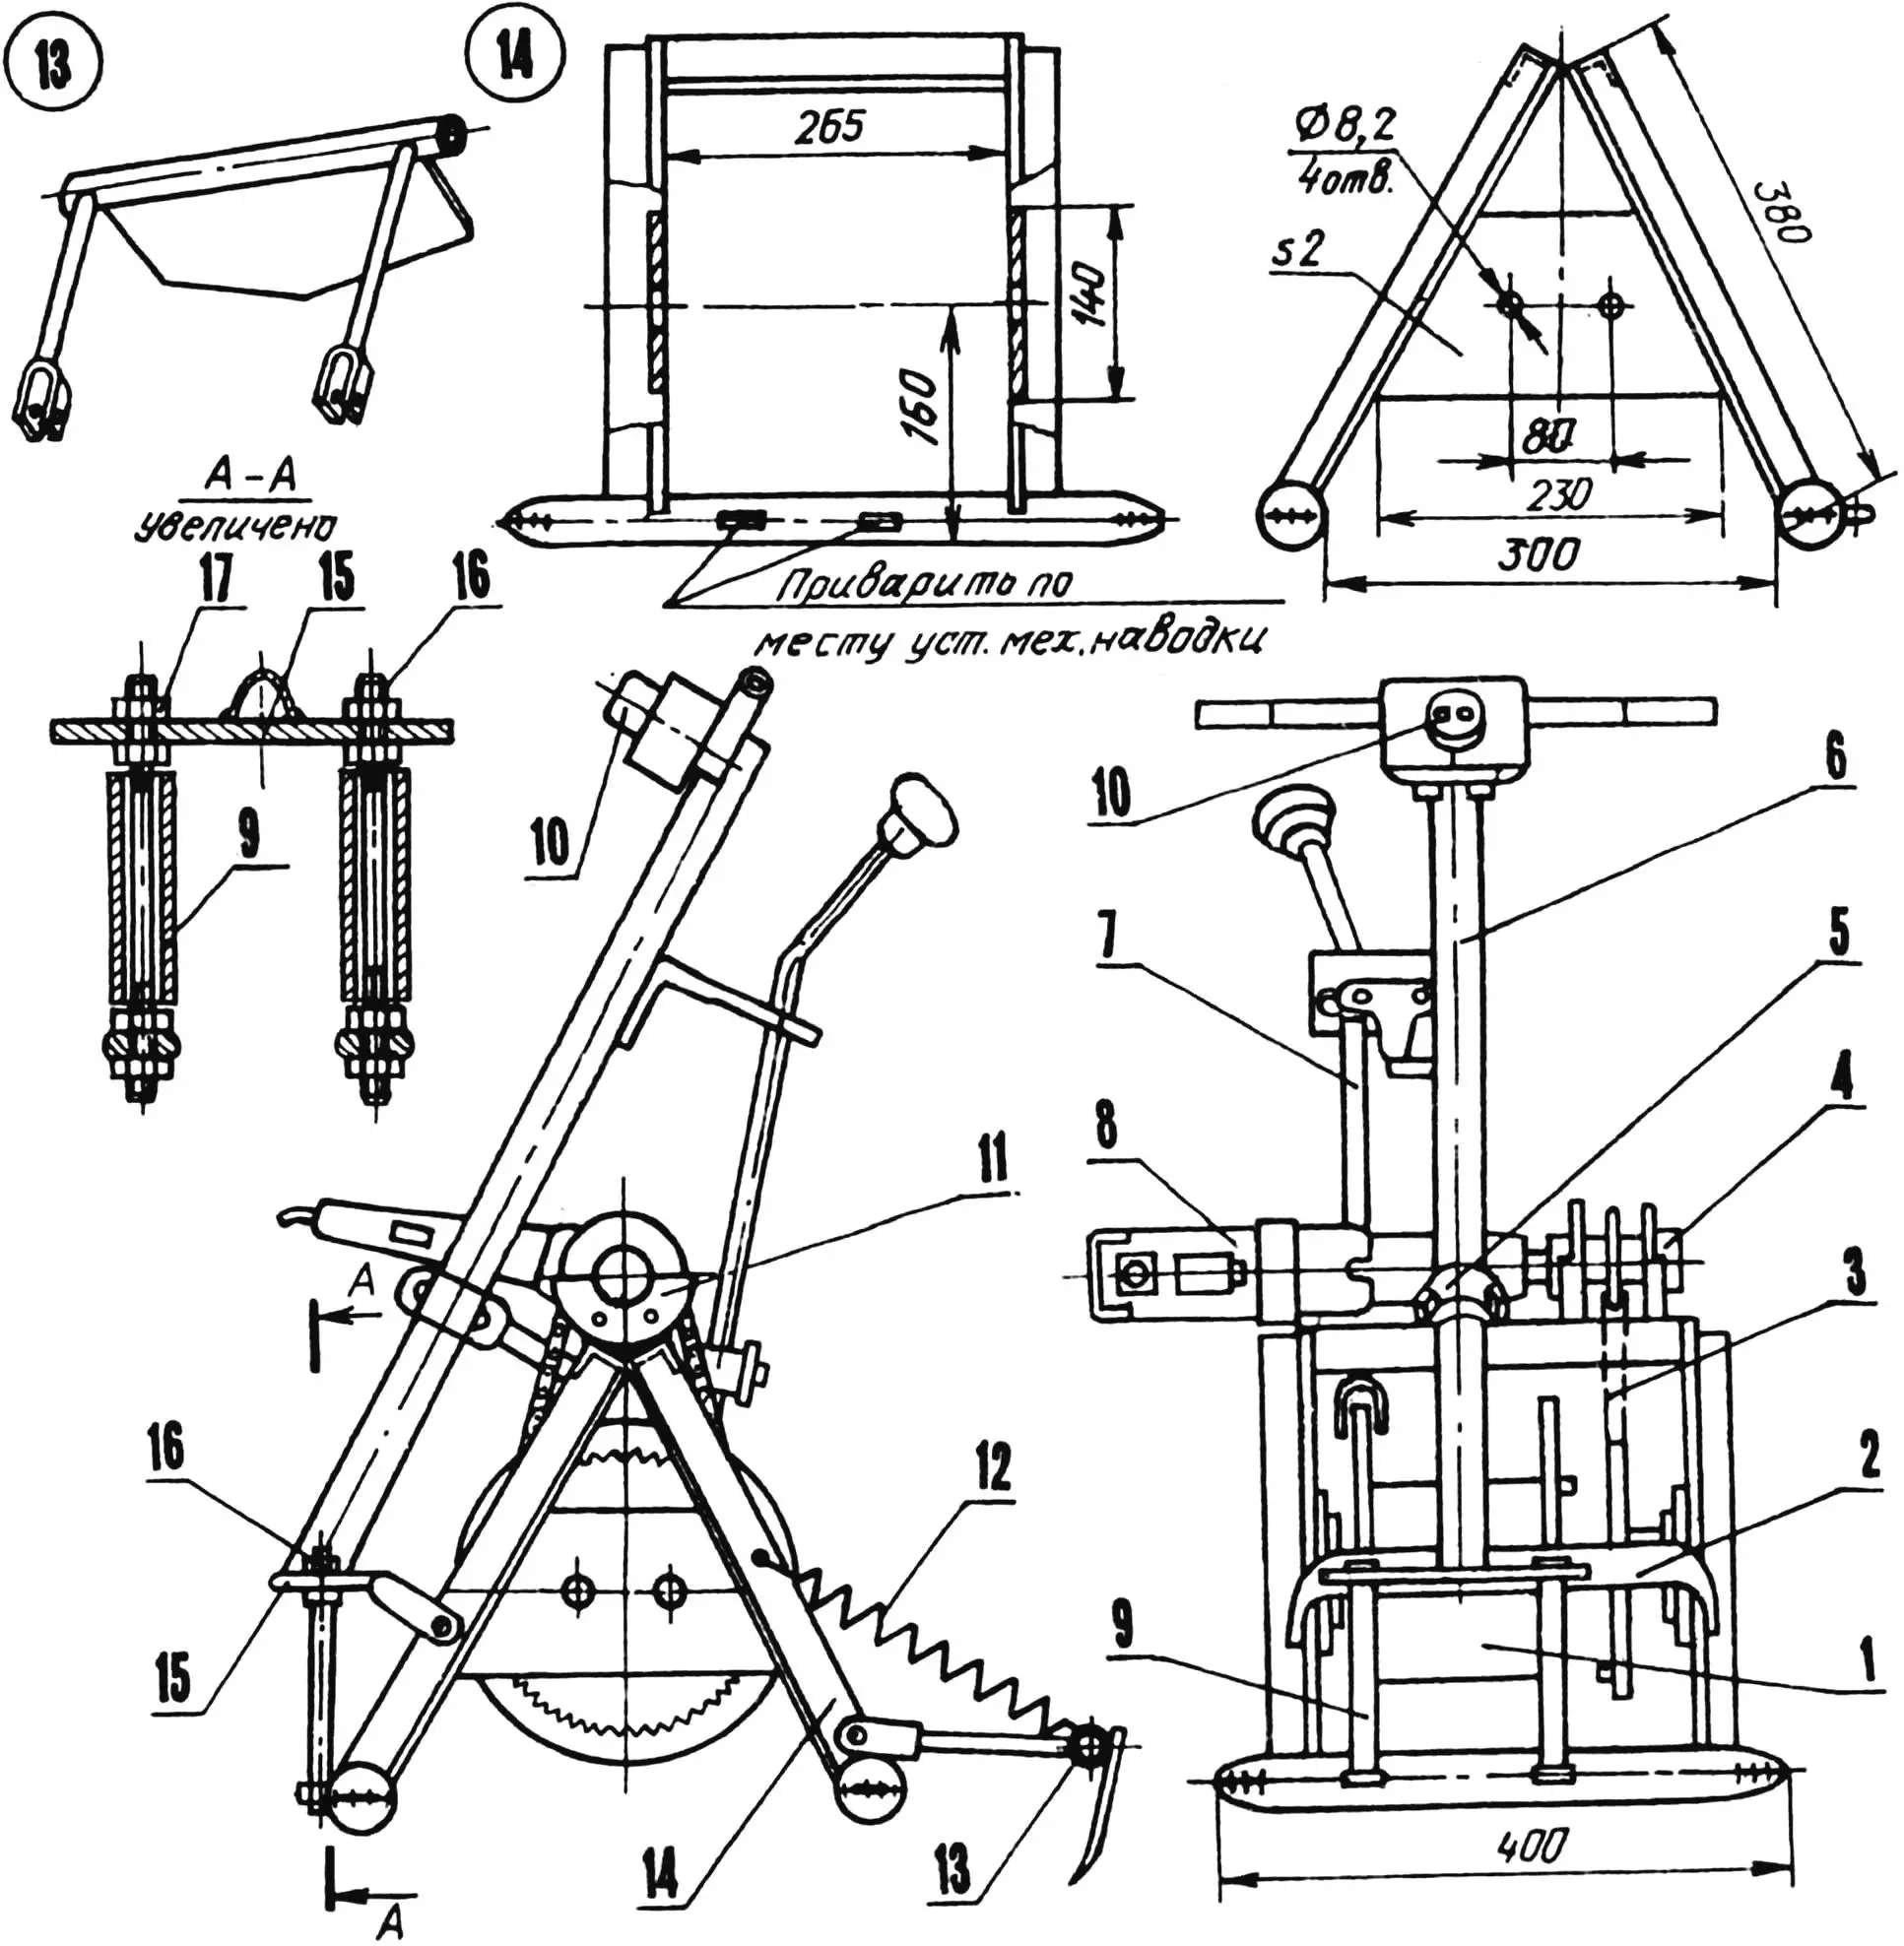
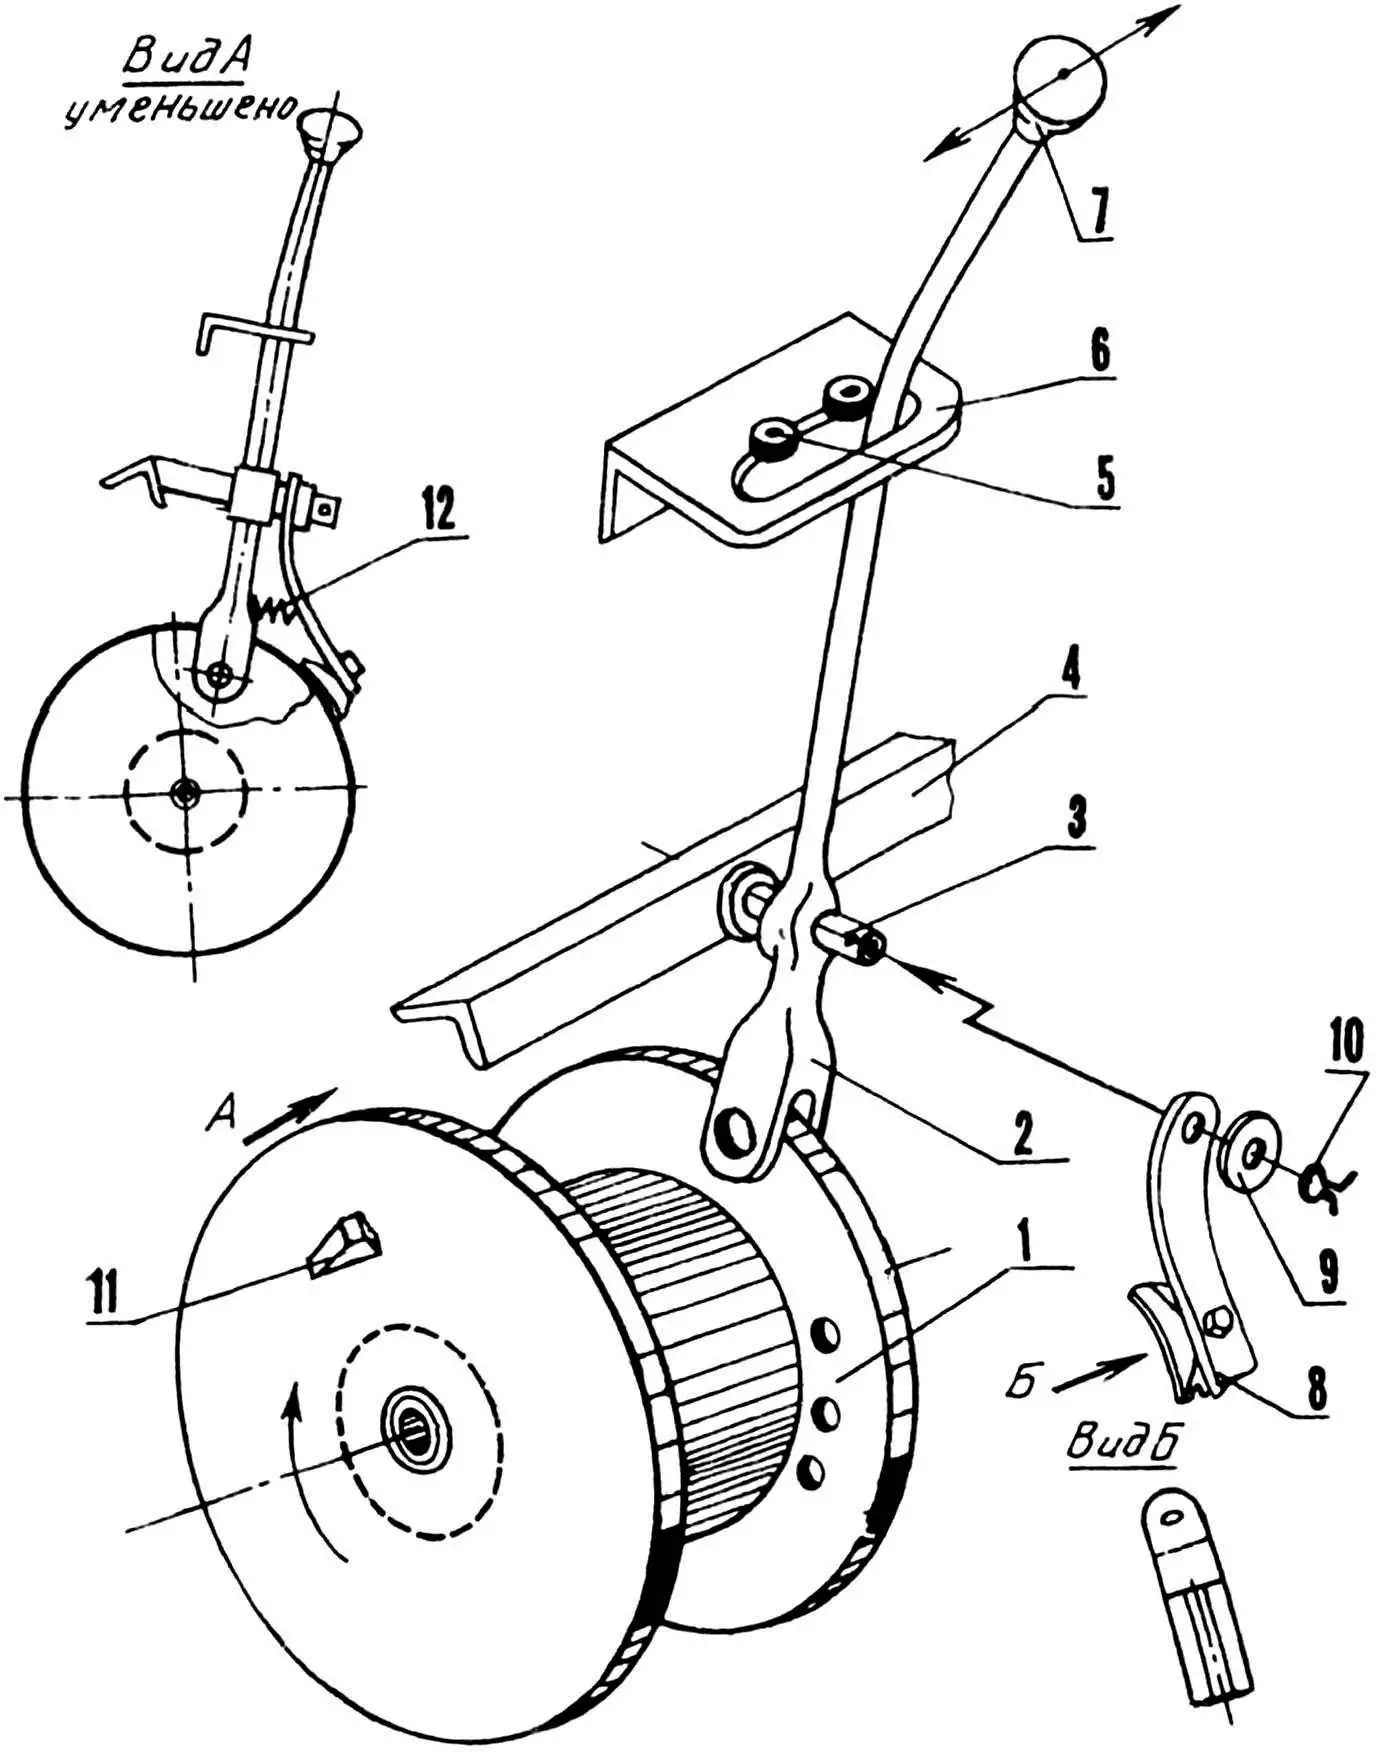
1 — drum with a towing cable, 2 — aiming arc, 3 — PR-12.7 chain, 4 — drive-shaft bearing housing (2 pcs.), 5 — control-post mounting unit (from the connecting rod of an automobile compressor), 6 — control post (steel tube 30×2), 7 — drum connection mechanism, 8 — electric drill (600 W, 250 rpm), 9 — aiming roller (brass tube 11×2.5, 2 pcs.), 10 — electrical distribution box with a socket, 11 — sickle-shaped bracket (St3, 2 pcs.), 12 — armature spring, 13 — assembled armature, 14 — steel frame (welded structure made of angle 32×32, tube 32×2.3 and sheet s2), 15 — cross member (St3), 16 — axle-stud M10 (2 pcs.), 17 — nut M10 (8 pcs.).
With my initial idea, disagreements, it seems, did not arise anywhere. The weight of the plow towbar with an electric winch did not exceed the planned 30 kg, even though the design practically has no lightweight parts. The compositional simplicity made it possible to reduce material costs. Moreover, the electric drill used really was not subjected to any modifications. And that means it can be easily removed and used for its intended purpose.
The electric winch is arranged as follows. In the upper part of the frame welded from angle members, within bearing housings of ball bearings, a drive-stub is located; on it a sprocket from a «Vyatka» scooter is rigidly fixed. Below there is a drum made from a steel pipe with a diameter of 152 mm. Steel cheek plates are welded to the drum on both sides. The central hole is bored for steel bushings, into which brass sliding bearings are pressed. On one of the cheek plates, a tooth is fastened for engagement with a similar element of the sprocket placed next to it, where z2=60.
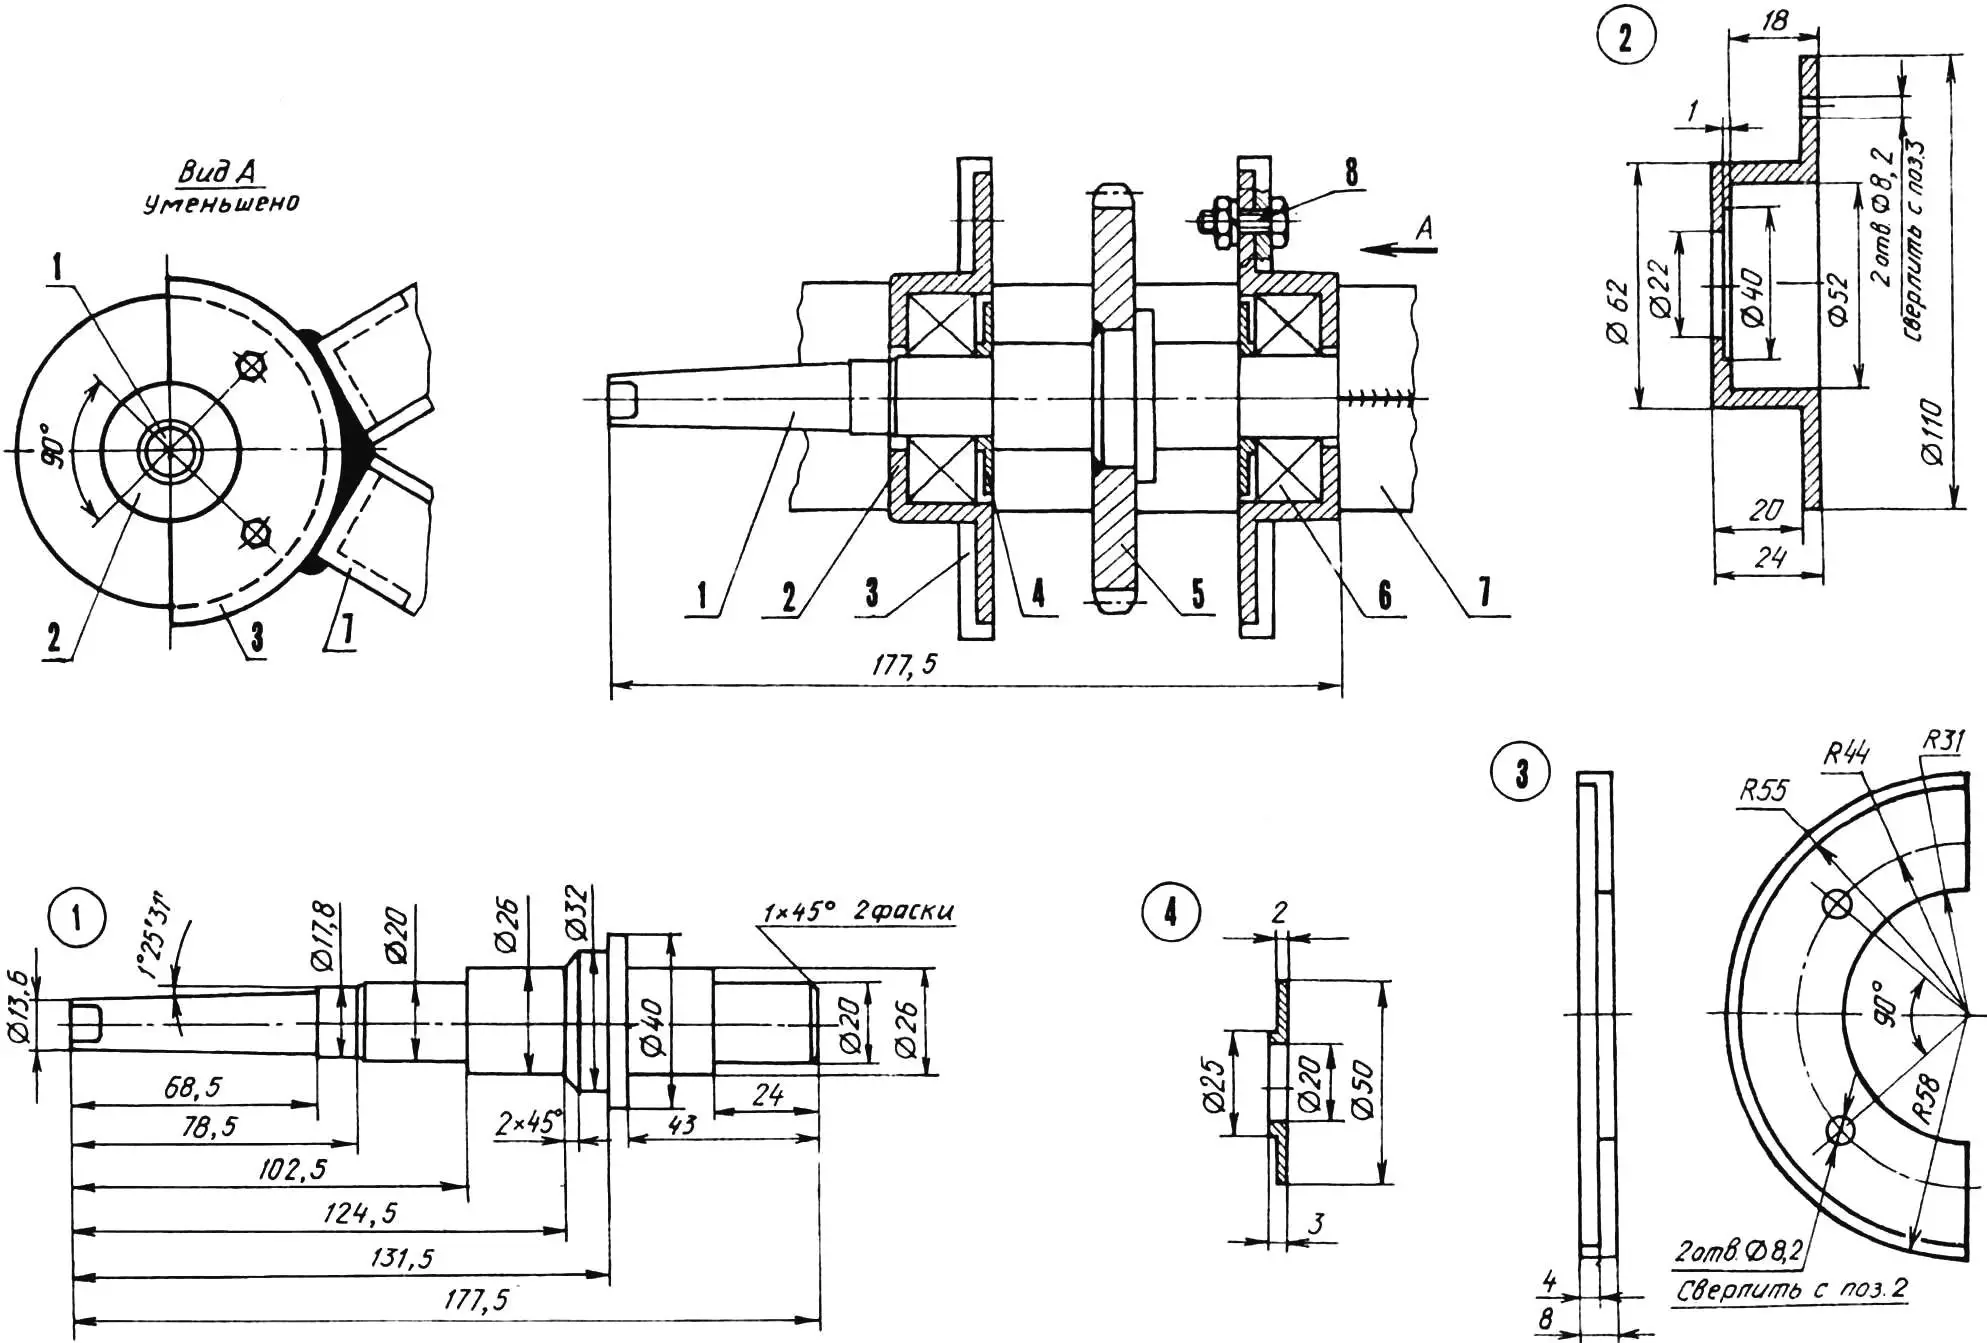
1 — drive shaft (St6), 2 — drive-shaft bearing housing (St3, 2 pcs.), 3 — sickle-shaped bracket (St3, 2 pcs.), 4 — sealing washer (St3, 2 pcs.), 5 — sprocket z1 = 22, 6 — bearing 304 (2 pcs.), 7 — frame side member (longeron), 8 — bolt M8 (4 pcs.).
At the ends of the drum shaft, bearings 304 are installed in the corresponding housings. The housings themselves have two fastening holes: one shaped as a slot, by means of which the chain tension is adjusted, the other with a diameter of 8.2 mm.
The drum moves freely along the axis on brass sliding bearings. For this, on the winch frame (along its own axis) a lever with a fork is installed, into which one of the drum flanges enters.
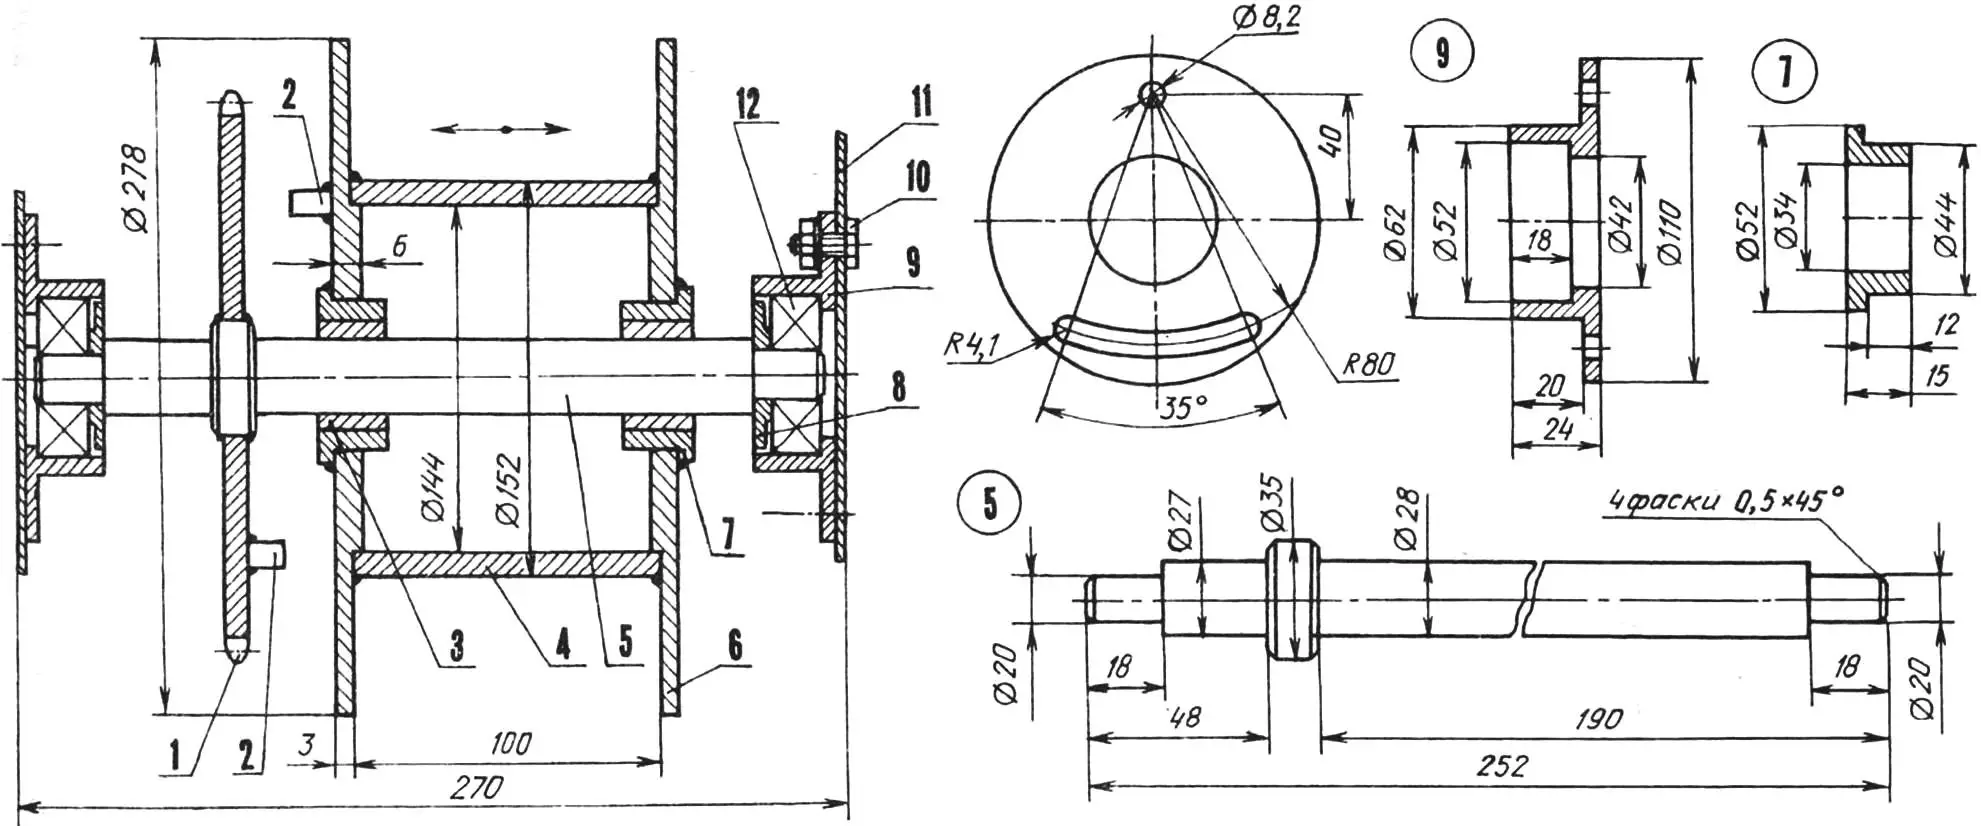
1 — sprocket z2=60, 2 — clutch teeth (steel 45), 3 — sleeve insert (brass tube 34×3, 2 pcs.), 4 — drum (steel pipe 152×4), 5 — driven shaft (St6), 6 — drum cheek (St3, 2 pcs.), 7 — drum bushing (St3, 2 pcs.), 8 — sealing washer (St3, 2 pcs.), 9 — driven-shaft bearing housing (St3, 2 pcs.), 10 — bolt M8 (4 pcs.), 11 — frame gusset plate (St3, 2 pcs.), 12 — bearing 304 (2 pcs.).
To return the plow to the beginning of the furrow, the drum is withdrawn by a lever out of engagement with the sprocket, and the cable is freely uncoiled. Then the drum is again brought into engagement with the sprocket, the electric winch is switched on, and the plow makes a working stroke.
On the switching lever shaft, a braking device is installed. It serves to reduce the rotational inertia of the drum when uncoiling the cable. As practice shows, the need for it arises immediately as soon as the working stroke of the plow becomes shorter than the cable length set on the drum. On a winch that initially did not have such a device, the cable often became tangled; it even sometimes slipped off the drum and threatened to wind up onto the shaft, which would have led to the shaft failing.
1 — drum, 2 — lever fork of commutation, 3 — lever axis, 4 — frame side member (longeron), 5 — stopper of the lever extreme position (2 pcs.), 6 — stop bracket, 7 — handle of the commutation lever, 8 — brake, 9 — washer, 10 — cotter pin, 11 — clutch tooth, 12 — spring.
The braking device works reliably and, as turned out, does not create significant resistance to returning the plow for the next run.
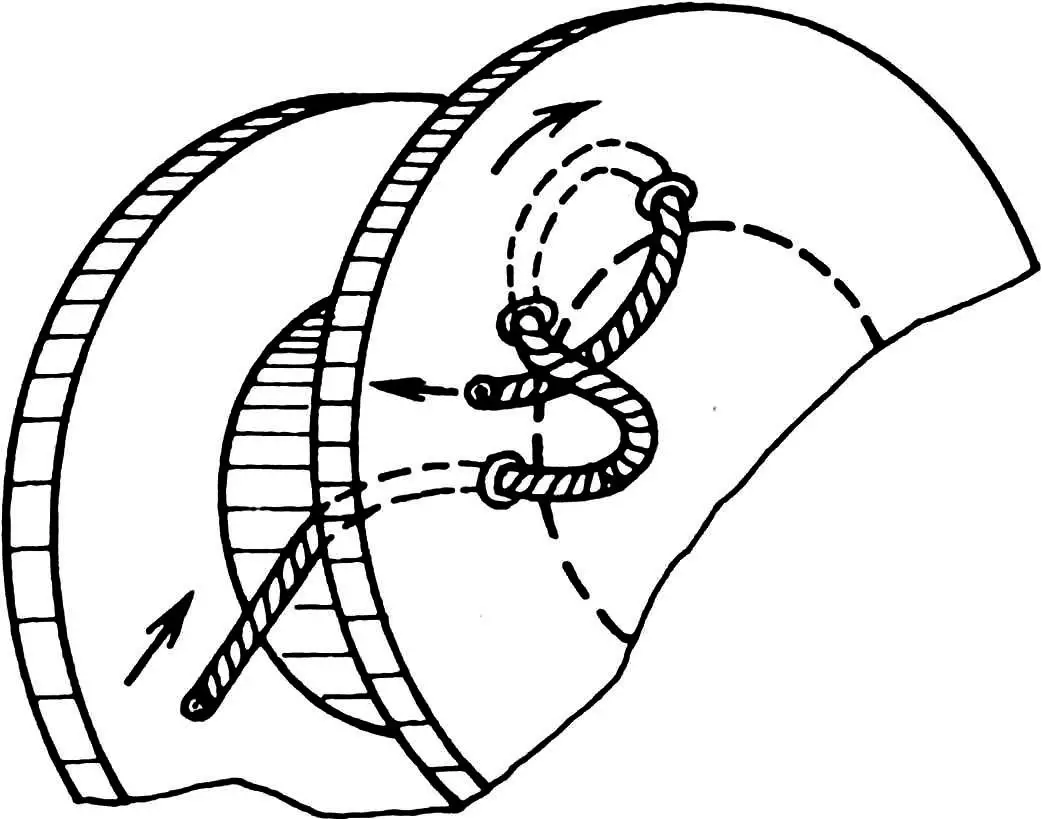
When making the cable aiming guide, I decided to give up the use of bearings and chose a simpler scheme. Its essence is that on two shafts with a diameter of 10 mm I installed brass guide tubes. To reduce friction, I applied lubricant to the shafts. And now, as they say, I know no trouble.
I found out that when working a plot with a plow and hiller, my winch with a fairly modest power unit (600 W, 250 rpm) shows better results than serial motor cultivators of the «Luch» and «Neva» type. And in terms of maintenance, a homemade electric plowman is simpler, more convenient, and more reliable than powerful factory motor helpers. For example, to adjust the chain tension, it is enough to loosen 4 bolts, slightly shift (up-down along the guide slot) both bearing housings of the driven shaft, and then tighten the mentioned bolt connections again.
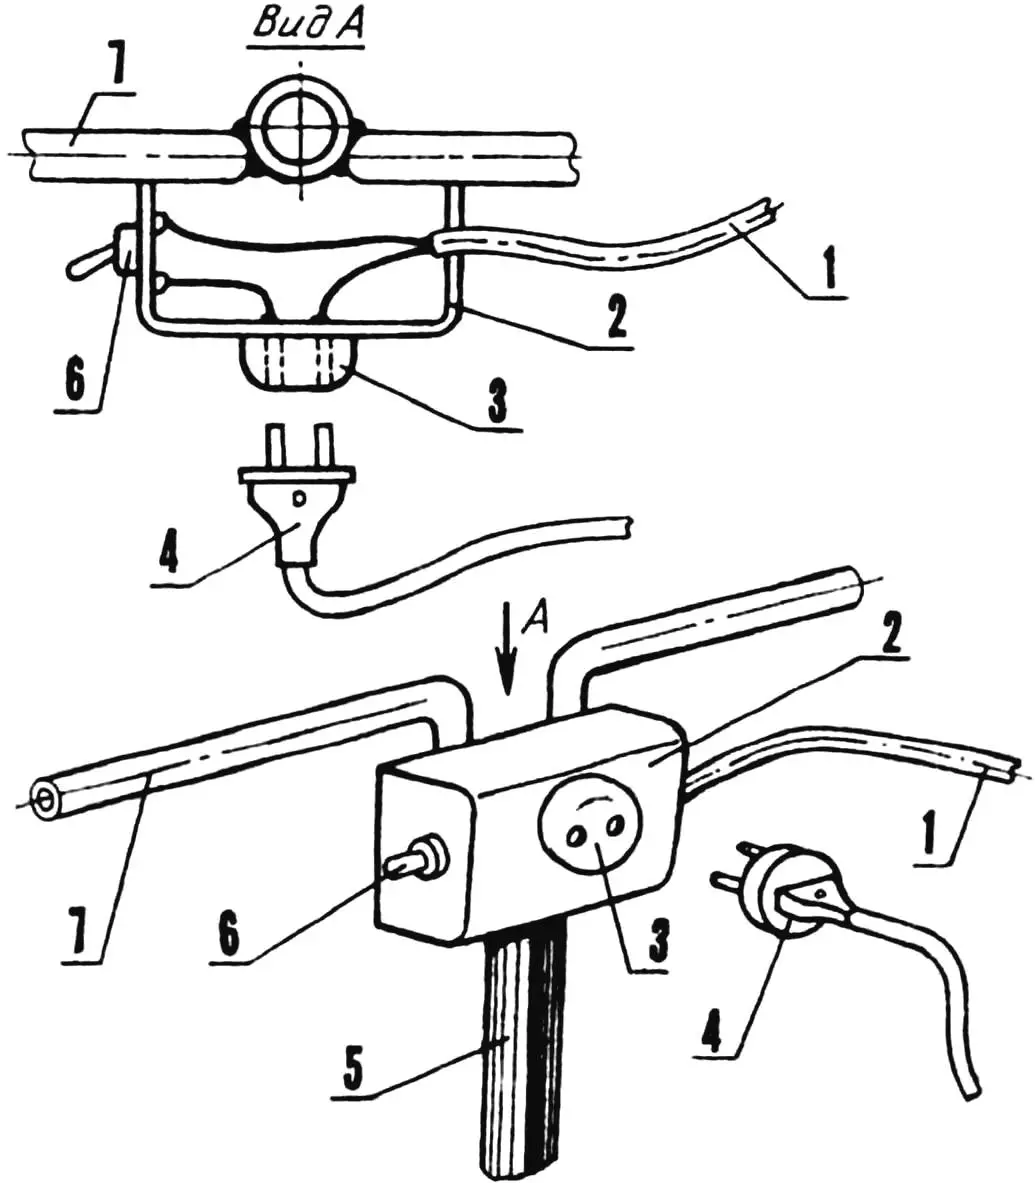
1 — two-core power cable, 2 — electrical distribution box, 3 — plug socket, 4 — plug with the drill power cord, 5 — control post, 6 — TV1 toggle switch, 7 — handle (2 pcs.).
Now a few words about the self-propelled plow. The version I use is largely similar to the example, published in «Modelist-konstruktor» No. 6’90. I note one detail: the moldboard on my plow is made of stainless steel. I recommend others, if they have such an opportunity, to switch to stainless steel as well — the costs will pay back a hundredfold. It seems worth experimenting also with the plow design itself, comparing it with other variants published, for example, in No. 4’94, 2’95, 8’95 of the journal.
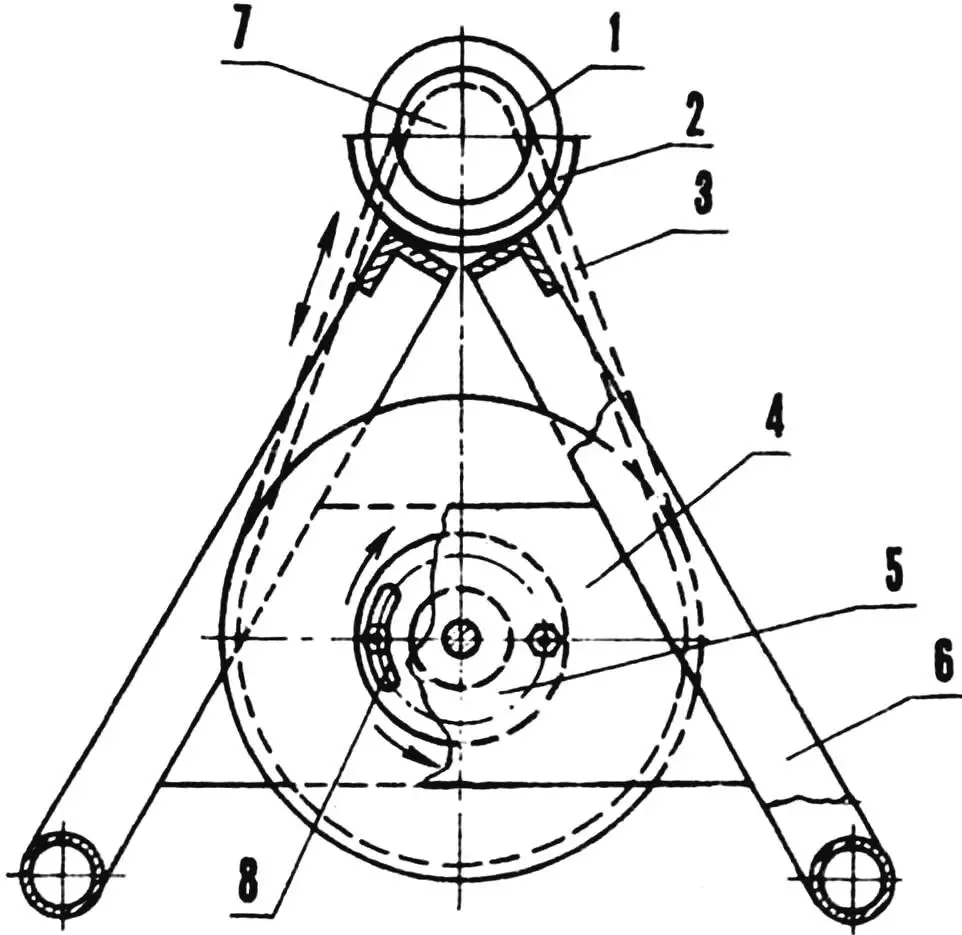
1 — drive-shaft bearing housing, 2 — sickle-shaped bracket, 3 — PR-12.7 chain, 4 — sprocket z2=60, 5 — driven-shaft bearing housing, 6 — frame, 7 — sprocket z1=22, 8 — adjustment slot.
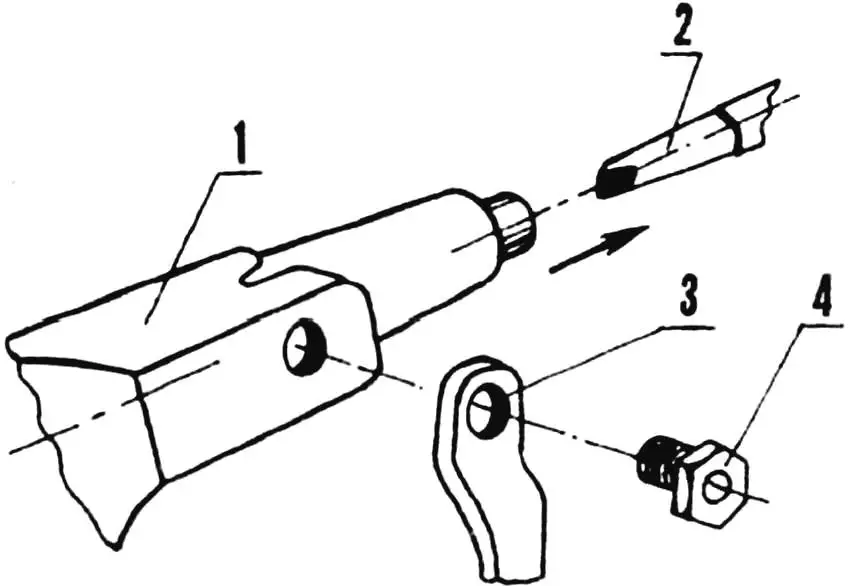
1 — electric drill (auxiliary handles are not shown), 2 — drive-shaft stub, 3 — bracket-lug, 4 — hollow bolt.
And one more thing. Under no circumstances should safety rules be neglected. With electricity, jokes are bad; after all, the winch is in the 220 V mains network, without a separating transformer and without electronic protection equipment! Using such equipment in tillage is possible only by observing extreme caution. Avoid wet bad weather, and in dry conditions start work only after taking care of personal protection against electric shock — rubber shoes and rubber gloves.
«Modelist-konstruktor» No. 11’97, V. ALEXANDROVSKYI
Recommend to read
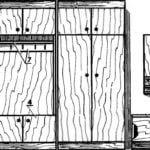 HALLWAY FURNITURE
The proposed set of furniture for the hall although made at home, but meets the requirements of modern furniture design, creating comfort and coziness at home. This consists of three...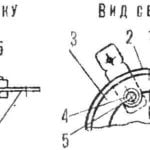 VARIABLE RESISTORS WITH TAPS
often need Amateurs with a passion for designing low-frequency amplifiers. But in the sale they are not always. The solution? To make a simple potentiometer with taps. For this it is...
