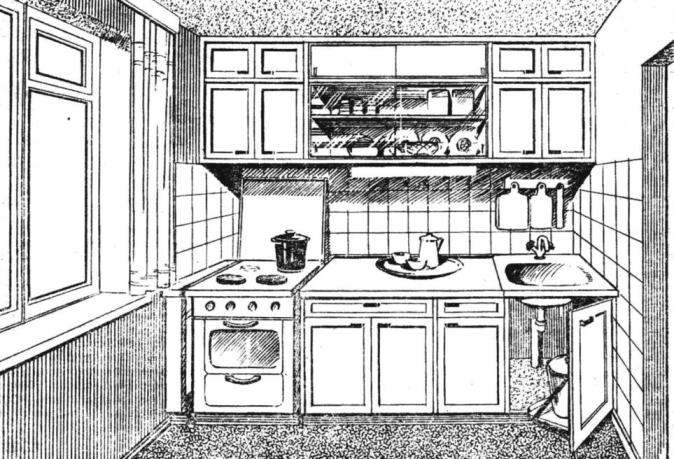
I thought: and what room, when we go home, we are often the longest? For women, in my opinion, this is the kitchen. Man, even the most caring, here only helps, plays only a minor role. But can play the main… in the landscaping and kitchen equipment, particularly small ones, where it is so easy to place a pile of various utensils. But we now require that the aesthetics were in attendance, and it was convenient to use, and the area is rationally distributed functionally, and to some meters remain free. Let’s try to count what they leave, if they, say, only about six.
Kitchen table, playing the role of dining with seats, is about 2 m2 . The sink is 0.5 m2 , hob, fridge — here’s the space is already there.
Decided to take her… the walls and ceiling: only the hanging wardrobe can help out in this situation. I myself am a Builder, but I want to assure you that the task is feasible and the layman, the main thing — patience and diligence. Indeed, any complex thing going from a rather simple details. This applies to the proposed Cabinet, despite the fact that he was framed and it looks very neat. For it did not require scarce materials, and the tool has been used the most available: planer, handsaw, hammer and screwdriver.
Material for the kitchen it took me 50 m Board section 20X40 mm. For the valves used plates from an ordinary packing case. On panels, walls and shelves went hardboard (but suitable plastic, and plywood from crates of tea and cigarettes). To connect the parts used casein glue and screws.
Fig. 1. Homemade kitchen Cabinet-wall.
Manufacturer of wall Cabinet should start with a framework. The size of his joints are visible from the drawing. Most joints have a sample, “vpoldereva”; the gathering glue and fastened with screws.
The whole Cabinet is better to divide into three sections. The two ends are identical, so they’ll start. Assemble the frame with glue and screws, then install bottom and middle shelves: they are not getting to the front of the plane serving as a kind of sample of “the fourth” for the porch doors. Then plywood or plastic sheathed exterior wall. Top and back panel can not be installed.
Next, the Assembly of the doors. For their part choose a container plank, free from knots and other defects. Stripping the plane, give them the same cross-section — 10X40 mm. Each wing is composed of two frames and a few more exterior, whereby when overlaying them on one another are formed ledges, as in the sample “vpoldereva” — for the overlaying panels and education vestibule with another door (the rest of the regional projections remove a plane). By the way, these doors are stronger and resist warping.
Put inside the frame panels of plastic, glass, DVL or plywood, sizing the edge and pressed against the bead on small nails — the door will receive an additional stiffness. It can be installed without hinges, missing the corners through the top and bottom beam of the frame on the nail, having Made the last sections, take the average. It is more in size, but simpler in design, as it has framed, sliding sash and ordinary glass or plastic. Poses for them are formed due to the indentation of the shelf from the front of the plane and the glazing bead, nailed flush with the carrier element of the frame, but can be set up and ready, made of plastic.
Fig. 2. Scheme top, hanging, part of the Cabinet.
If necessary, the same way you can do the lower part of the kitchen wall, which will combine the cutting table, washing her bedside table, the stove. Such a single top it is better to cover with a sheet of plastic, gluing it on the Bustilat, PVA emulsion, or any mastic for ceramic or linoleum tiles.
Finish on all other surfaces of the Cabinet wall depends on what the material was used for its Foundation. If it is white or tinted plastic, which is good in itself. Plywood should in any case be thoroughly sanded with sandpaper, then cover with several layers of a furniture varnish with intermediate drying. The wooden surface gives a beautiful light roasting with a blowtorch with the subsequent varnishing. A good effect will give a staining rack in white enamel or color — soft, nice colors. The wall space between the upper and lower parts of a case it is advisable to lay tiles: practical and hygienic.
Among the dimensions given in the drawing, nor the depth of the Cabinet. It depends on the size of the kitchen and placed in the wall of the items. Roughly it to the top, bottom 300 mm — 550 mm, at the height of the window sill.
G. PETROV
Recommend to read SOURCE THREE “STREAM” For connecting various electronic and household devices designed for a constant voltage of 9, 12 or 15 V, requires adapter (the adapter from the network 220V). Usually every device it... JET “ALBATROSS” Czechoslovakia justly called the center of Europe: at its plants at different times was created by the machines and equipment are well known throughout the world and is characterized by... 
 I thought: and what room, when we go home, we are often the longest? For women, in my opinion, this is the kitchen. Man, even the most caring, here only helps, plays only a minor role. But can play the main… in the landscaping and kitchen equipment, particularly small ones, where it is so easy to place a pile of various utensils. But we now require that the aesthetics were in attendance, and it was convenient to use, and the area is rationally distributed functionally, and to some meters remain free. Let’s try to count what they leave, if they, say, only about six.