When making furniture at home, the main problem always arises for the amateur craftsman: how to join the individual parts, what fastening to choose so that it is simple but reliable. Everything is used: from simple nails and screws to mortise-and-tenon and complex glued joints, bolt fastenings, metal parts, and shaped profiles — depending on what the amateur carpenter can do and what he has on hand.
At the same time, there is an extremely accessible and simple joint that is ideally suited for making homemade furniture — the so-called interlocking grooves, where the parts have identical facing cutouts into which they are mutually slid, forming a kind of lock that practically requires no other additional fastening.
A vivid confirmation of this and a clear practical illustration of the mentioned joint is the proposed design of an unusual chair.
Design features
What is remarkable about this chair is that, despite a relatively large number of parts, they are all joined without any metal fasteners, tenons, or glue. At the same time, the structure has the necessary strength and reliability. Moreover, it can be easily disassembled at any time, for example for transportation, and just as easily assembled in a new place.
Let us look in more detail at the chair’s construction. It has four main parts: two side panels made together with the legs; the backrest and the seat. They are all cut-out flat parts made from a single material: plywood or chipboard 20 mm thick.
Manufacturing
The only more or less complex parts of the chair are its shaped side panels and backrest, so their outlines are shown on a scale grid to make them easier to reproduce. Nevertheless, to cut them out (and the other parts as well) you will need nothing but a narrow (coping) hand saw.
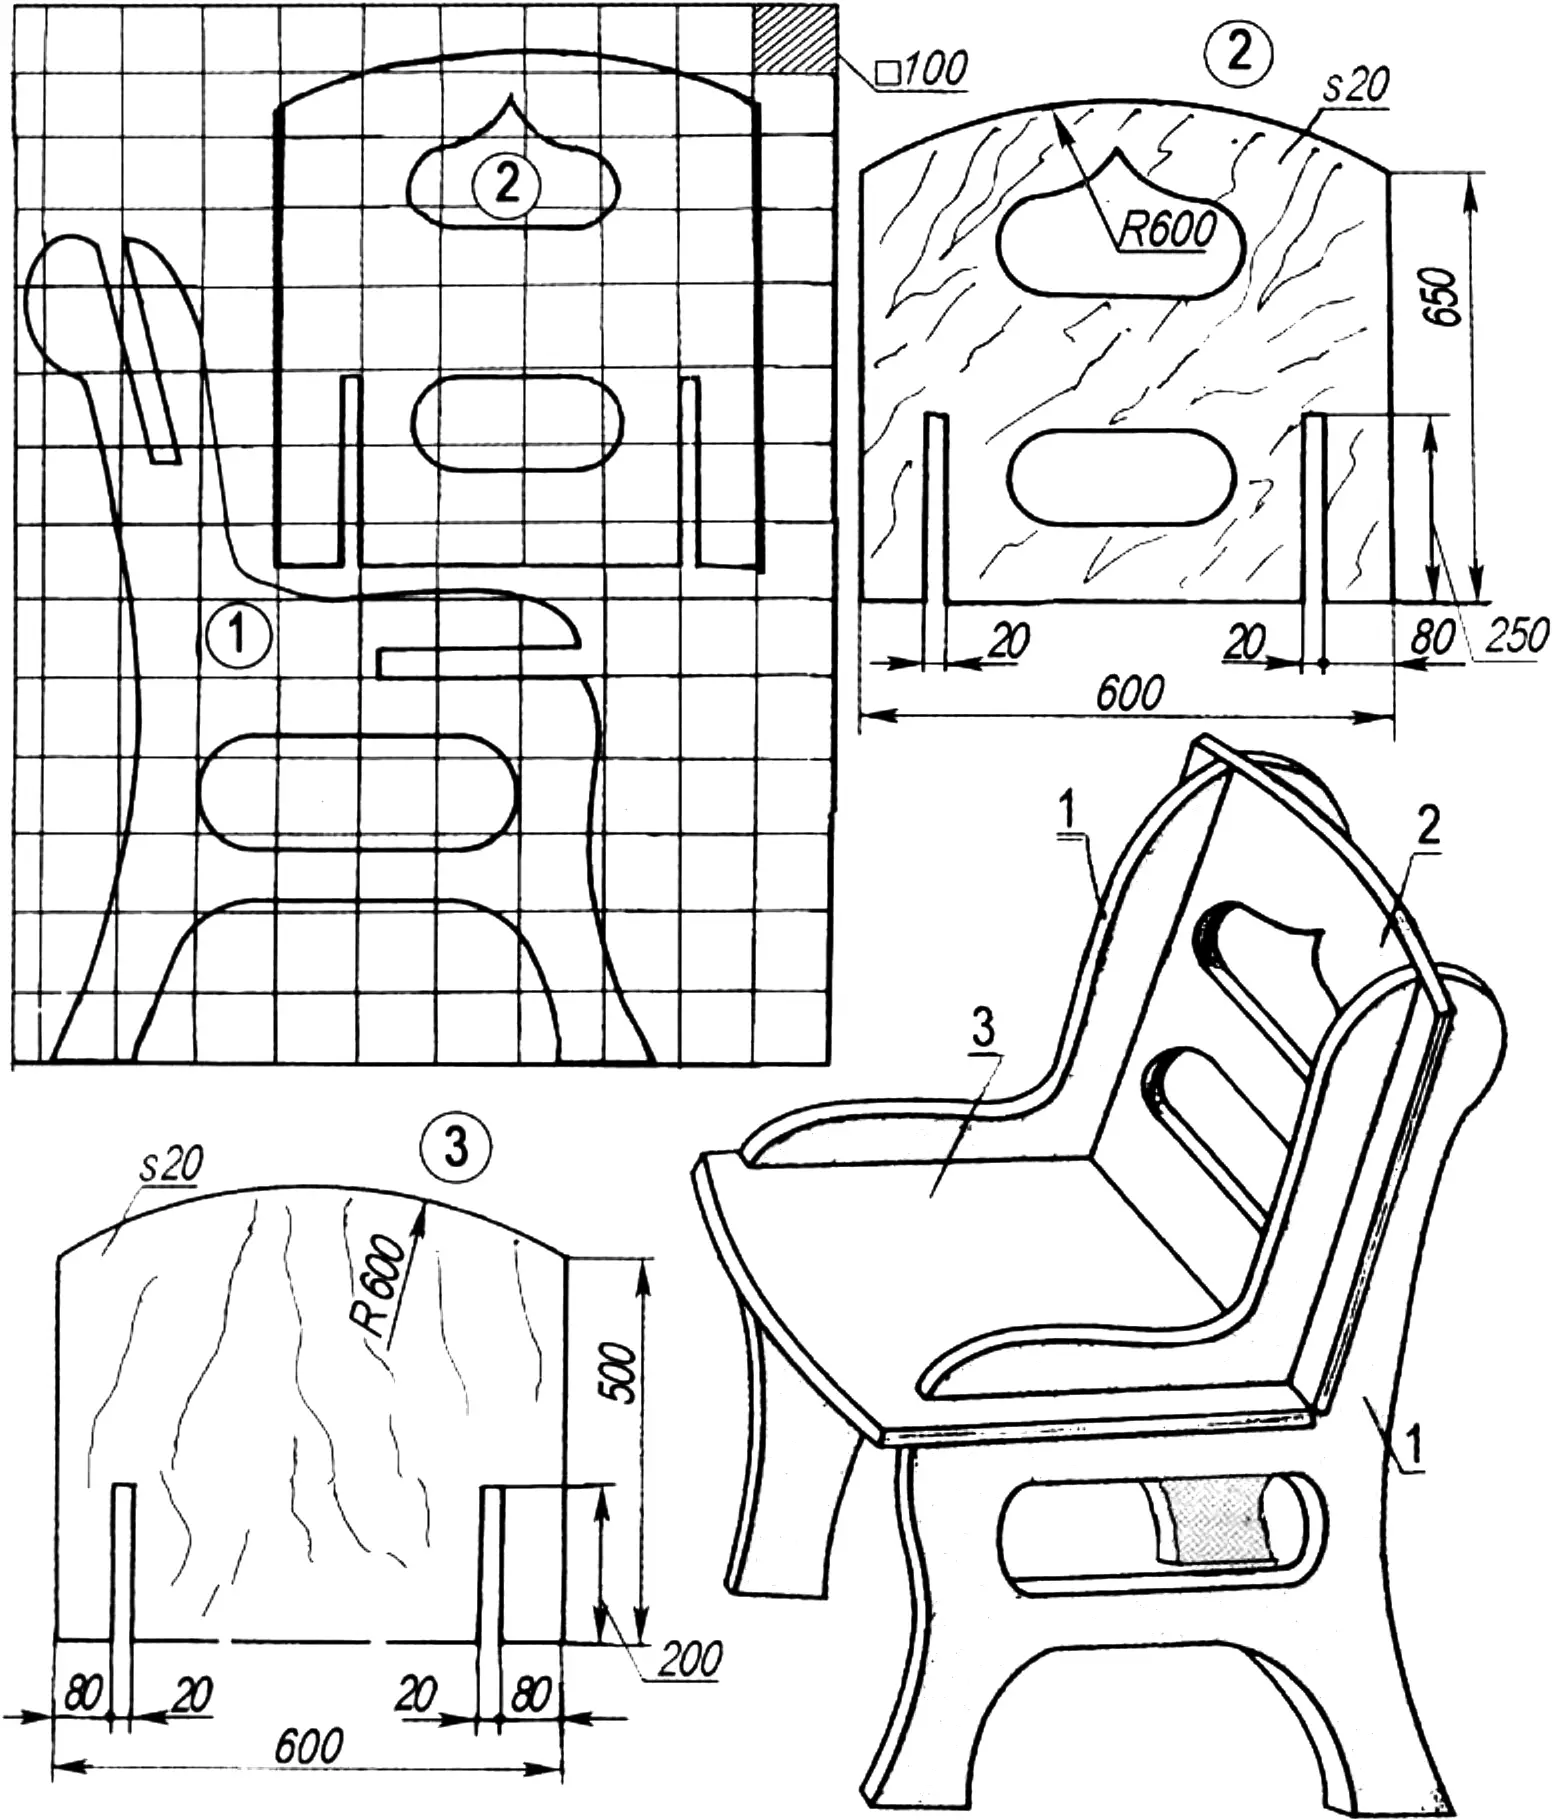
1 — chair side panels (with mating grooves); 2 — backrest (also with grooves); 3 — seat (also with interlocking mating grooves)
The drawing shows that, in addition to the lines forming the shape of the side panel together with the legs and the cut-out opening in the middle, there are also cutouts in its upper part. The first, vertical one, is intended for joining the side panel to the backrest, and the second, horizontal one, is for the seat. In both of the mentioned parts, interlocking grooves of the same size are cut out accordingly. The more carefully all the cutouts are made, the tighter, stronger, and more reliable the joint of the structure’s parts will be.
Assembly
It is extremely simple, since only the chair parts themselves are involved, without any auxiliary fasteners. For the same reason, assembly can be done in practically any sequence. For example, as follows.
First, join the side panels and the seat. To do this, the seat is first slid with its groove onto the corresponding groove of one side panel, then in the same way onto the groove of the other side panel. This can also be done at once on both side panels set with the grooves facing up. Since the fit is fairly tight, the seat can be slid into the grooves of the side panels by gently tapping it with a hammer (mallet). It is important that the interlocking grooves meet precisely all the way to the stop.
Now the resulting assembly can be set on the legs and the chair backrest can be slid from above onto the grooves of the side panels with its grooves, also all the way to the stop. That is the entire assembly — the structure is ready.
Finishing
It will depend primarily on what material was chosen for making the chair. Plywood is certainly the most advantageous in this respect: its surface often has an attractive natural grain. To preserve this pattern, each part should be carefully sanded and polished before assembly with fine-grit sandpaper.
After that, if desired, treat with wood stain to obtain darker tones, polish again, and coat with furniture varnish in several (two or three) layers with thorough intermediate drying and additional polishing.
If chipboard was used as the material, whose surface is not attractive, the parts of the chair made from it should not be varnished, but rather coated with paint in your preferred color, also in two or three layers. The first layer is best applied as thinned paint so that it soaks into the chipboard surface and serves as a primer on which the next layer will lie evenly and firmly. The chipboard surface must not be left unpainted for environmental reasons: the material is considered toxic, and paint isolates it.
«Modelist-Konstruktor» No. 4’2010, B. VLADIMIROV
Recommend to read
 RELIABLE “THE WAVE CHANNEL”
The TV antenna type "wave channel" is popular even in remote rural areas. Easy to manufacture, it does not require complex tuning and matching with precisely proportional to the sizes... ARMORED CAR IVECO UNDER THE BRAND NAME “LYNX”
Cars, army UAZ-29661-vehicle with engine ZMZ-5143 98 HP and an elongated UAZ-2966 motor 9МЗ-4219.1 84 HP, which in the early 2000s were equipped with the Russian army, created on the...
