Grinding of workpieces can be produced as grinding machines and manually. In the latter case, the abrasive paper is placed on the glass sheet and each plate is treated on both sides. At this stage it is not necessary to bring the surface of the plates to perfection, because the finished model will still have more to process. It is only necessary to level a surface, to remove the “fluff” and prepare a workpiece for bonding.
You can then proceed to constructing. To saw boards better fine teeth “obushkovo” saw. If not, you can use a hand hacksaw. Fine teeth tool allows you to get a clean cut, without torn wood fibers, requiring virtually no further processing.
Truck Gorky automobile plant (GAZ):
a) Board; b) the van
Assembly of parts used PVA glue. Some difficulty may cause the manufacture of wheels. The best material for them — well dried birch. The optimal solution in this case is to use a lathe. But in the absence of both, you can use the same packing-case boards, glued together in two or three layers to achieve required thickness. Cut round the item, for example, using a hole saw of appropriate diameter, clamped in the Chuck of a drill.
The presented model does not claim to be an exact copy of the real machines. However, have with them a certain similarity, so they will be called in the same way as the prototypes.
Start with the classic truck bonnet layout GAS. The basis of the car – frame, is made of plates of thickness 8 mm. If the width of the selected workpiece is 50 mm, then it can only be cut to the length dimension of the frame. A cargo platform of a real car mounted on two longitudinal bars lying along the frame, and four cross supports on the underside. The boards are cut from 8 mm plates. The sides and bottom of the body – plates thickness: 5 mm And for the bottom shield is used, glued two boards. The technology of manufacturing of the shield next. Side edges of two adjacent plates proshlifovyvayutsya (lapped), lubricated with glue and join. Bonding of shield is performed on a sheet of glass or smooth plywood. Glass is good so that it is easy to remove a glued item, especially if it is performed under load.
SUV Ulyanovsk automobile plant (UAZ)
Most of the elements of which are going to truck are rectangular panels. So there is no need to give here drawings of individual parts. Dimensions are “removed” from the General arrangement drawing and transferred directly to the prepared plate. Thus we need only consider that the front and rear walls of the cabin are glued between the sides, and accordingly to reduce the width of the blanks, again taking into account the thickness of the material. To simplify the side walls of the cab can be made from two separate elements (in a side view of the line connections shown in phantom).
The cab is glued together from sawn blanks 5-mm thickness. To the rear and side walls are used boards collected by the already described technology. Since the cabin has a trapezoidal shape in plan, it is easier to glue using the template. The pattern is cut out of thick cardboard in the shape of the internal space of the cab (when viewed from above). It is laid on a flat surface and around glue installed billet cabin walls. Thus, the required angles are maintained. It only remains to control the verticality of the walls. After drying, the adhesive mounted cowl panel windshield and roof of the cab. In the frontal and side panels can execute the window openings and set in the seat and steering wheel. The window openings are easier to do by drilling four holes at the corners of the opening, and then propilov bridges between them. It should be noted that the wood can easily crack. After bonding is made by grinding the finished cabin on all planes. At the final stage of sanding rounded edges, faces, and corners that give the cabin a finished look.
The wings are made of glued in the plane two or three blanks (for desired thickness). Further, from the obtained block is cut wing (side view). And then cut to the desired angle (top view) for coupling with the side wall of the cab. In the same way as with the cabin, made the sanding and rounding sharp edges. Sanding of the wings and the cockpit easier to produce to gluing them together, and gather completely ready elements. Headlamps can be done either overhead or to drill holes in the appropriate places shallow wells. After installing the cab on the frame first unit from the bottom of the footrests. On the front end of the frame is attached to the bumper.
Bus Lviv bus plant (LAZ)
For mounting the wheels to the frame in appropriate places to stick the “spring”. They can be made from plates 5 mm or 8 mm thickness. Axles – wooden sticks with a diameter of 6 – 8 mm or steel wire with a diameter of 4-6 mm. Axis are ignored in the holes pre-drilled in the “springs”, and to them with glue are mounted wheels.
To paint the car or not, is a matter of taste Modeler neatly executed model of sanded wood looks quite impressive and without coating.
Based on the described model using the cab, frame and chassis, you can create a number of special vehicles mounting various types of bodies. For example, another variant on the same truck – all terrain vehicle. It differs from the increased diameter and width wheels and the “lean-to” rear axle.
In the presence of a lathe you can make simulated axles of the vehicle. In a larger size front bumper installed “winch”. Cargo platform can be covered with cloth awning on wire arches, or making a pick-up.
The prototype of the next model of the selected well-known domestic SUV UAZ. It is somewhat more difficult to manufacture, because it is present in the interior. Some of the elements are separate drawings, in which specified basic dimensions. Transfer the drawings to wood better with the help of cardboard templates.
Diagram of grinding device:
1 – motor; 2 – sanding disc; 3 – base; 4 – stop; 5 – movable plate; 6 – workpiece; 7 – axis of rotation of the workpiece
To begin, as usual, with the frame of the car. It represents the plaque size 175×56 mm thickness 8 mm. Along the long sides of the frame are glued body side with wheel arch cut-outs. Between them are pasted tailgate and the engine hood is made of block sizes 56x55x28 mm. And the bar you can dial from several boards, glue them together to obtain the required thickness. In front of the bonnet grille is installed. As such, the body should be treated with sandpaper, to round the upper edges of the sides. Separately cut and processed side-lining the sides of the body. And then pasted on the appropriate places, otherwise it will be difficult to handle the newly installed parts without damaging the finished surface. A difficulty could cause panel installation windshield. It should be cut from plates 5 mm thick and with a file and sandpaper to fit to the hood and side of the body. Bottom frame glued “spring” and installed the wheels on the axles.
You can Park your car in open version or install on top of the awning. In any case be viewed the internal space of the body. Therefore, it is desirable to mount in the cab seat and steering wheel. And two cubes behind the rear seat close the the wheel arches inside the body. The tent is made of planks with a thickness of 5 mm. Between two side glue top two panels and one back. The width of the awning should fit the body without side plates (72 mm). To make the awning is detachable, it is necessary to drive in the lower end of the panels of the tent two or three clove without the cap, and rear and side body panels to the corresponding vertical drill holes. Finishing touch car manufacturer is to install a front bumper and spare wheel.
Bus is found in our lives almost every day. This regular urban and small suburban, intercity and handsome. For all its positive qualities, modern buses lose of his predecessors in elegance of external forms. If you try to make a modern bus from elementary plates, it will be a box, delivered to the wheels. Therefore, as a prototype for bus model selected recently running on our roads LAZ, characterized by streamlined body shape. To make it from flat plates is not as difficult as it might seem at first glance.
Unlike previous models, the work begins immediately with the case. Initially, it should be a rectangular box without a bottom with external dimensions of 100 mm X100 х365 (including allowances for processing). The walls of the box to be glued together from prepared plates. To diversify the monotony of large areas of the sides of the body, can be applied to the upper and lower parts of the tree structure or different colors such as beech and aspen. Because the front, near the windshield, the body has a tapered surface, the thickness of the front panel needs to be increased to 16-20 mm, gluing from the inside of the box with additional plates. Now we need to fill four internal triangular corner boxes with wooden blocks. For the two rear corners of the cubes with an edge of 30 mm, for the front is 15 mm. the Remaining eight internal dihedral angles are filled with rods of rectangular or triangle (with right angle) cross-section (in the drawing shown by the dotted line). All this is necessary to ensure that after rounding the outside corners of the box body had no cracks, and is simply not fell apart into separate elements. You should definitely note that glue joints after sanding will be on the outside. And, not to spoil the appearance of a model, all mating surfaces should be carefully adjusted to each other, achieving minimum thickness of the seams. At this stage it is advisable to lay out and cut the wheel arches and drill the through holes in the front panel to install the headlights. Possible chipped and torn edges of the holes will be removed during subsequent grinding.
Now the box housing can be roughly treated with a handsaw and planed and sanded with sandpaper. It should be noted that the layer of cut material is relatively large, besides to manually correct radius 135 mm and 165 mm hard enough. This can be done with simple homemade devices.
Some operations of the manufacturing process model:
a) grinding of the workpiece; b) bonding parts in a design; in) finished model
First you need to make a simple grinder (it’ll be useful in the future) is the motor capacity of 80 – 150 watts mounted on a shaft-disc diameter 120 – 180 mm plywood 8-12 mm thick, covered with cloth. On the shaft it is fixed with a flange to the face of the disc with glued sandpaper had no protruding elements. The drive can be applied to the drill. The drive must be mounted on any base. For this it is convenient to use a trimming of laminated chipboards. On the basis of two fixed stops, which should be removable, so you can adjust their position relative to the grinding disc. As the stops you can apply a small clamp. The spacers limit movement of the plate on which the workpiece is tightened the housing. The plate is free to slide on the base, so it is better to use laminated particle Board. The movement of plates is limited only to established stops. The bus body is fixed to the plate by a screw which is the axis of rotation and provides the desired radius of processing. For this purpose inside the housing temporarily pasted block.
In a rotating grinding disc plate together with the body gradually moves to a circle, the housing should be rotated around the axis of the screw, gradually removing the excess material. When the plate reaches the stops – the treatment is finished. This automatically maintained the required radius of curvature. Similarly, the processing the back of the case. For processing an inclined surface of the windshield plate installed under the wedge-shaped lining. The small radius of the angles you can run without installing the case screws. After this treatment is almost finished the body of the bus, requiring only minimal modifications sandpaper by hand.
Frames are suitable, select an appropriate plate thickness of 8 mm. Frame is glued somewhat recessed relative to the lower edge of the housing. For this purpose the inner side of the front and rear walls of the housing in the appropriate places stick stops made from scraps of rails so that the frame after installing fell on them. It now remains to fix the vents on the roof, lights, axles with wheels. Bridges are made of round or rectangular cross-section bars, with longitudinal holes for the axles glued to the frame. The front bumper and the air intake on the rear slope of the body can be bend from steamed thin plates or jigsaw to cut along the contour of the workpiece is the desired thickness and glued onto the appropriate places.
Dmitry KALYUZHNY, Izhevsk
Recommend to read START IN FLIGHT Offer paired schematic model made in model aircraft laboratories of the station of young technicians in the city of Nikopol. Structurally, it is a "aviamarch", consisting of... AND A JIGSAW AND A DRILL All the details of this wooden truck, so the tools for the job need simple: kicks jigsaw, drill, sandpaper, files. The frame consists of two strips of a cross section of 25X36 mm and a... 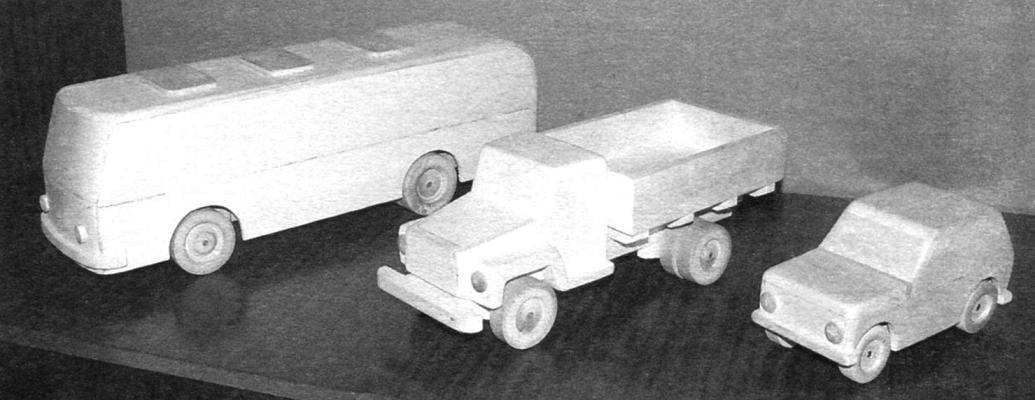
 Wooden boxes for transportation of fruits or vegetables are mostly one-time use and then are disposed of. Boards, of which they are made, can be a good building material for the manufacture of a “fleet” is simple but, most importantly, strong models. Of course, they lose the purchase of multi-colored plastic toys in bright colors. Although this disadvantage can be eliminated by applying their artistic abilities in the final stage of manufacture.