FLOPPY DISKS — “SKYSCRAPER”

DISKETTES —

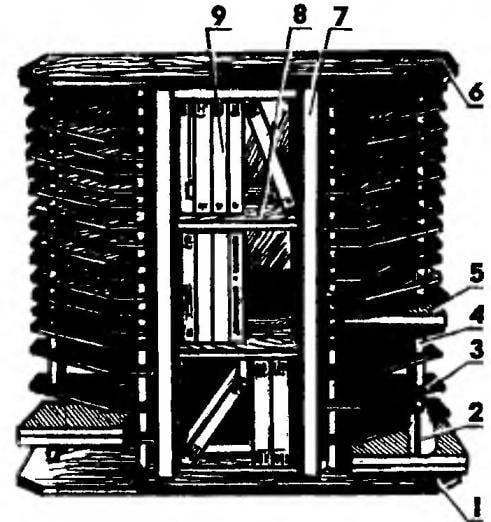
Many things quietly accumulate, and modern video cassettes, diskettes and CD-ROMs is not an exception. Gradually they grow mountain which would need to somehow arrange to not collapse and take up less space. One of the options of rational storage and offers the Hungarian magazine”, Earmaster-hobby”. This kind of “skyscraper”, each floor is a separate “apartment” for floppy disks or CDs, and the Central “tower” — a video cassette.

Structurally, the vault consists of three separate blocks on a common “Foundation”-the bottom under a single roof. Two blocks intended for floppy disks, the same, only the mirror is made; and the middle part — the tower — self-insert, are designed for videos. She’s going of the plank blanks 10 mm thick and has the appearance of a mini-shelves: two racks with shelves between them.Side blocks — the basis of design. They consist of metal rods (threaded studs) connecting the bottom and the roof of boards thickness 10 mm; for threaded rods, plywood or plastic plate with dividing spacers. The whole package is pulled together by nuts screwed onto the shanks of the studs embedded in the floor and the roof.
 

Disco table


Fig.1. Table disco:
 
1 — bottom; 2 — threaded rod; 3 — a lateral shelf; 4 — spacer; 5 — CD with case; 6 — roof; 7 — side panel mini-stack; 8 — shelf mini-shelves; 9 — cassette in box
 
Marking a plywood strip under races Pelevine
Fig.2. Marking plywood strip under races Pelevine
 

Layout blocks disco


Fig.6. Layout of blocks discos:
 
1 — bottom; 2 — threaded rod; 3 — a lateral shelf; 4 — spacer; 5 — side panel mini-shelves; 6 wall shelves; 7 — shelf


Figures 2 and 3 of this tips about convenient technology of the same billet side shelves — sawing on the proposed scheme package plywood strips (the size — indicative, as in Fig.6). Pre-prepared for sawing and marked the package Assembly drilled the holes for the studs (Fig.4).

 
Block sawing plywood strips for shelves on the sides
Fig.Z. Block sawing plywood strips for shelves on the sides
 
Drilling holes in the block plywood strips under studs
Fig.4. Drilling holes in a block of plywood strips under studs
 
Spacers cut from plastic tubing of suitable diameter. However, they can be produced from a wooden rod with a diameter of 30 mm, sawn it on penechki height slightly greater than the thickness of the hard case the CD-ROM drive and drilled the Central hole for the pin (Fig.5).
 
Drilling the center hole in the spacer from the wooden rod
Fig.5. Drilling the center hole in the spacer of a wooden rod
 
Mounting blocks under the CDs
Fig.7. The mounting blocks under CDs
 

Installation of mini-shelves
Fig.8. Installation of mini-shelves
 
Finishno build: embedding mini-staerke between the side blocks
Fig.9. Finishno build: embedding mini-staerke between the side blocks
 
Before assembling all the wooden parts are painted with enamel or nitropaints bright colors. You can also render them stain and cover it furniture varnish.
 
The Assembly of the side blocks (Fig.7) and mini-stacks (Fig.8) presents no special difficulties. The final operation — insert miniaturki in the basic design of Assembly (Fig.9).

Recommend to read

  • ON THE SCHOOL – “CRAYON”ON THE SCHOOL – “CRAYON”
    With a minimum of welding operations, avoiding difficulties of manufacturing in more modest circumstances than the school shops complex assemblies and precision parts to make your...
  • BARREL-FACTORYBARREL-FACTORY
    Read No. 5 of 1883 article "do Concrete yourself" with the drawings mixers and remembered how himself had to be built. We used a more simple device, which is produced in one day. Took...