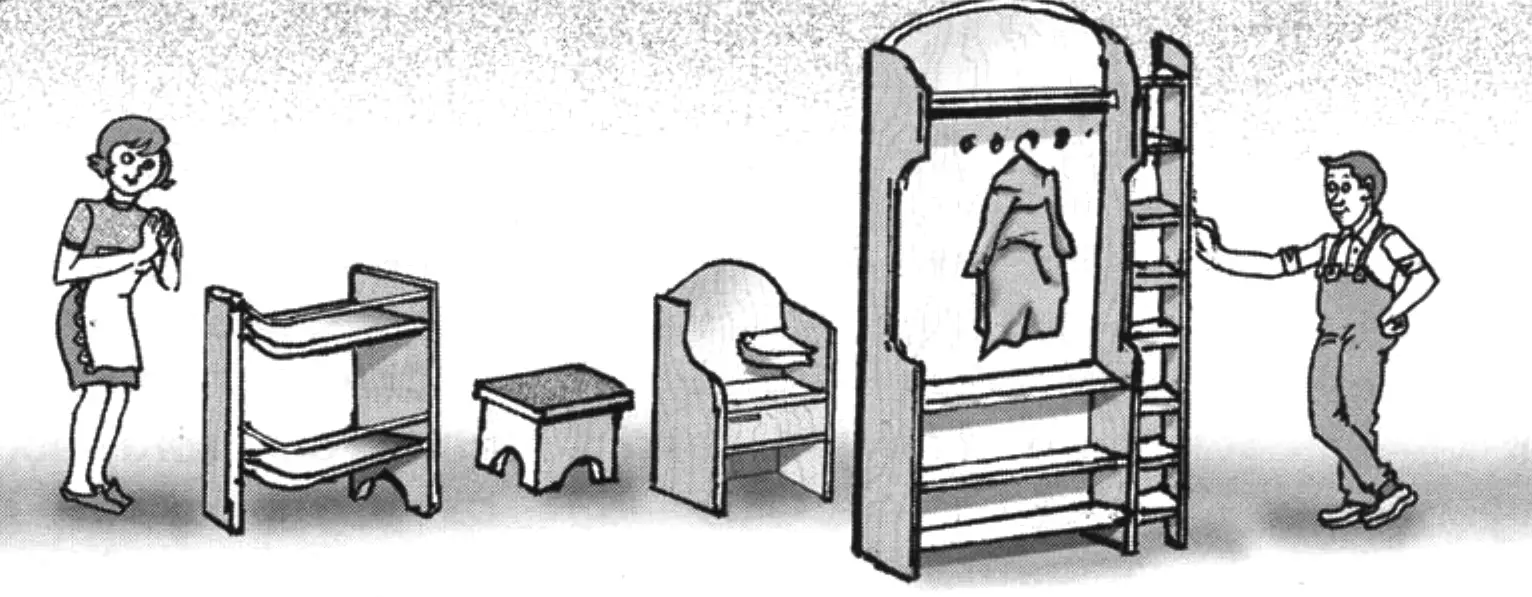
After a long DIY construction project of my own — or rather a major renovation of a purchased country house — it turned out that we would have to move in not only to “bare walls,” but also practically with empty pockets.
I think some readers of this magazine I respect so much may find themselves in the same situation, so I want to share my experience with them. (From my own life practice I know: in Russia you won’t earn as much as you can save.) So I had to switch immediately to making furniture. And I started with a hallway set — or rather with separate pieces that later made up a complete suite.
First I made a wardrobe for clothes, which can also be called a hanger, since it is open, without doors. I’ll begin the story of the suite with it.
The wardrobe’s design, overall dimensions and shapes were dictated by its predetermined location — not far from the front door. However, the hallway width there was only a little greater than the door itself.
The overall dimensions and shape of the wardrobe, as well as of all its elements and parts, are quite clear from the assembly drawing provided; as for the construction — which mainly concerns joining methods, materials used, and the specifics of manufacturing and assembly technology — I will try to explain in words.
For making the wardrobe I mainly used “laminated” (film-faced) particleboard (chipboard). The edges (ends) of the parts cut with a jigsaw were edged with special “button” (iron-on) edge banding matched to the laminate texture. On the reverse side the tape already had a layer of dried polyvinyl acetate glue (PVA). All that remained was to place the tape on the edge and press it with a hot iron. The tape turned out slightly wider than the edge, so I aligned them on one side and carefully trimmed the other with a finely sharpened knife. The arrises were lightly dulled with fine-grit sandpaper.
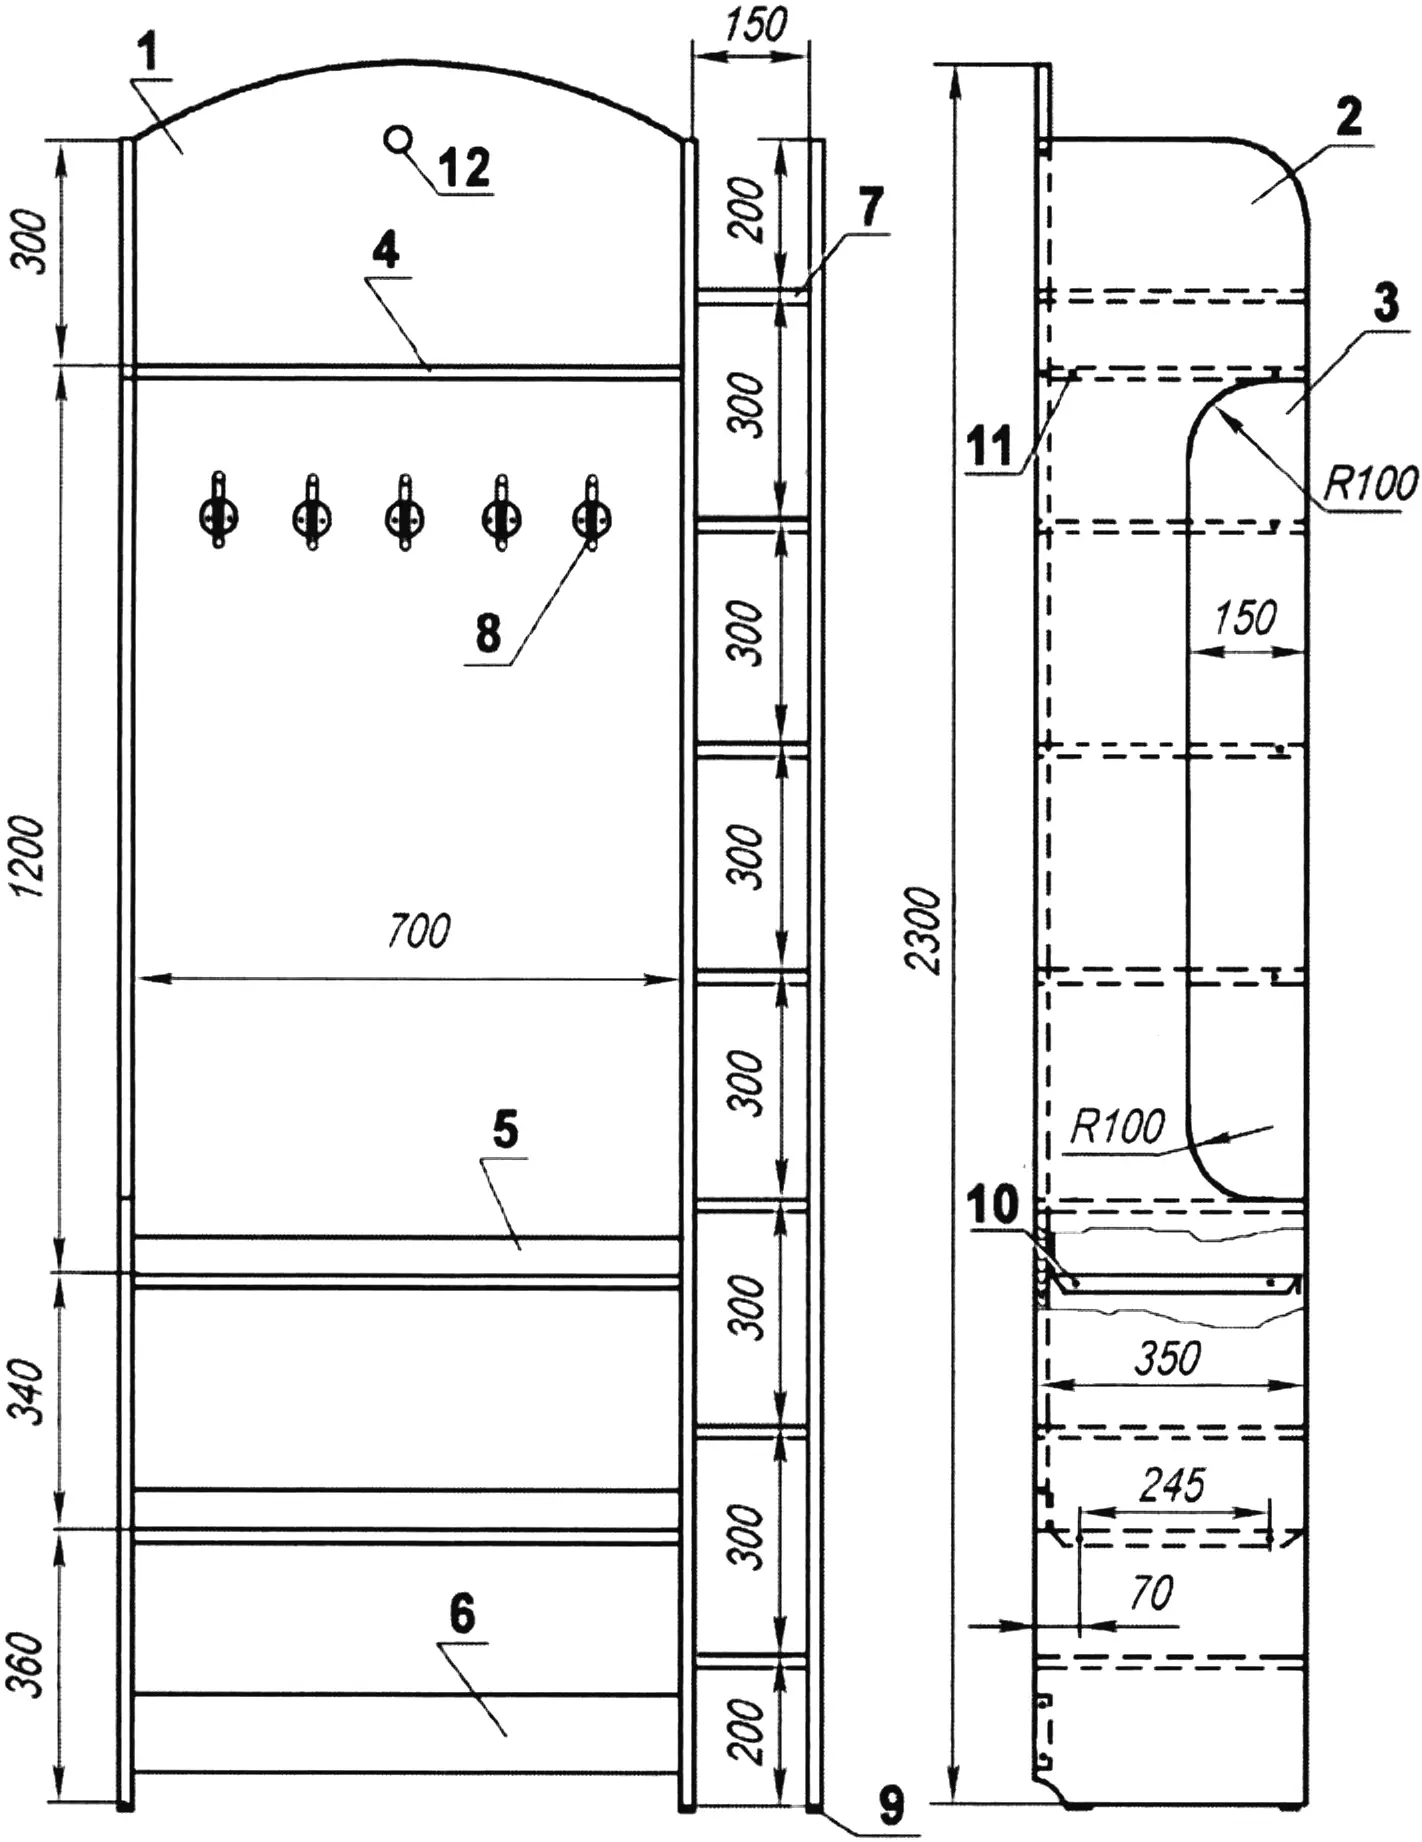
1 — back panel; 2 — side panel with cutout; 3 — regular side panel (2 pcs.); 4 — shelf for headwear; 5 — shoe shelf (steel sheet s1.5, 2 pcs.); 6 — lower crosspiece; 7 — shelf of the “honeycomb” section (7 pcs.); 8 — hanger hook (5 pcs.); 9 — foot pad (6 pcs.); 10 — M5 bolt (8 pcs.); 11 — furniture screw (as needed)
I should note that cutting blanks to size with a circular saw (either stationary or handheld) gives higher edge quality (fewer chips and no tool “wander”). But at that time, unfortunately, my circular saw was out of order.
The shape of the parts is mostly simple. All shelves and small shelves are rectangular. The carcass parts, although they have rounded corners (and one side panel also has a cutout), use fairly large radii. When making them, the advantages of a jigsaw over circular (and other) saws become apparent. If you don’t have a jigsaw, you can saw the rounds and the cutout without going past the layout lines on the curves, and finish the radii with a rasp — a round one will be needed for the inner curves.
The cutout in one of the side panels was made for convenient entry into a narrow hallway by a broad-shouldered or stout person. In addition, the cutout lightens the structure. The lower cutout for the skirting board can also be made rectangular — it won’t be visible anyway.
The wardrobe was assembled with 50 mm furniture screw connectors of two types: with heads for a Phillips screwdriver and for a 4 mm hex key. I had both on hand — I simply didn’t have enough of the same kind. On each face of the side panels I used only one type, so the mix wouldn’t catch the eye.
I drilled the holes for the connectors in the parts with an assistant — my son. After butting the shelf at 90° to the panel in the required place, I first drilled a through hole in both parts with a bit slightly larger (by 0.1–0.2 mm) than the internal diameter of the connector’s thread (5 mm). The hole depth in the shelf must exceed the connector length by 10–15 mm. Then I enlarged the hole in the panel to the diameter of the connector shank (7.5 mm). Countersinking for the connector head is not necessary — it will sink in as you tighten it.
In my case, installing the wardrobe also solved another problem — it covered a heating radiator. In turn, the radiator itself heated a couple of the lower shelves in the wardrobe and the space between them. So I made those shelves from 1.5 mm steel sheet, bending flanges around the perimeter for stiffness (making the rear one tall and bending it upward), and painted them to match the particleboard texture (we dry shoes on them when needed). I fastened the metal shelves to the side panels with M5 bolts, choosing ones with similar heads. The slots in the panels for the heating pipes were cut on site (they are not shown on the drawing).
To the lower edges of the side panels I screwed a pair of polyethylene foot pads on each. To the back panel, at a suitable height, I attached five hanger hooks.
Because the wardrobe is rather narrow and not very stable, I drilled a hole at the top of the back panel and fastened the wardrobe to the hallway wall with a wall plug (dowel).
Furniture for the telephone
An empty corner in the hallway with a telephone on a stool reminded me for several months that for a complete set in this front room we still lacked a secretary-style cabinet. I had to design and build that as well, fitting it into the style of the previously made wardrobe-hanger. But that was not difficult, since the material for the cabinet was the same 16 mm particleboard with laminate of the same texture.
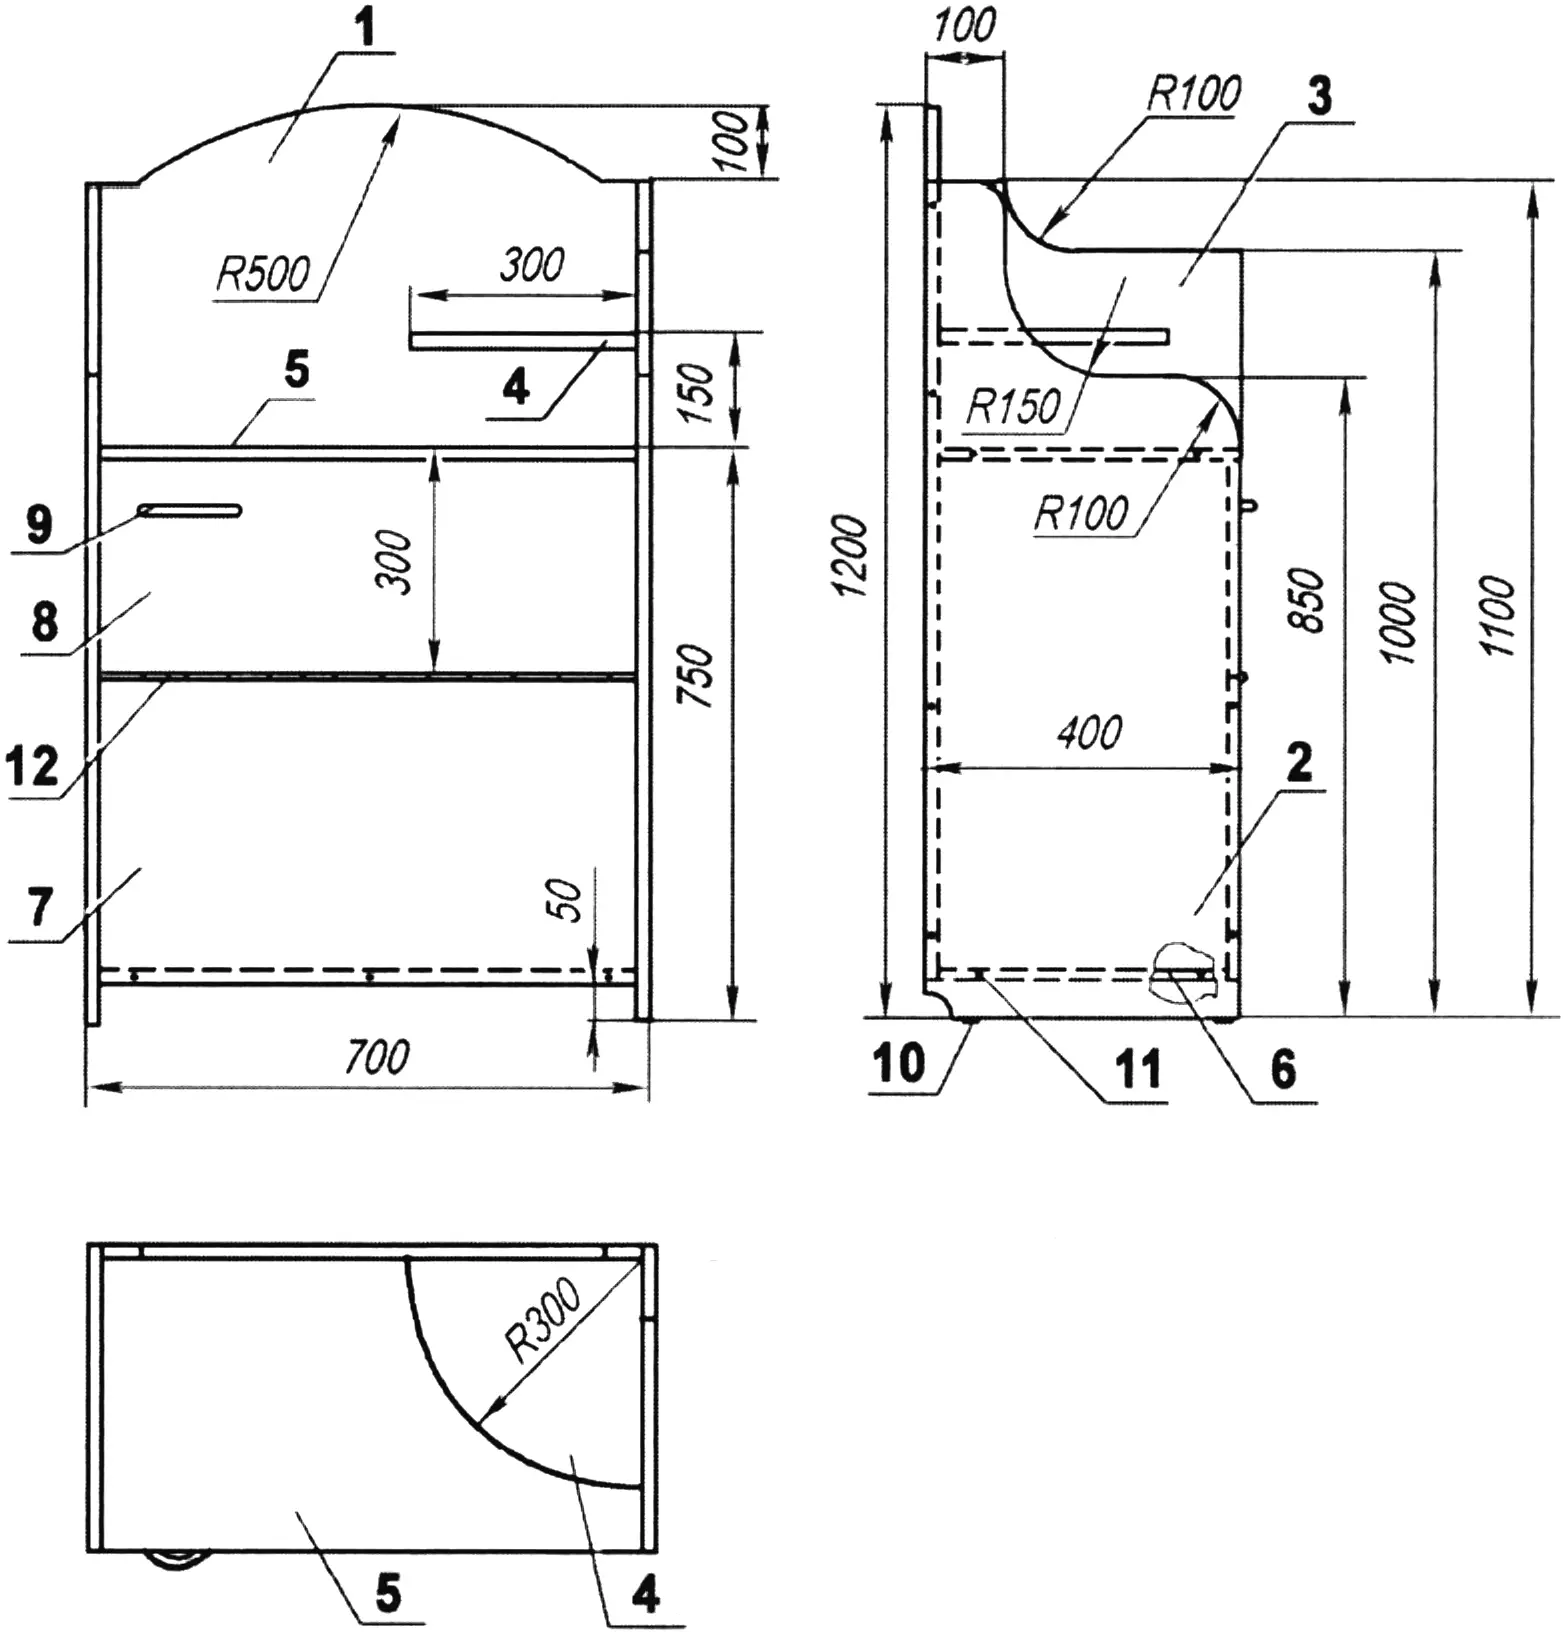
1 — back panel; 2 — low side panel; 3 — tall side panel; 4 — sector shelf; 5 — top; 6 — bottom; 7 — front panel; 8 — drop-down door; 9 — handle; 10 — foot pad (nylon, 4 pcs.); 11 — screw connector (as needed); 12 — hinge (piano hinge)
The cabinet width remained almost the same as that of the wardrobe, but I increased its depth a little, since the hallway was wider where the cabinet was to be placed. Unlike the wardrobe, I made the cabinet closed — giving it a front panel and a door. The door is joined to the front panel with a piano-hinge pivot, and the front panel itself is fastened with furniture connectors to the side panels and the bottom. The bottom itself, like the top, is joined to the side panels (and the latter to the back panel) also with furniture screw connectors. There are no shelves inside the cabinet, since it was intended for storing bulky items or footwear (tall boots, felt boots).
Above the top, in the corner, a small sector-shaped shelf is arranged — a telephone set fits on it quite well, and even a thick directory fits under it.
The manufacturing technology for the cabinet is exactly the same as for the wardrobe, and there is no point in repeating it. The cabinet’s construction, as well as the configuration and dimensions of all its parts, are clear even from the assembly drawing.
Stool-ottoman
Another piece of hallway furniture is a small, low stool-ottoman. It is needed not so much for children as for elderly people when putting on shoes.
The stool’s construction and the dimensions of its parts are clear from the assembly drawing. Of course, it can also be made from the same particleboard as the wardrobe and cabinet, but it is better (and stronger) to make it from plywood or boards, painted to match the laminate color. A shaped crosspiece will give the stool even greater rigidity. The wooden parts are fastened with ordinary long wood screws.
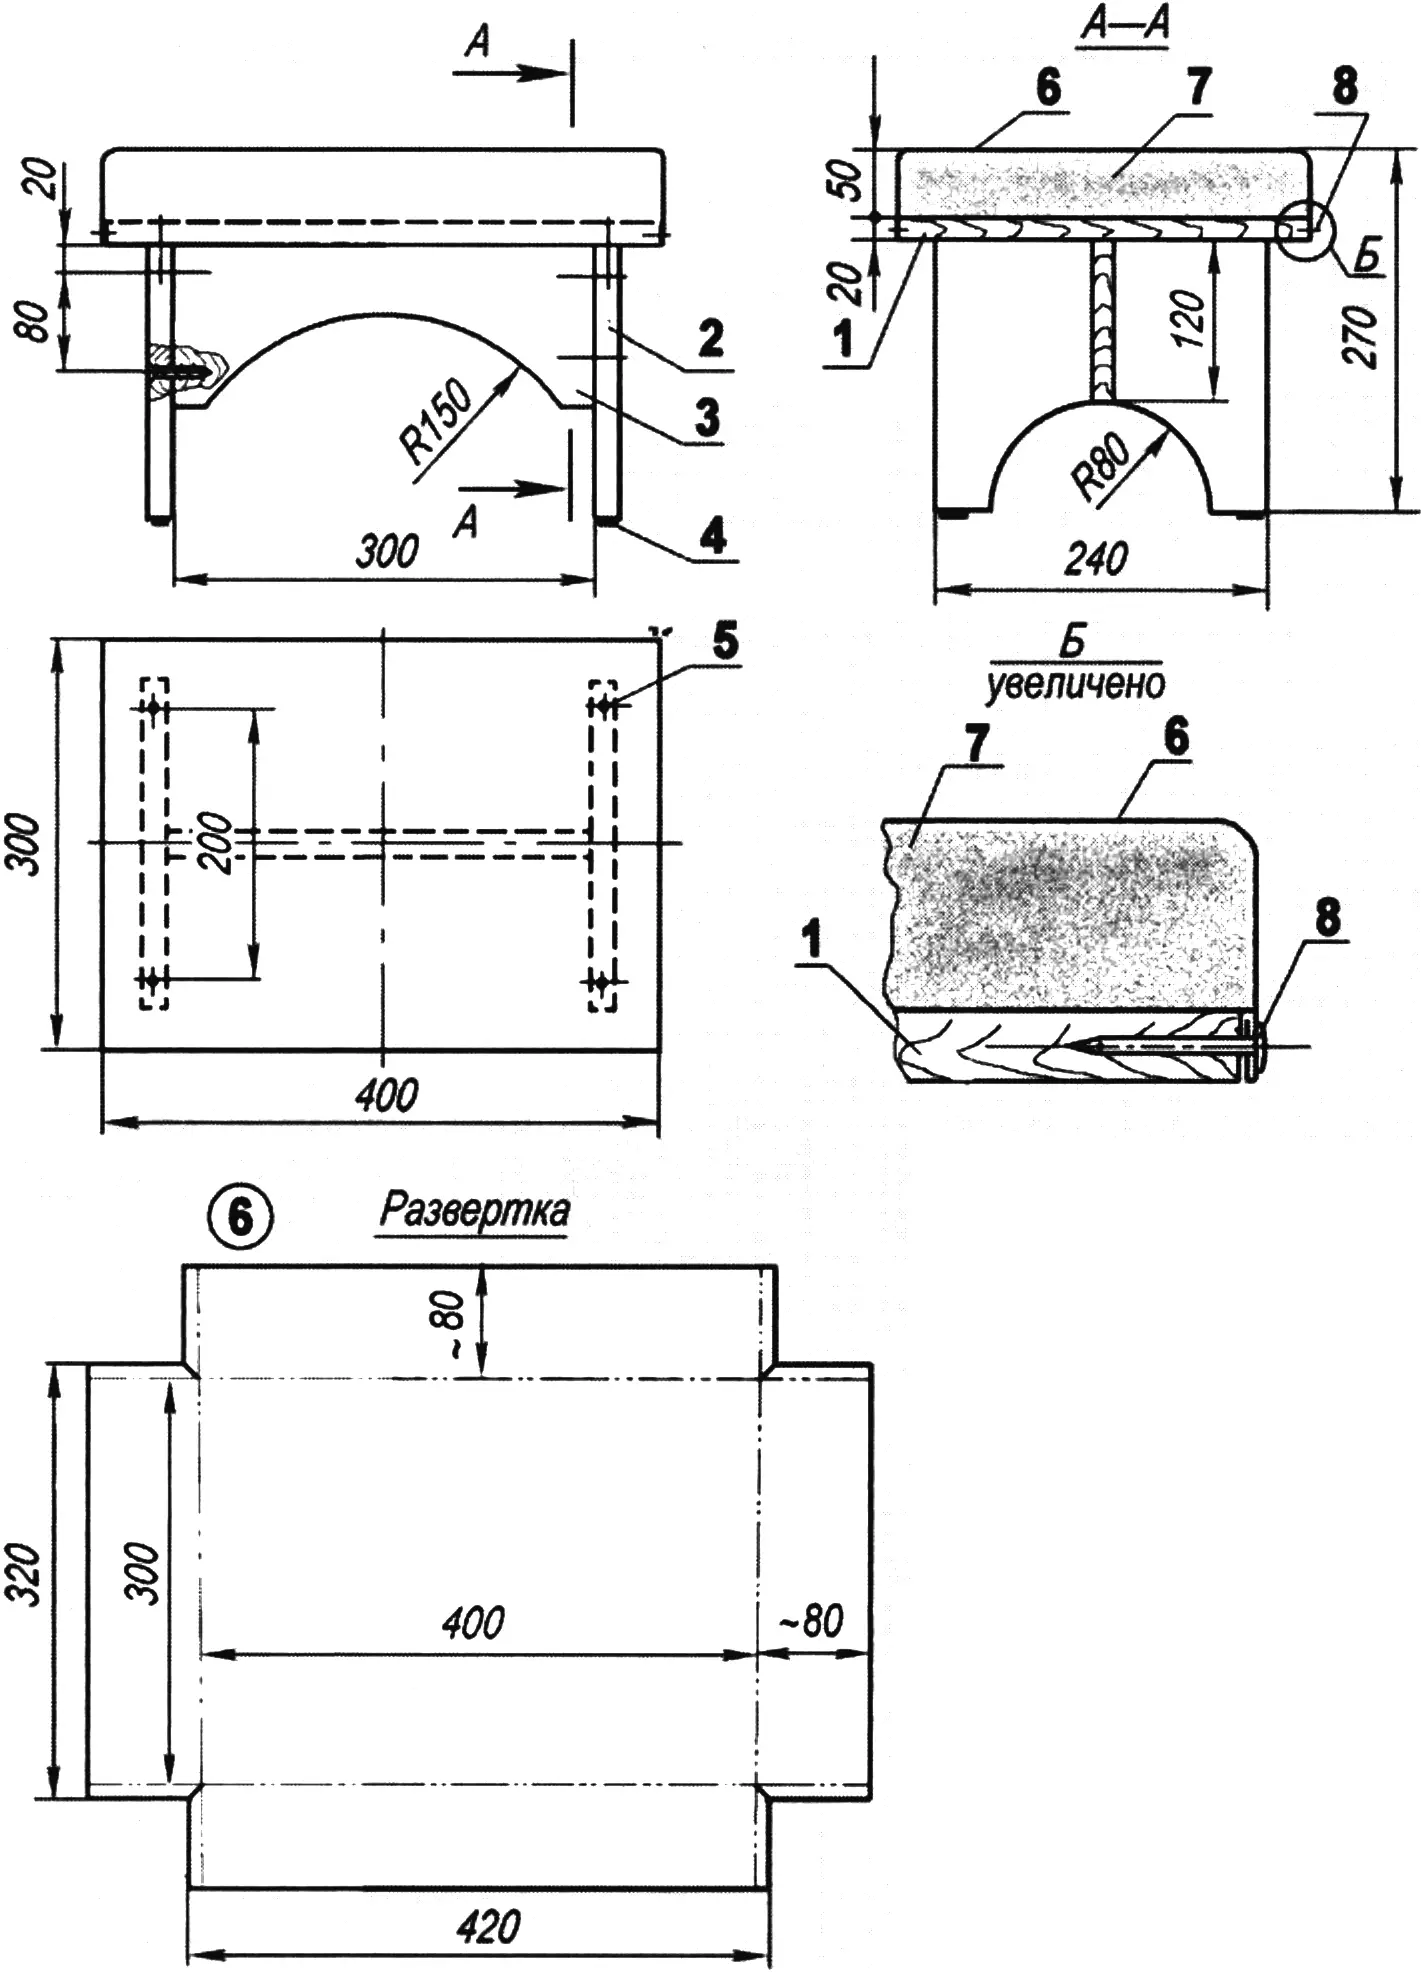
1 — seat; 2 — leg (2 pcs.); 3 — crosspiece; 4 — foot pad (nylon, 4 pcs.); 5 — wood screw (as needed); 6 — covering (fabric); 7 — padding (foam rubber s50); 8 — nail with decorative head (as needed)
You could stop there and finish making a bench-type stool. However, it will be much more comfortable if the seat is made soft by laying a thick layer of foam rubber on it and covering it with soft upholstery fabric. The upholstery is fastened under the seat with staples. But you can also nail it to the side edges of the seat with nails that have decorative heads.
Étagère
As it later turned out, the same hallway needed yet another piece of furniture — a small floor-standing shelf-étagère for various items, as well as for newspapers and magazines. Its dimensions were determined by the free space remaining in the hallway between the telephone cabinet and the wardrobe-hanger.
The material for the étagère was pine board 25 mm thick. Here’s one tip right away: don’t throw away the offcuts immediately — keep at least a few of the larger ones; they will still come in handy.
Of course, making furniture from solid wood is much more labor-intensive and requires sufficient experience in the finishing of parts. However, wooden furniture also has qualities that particleboard products cannot match: it is not only environmentally safer, but also gives off beneficial scents itself.
For beginning home craftspeople, making such furniture will serve as a good lesson on the way toward the heights of cabinetmaking skill.
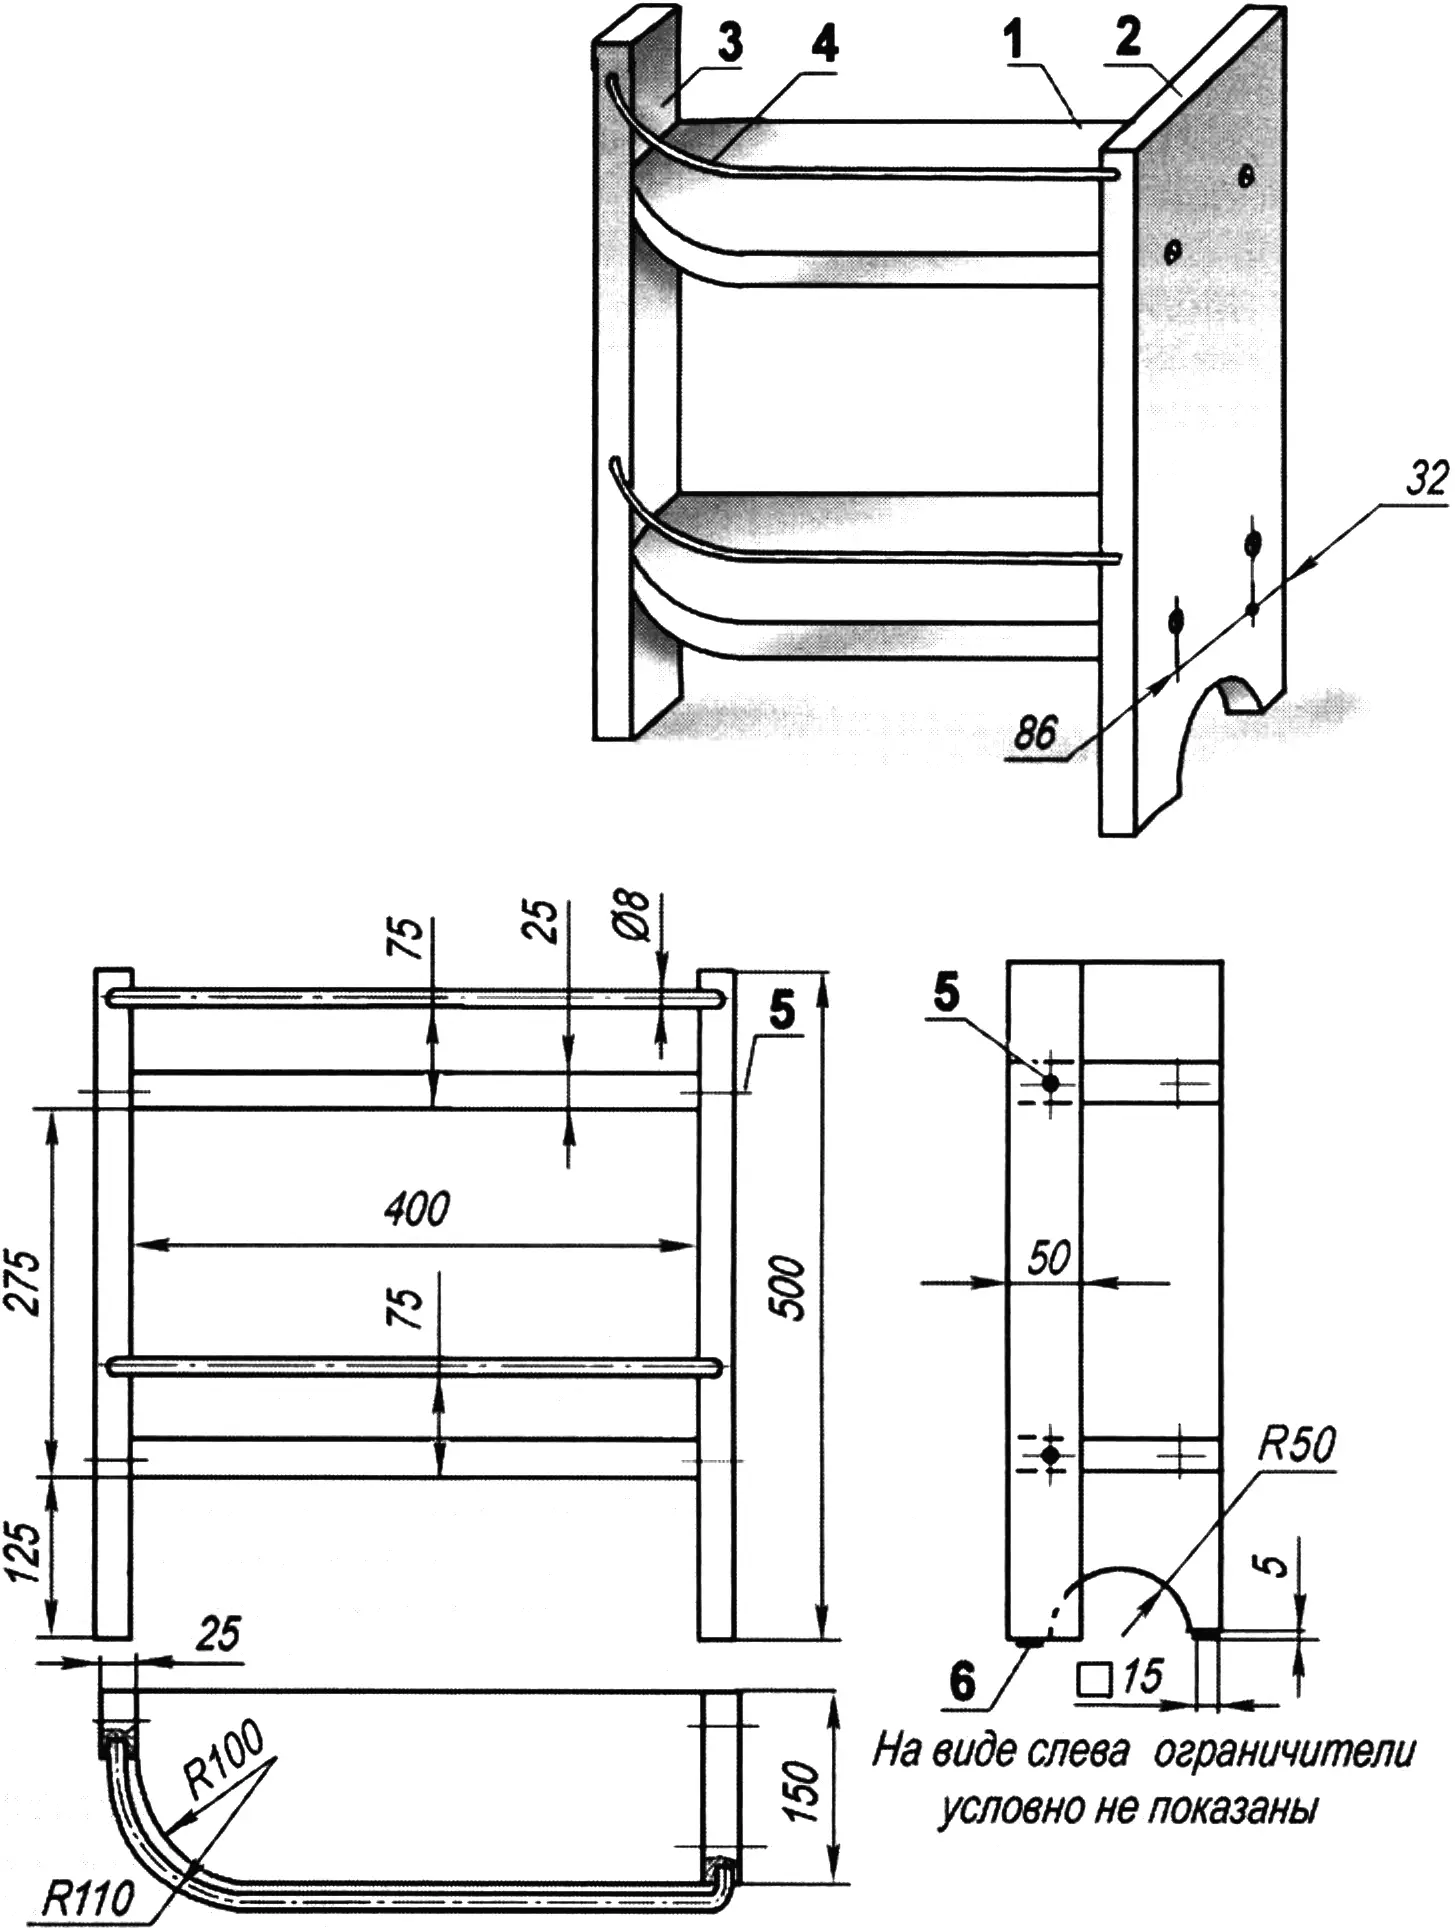
1 — shelf (2 pcs.); 2 — wide upright; 3 — narrow upright; 4 — stop (PVC-coated wire Ø8, 2 pcs.); 5 — screw connector (6 pcs.); 6 — foot pad (nylon, 3 pcs.)
The technology of working wooden parts is described in sufficient detail in various publications, including the pages of the magazine “Modelist-Konstruktor.” There is no point in dwelling on it again.
But the specifics of assembling a product from wooden parts using screw connectors, I think, are worth covering in more detail.
There are only a few such features. First, the hole in the shelf can (and should) be drilled to the internal diameter of the thread on the connector shank. Second, since the screw is fixed in the body of a board part along the grain (the direction of wood’s least strength), it is a good idea to coat the hole with glue before assembly. It is helpful to use almost obsolete hot hide (bone) glue. It penetrates into the wood better, and it sets immediately as it cools to room temperature.
The third feature (one might say difficulty) is matching the product’s finish color so that it suits the surrounding décor.
A wide choice of toners and paints and varnishes on building markets makes it fairly easy to solve this problem as well. You can make sure you have the right color by trying several of them, applying finishes to the leftover board offcuts.
“Modelist-Konstruktor” No. 5’2008, A. MATVEYCHUK
Recommend to read
 OUR ANSWER “STRATOJET”
Long-range bomber Tu-16. Large-scale development of high-speed jet bombers, long-range flight, which began in the USA after the Second world war, could not remain unnoticed in the Soviet... SYMMETRIC FENCE
The DPJ picket fence infield or garden often make a pointed — with symmetrical bevels right and left. To make such bevels is most convenient in solehah wooden box, the walls of which are...
