Folk wisdom insistently advises counting chickens in the autumn. Without hesitation, however, let us note: in a period of total shortage that has swept the country, one cannot fail to take care of the timely acquisition of the “source material” — those same live fluffy little balls that are supposed to turn into future broody hens. In spring they are, as the saying goes, worth their weight in gold. At night people stand by the walls of the hatchery station in a queue, wondering whether they will be lucky with chicks — or not.
An interesting solution to this pressing problem is offered by a long-time subscriber of our magazine, A. Tymoshenko. He advises “hatching” chicks in a homemade incubator that almost anyone can easily make at home. The only thing required is to find an old, unusable refrigerator. After a minor conversion, it can, it turns out, successfully replace a broody hen. And not just one.
A homemade “factory for producing live chicks” is not some elaborate structure. The temperature regime needed for hatching can be provided by ordinary electric bulbs. The required humidity will be created by a tray of water, supplemented with a pre-wetted cloth (to increase the evaporation surface). Forced ventilation? But a live broody hen does not have it either.
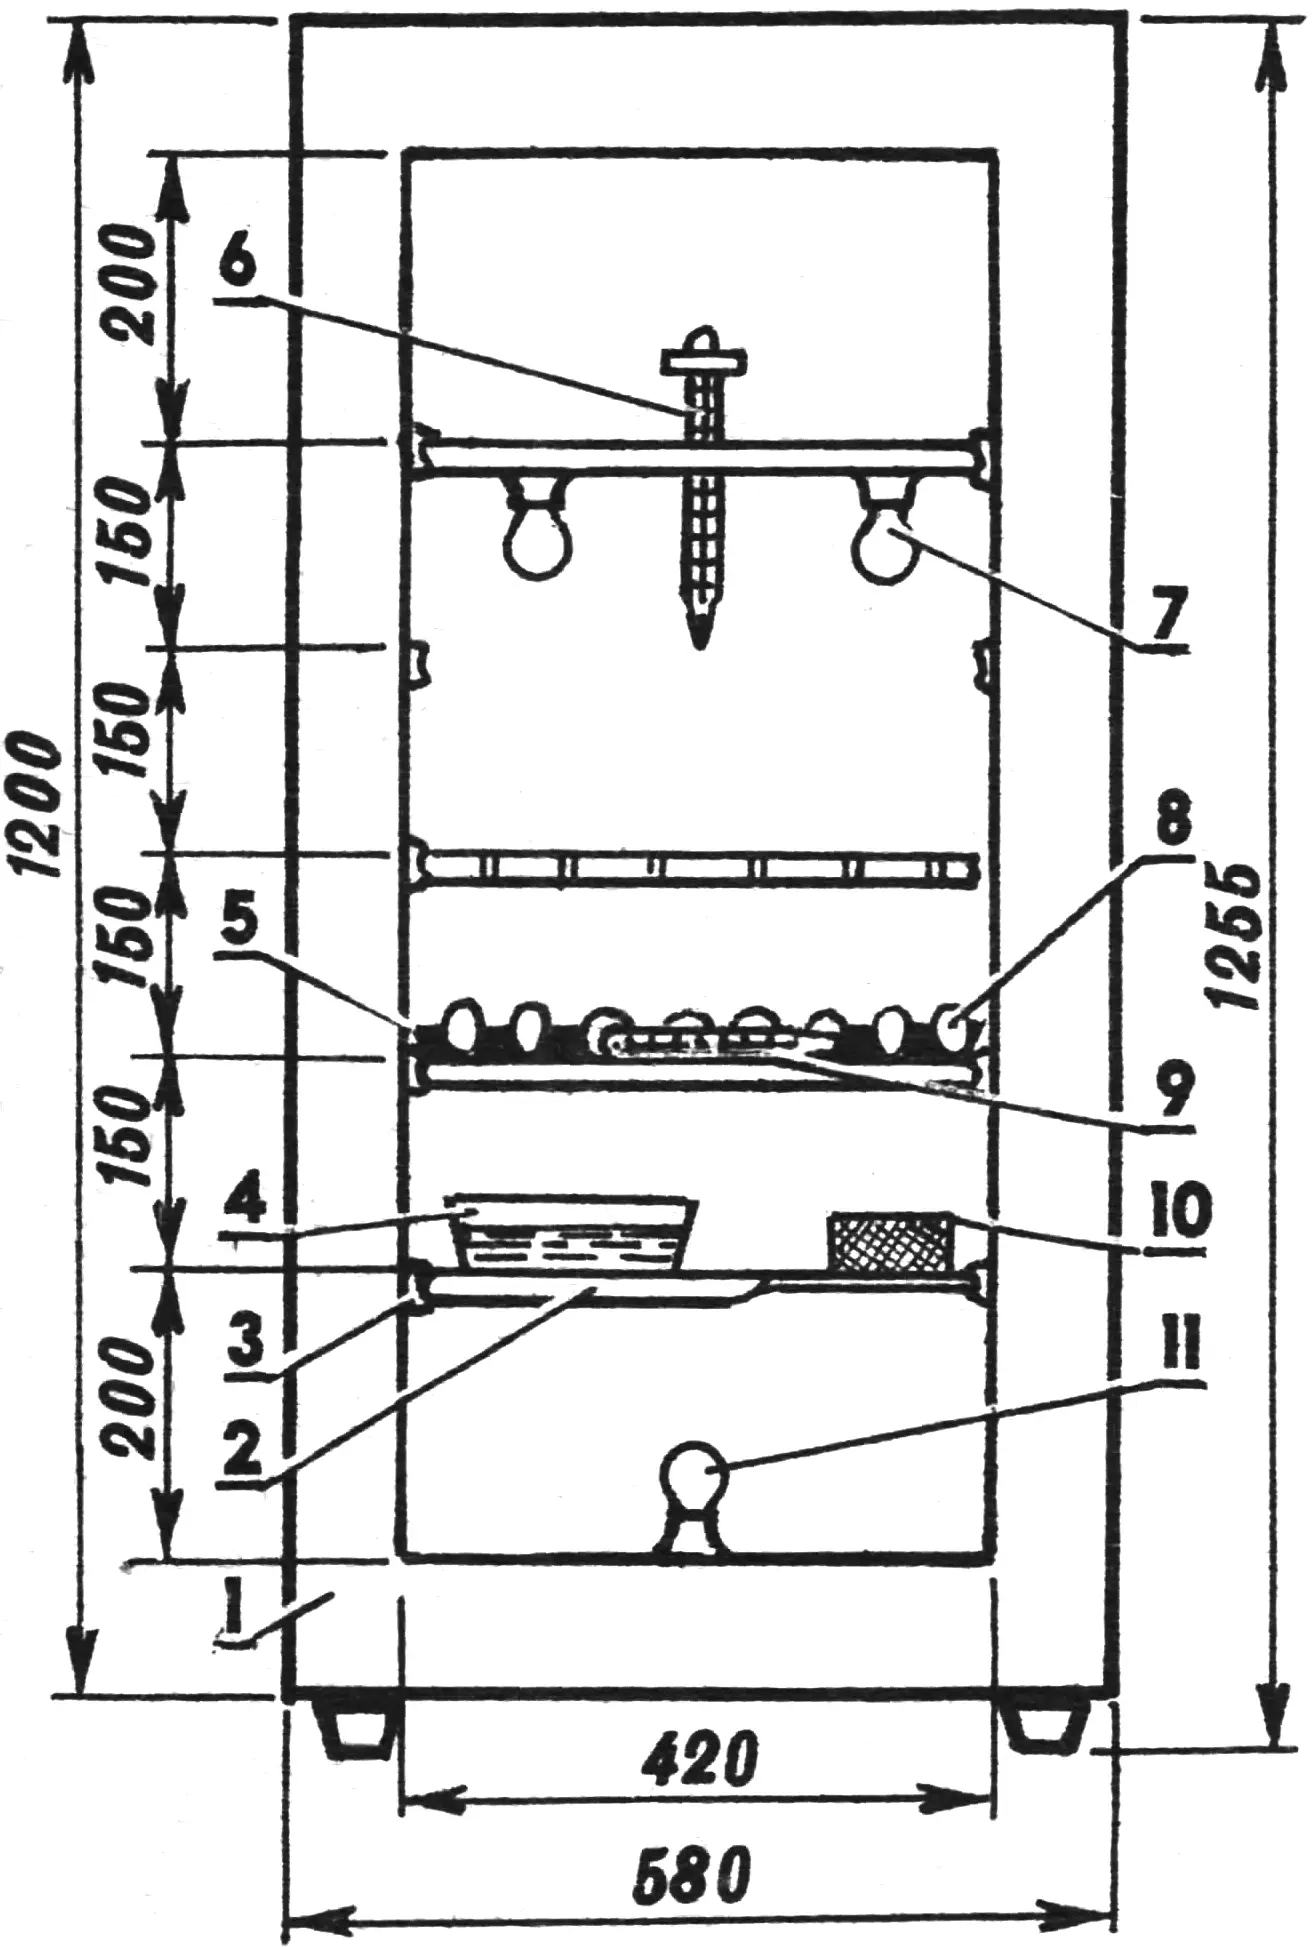
1 — body of an old refrigerator, 2 — removable shelf (3 pcs.), 3 — bracket-guide (20 pcs.), 4 — tray with water, 5 — cardboard tray (packaging tray for 56 eggs), 6 — electrocontact thermometer, 7 — electric incandescent lamp R-15 (40 W, 4 pcs.), 8 — egg (56 pcs.), 9 — control thermometer, 10 — cloth moistened with water, 11 — electric incandescent lamp (permanently on, 40 W)
As for a device for turning the eggs, having one in a homemade incubator would not hurt. But it would inevitably complicate the design. A pile-up of extra parts and assemblies would impair natural ventilation… Wouldn’t it be simpler to confine yourself to turning the eggs placed in the incubator by hand? Say, 3—4 times a day, and during daytime hours.
Then comes the main thing. What base should the design taking shape in one’s mind be assembled on? It would be nice to adapt some ready-made enclosure.
And then the eye fell on an old broken refrigerator someone had thrown away as useless. That was an almost ideal option for carrying out my idea: a thermally insulated body! We remove the freezer compartment, already “gutted” by someone, and other equipment unnecessary for the incubator design. Instead, we take care of equipping the future “factory for producing live chicks” with an electrocontact thermometer and a KR-6 contactor-relay whose coil is rated for 220 volts.
Assembling everything into a single working incubator will not present any special difficulty even for a beginning DIY enthusiast (see the illustrations). When plug NR1 is plugged into the mains, lamps EL1 — EL5 light up and immediately begin heating the air in the working volume of the former refrigerator. The set temperature is monitored by electrocontact thermometer KT in the control circuit of contactor-relay KR1. When the required t°C value is reached, this thermometer actuates, supplying power to the KR1 winding. Contacts KR1, which until then were closed, open and de-energize lamps EL1 — EL4. As the temperature drops, the electrocontact thermometer will switch off the contactor-relay coil, which in turn will again close contacts KR1.1 — 3 and supply power to lamps EL1 — EL4. The process of heating the incubator’s working volume is repeated.
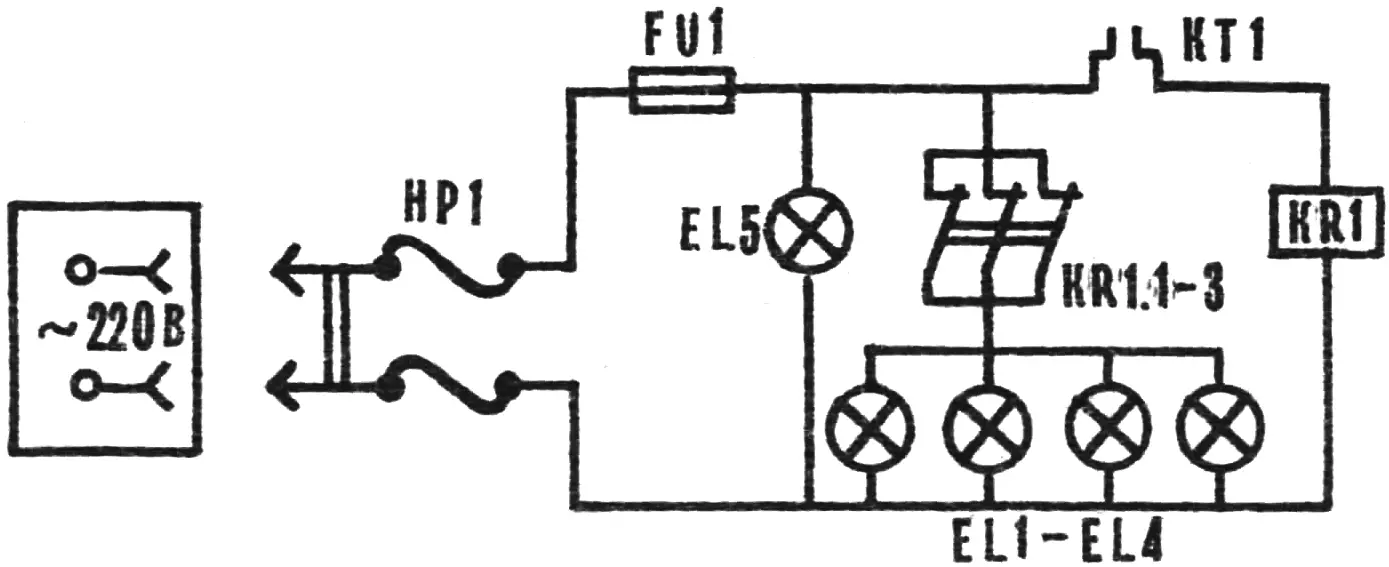
NR1 — plug, FU1 — fuse, 1 ampere, EL5 — lamp for continuous even heating of the eggs (40 W), KT1 — electrocontact thermometer, KR1 — winding of contactor-relay KR-6, EL1 — EL4 — electric incandescent lamps R-15 (40 W each), KR1.1—3 — normally closed contacts of contactor-relay KR-6.
The purpose of permanently switched-on lamp EL5 is to ensure even heating of the eggs and to create the required humidity by intensifying evaporation of water in the tray and from the surface of the wet cloth on the lower shelf. In addition, the frequency of contactor-relay operation is reduced.
Before incubation begins, the eggs are checked, selecting those of the correct shape (neither triangular nor excessively round), with a clean shell free of deposits and cracks. Preference is given to the freshest ones, laid no more than 5—7 days earlier for hens, 10 days for turkeys and ducks, and 15 days for geese. The surface of such eggs is matte because it is covered on top by a cuticle film. It has bactericidal properties, so washing eggs before incubation is not recommended.
It is desirable to operate the incubator in a room where the temperature is kept within 15—22°C. When setting the eggs, make sure the working volume of the chamber is sufficiently warmed up. For this, as practice shows, the initial temperature should exceed by 1—2°C the temperature usually recommended for the initial incubation period. For chicken eggs it lasts 10—11 days. When incubating ducklings and turkey poults, the initial period takes 13 days. For goose eggs — 15.
The required temperatures and humidity in the incubator I designed are established rather quickly. Later the heat given off by the lamps becomes so great that the automation has to intervene continually, tracking the value set by the schedule. And to reduce the frequency of contactor-relay operation one can even unscrew one or two forty-watt heater lamps.
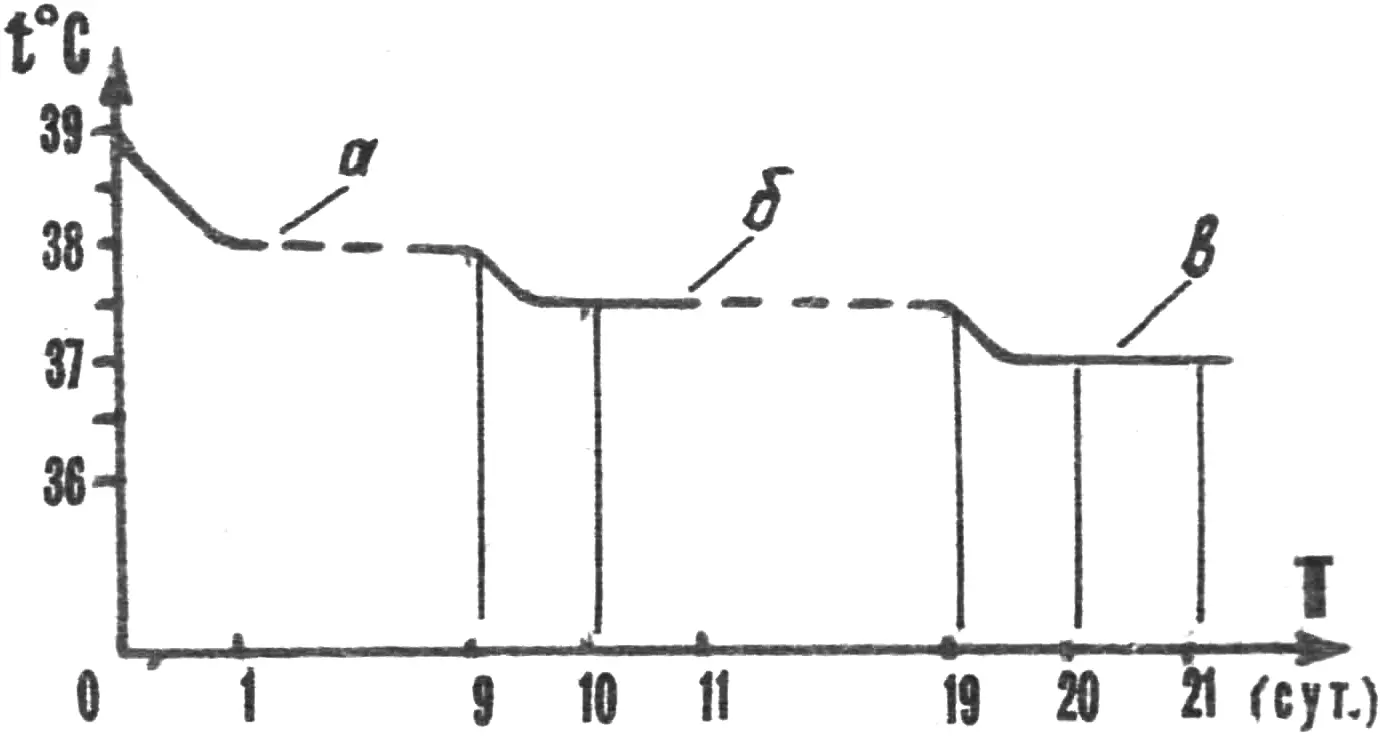
a — initial period, b — middle incubation period, c — chick hatching period
The middle incubation period for all eggs is set until hatching begins. And the hatching period — from the moment peeping of the chicks inside the eggs is heard. Moreover, temperature and humidity in the middle incubation period are kept at a lower level than in the initial one. The eggs are turned more often. In the hatching period the temperature is reduced still further, while humidity and ventilation are increased thanks to convection processes taking place in the incubator’s working volume.
Chicks hatch on the 20th—21st day, ducklings and turkey poults on the 26th—27th, and goslings on the 29th—31st day. From the fact that no unused albumen remains on the inner surface of the egg, it is clear: the young take from the maternal material everything due to them.
And one more remark. The eggs must be turned, combining this operation with cooling. How long should they be cooled? You will learn the time by placing an egg against your own eyelid. If you feel neither warmth nor cold — that is enough. Moreover, with manual turning the eggs are cooled from the second day of incubation until hatching begins, until peeping is heard from inside or until pipping starts.
“M-K” 11’92, A. TYMOSHENKO, pensioner, Feodosia
Recommend to read
 THE FILTER IS GOOD, BUT THE HOOD BETTER!
Cooking, usually accompanied by a aerosol air pollution in the kitchen and throughout the apartment. In this form fat particles, soot, soot, etc., which are deposited on the ceiling,... “SKEWER” FOR THE FILM
Widely used by gardeners and farmers plastic film is good in summer, but can not tolerate the winter cold with snow and winds crack and break, so autumn is required to remove it into the...
