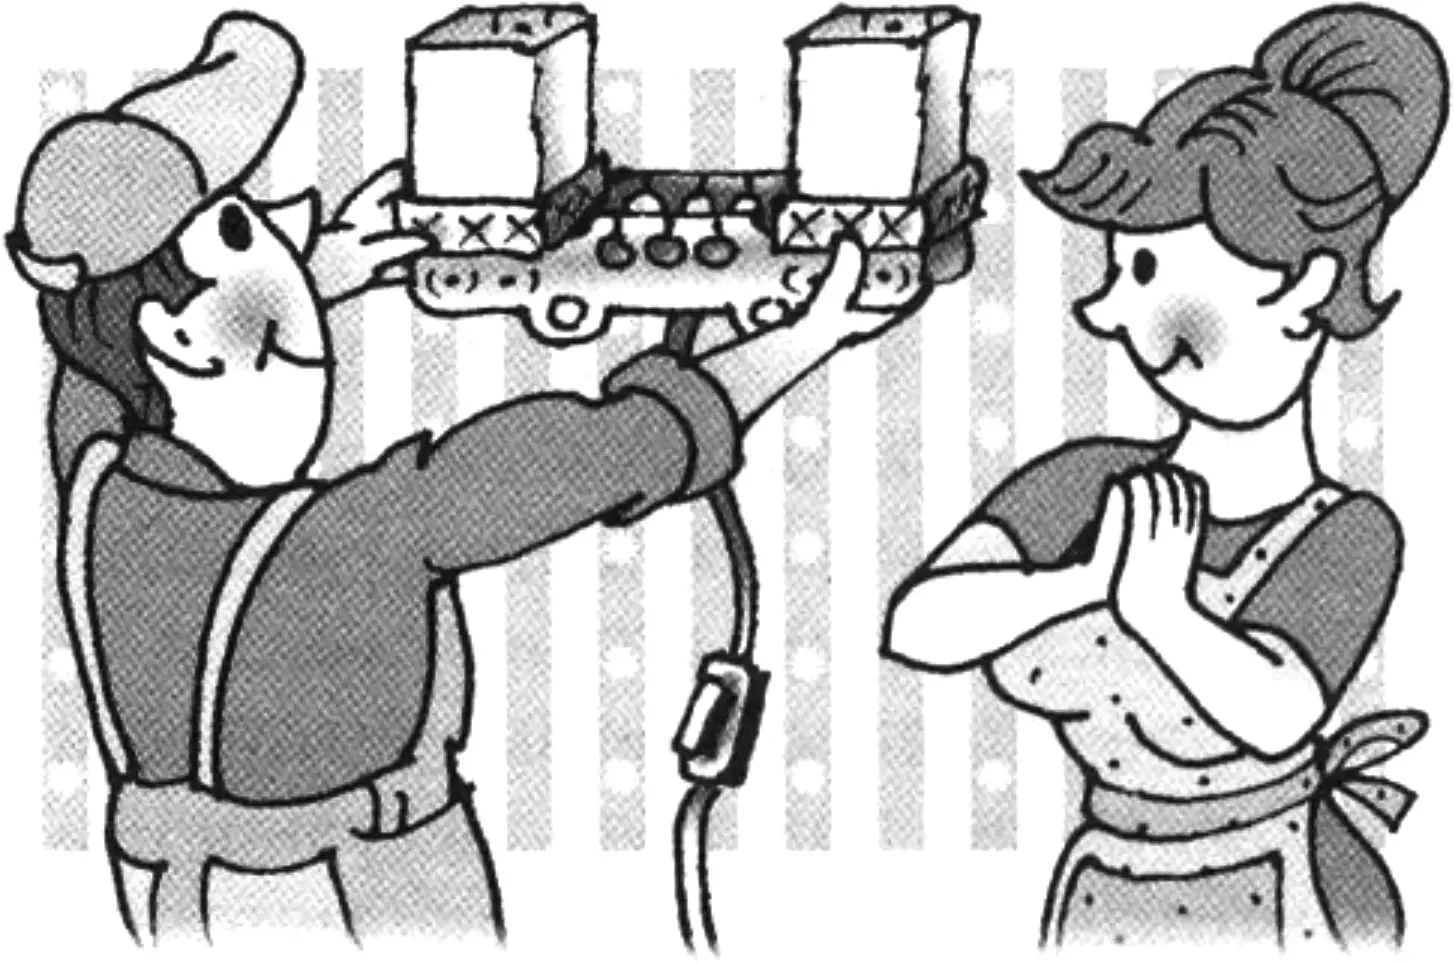
In a modern home interior, factory-made and homemade furniture items or other products can blend organically. Moreover, a few unconventional crafts can change the look of a typical apartment, give it individuality, create coziness, and even bring a sense of “warmth.” Moreover, these simple things can serve a utilitarian (practical) purpose, a decorative one, or combine both qualities at once.
An example of such a combination is the wall sconce presented here, which emits “soft,” evenly diffused light.
Making this light fixture is within the reach of a home craftsman — a beginner in wood carving.
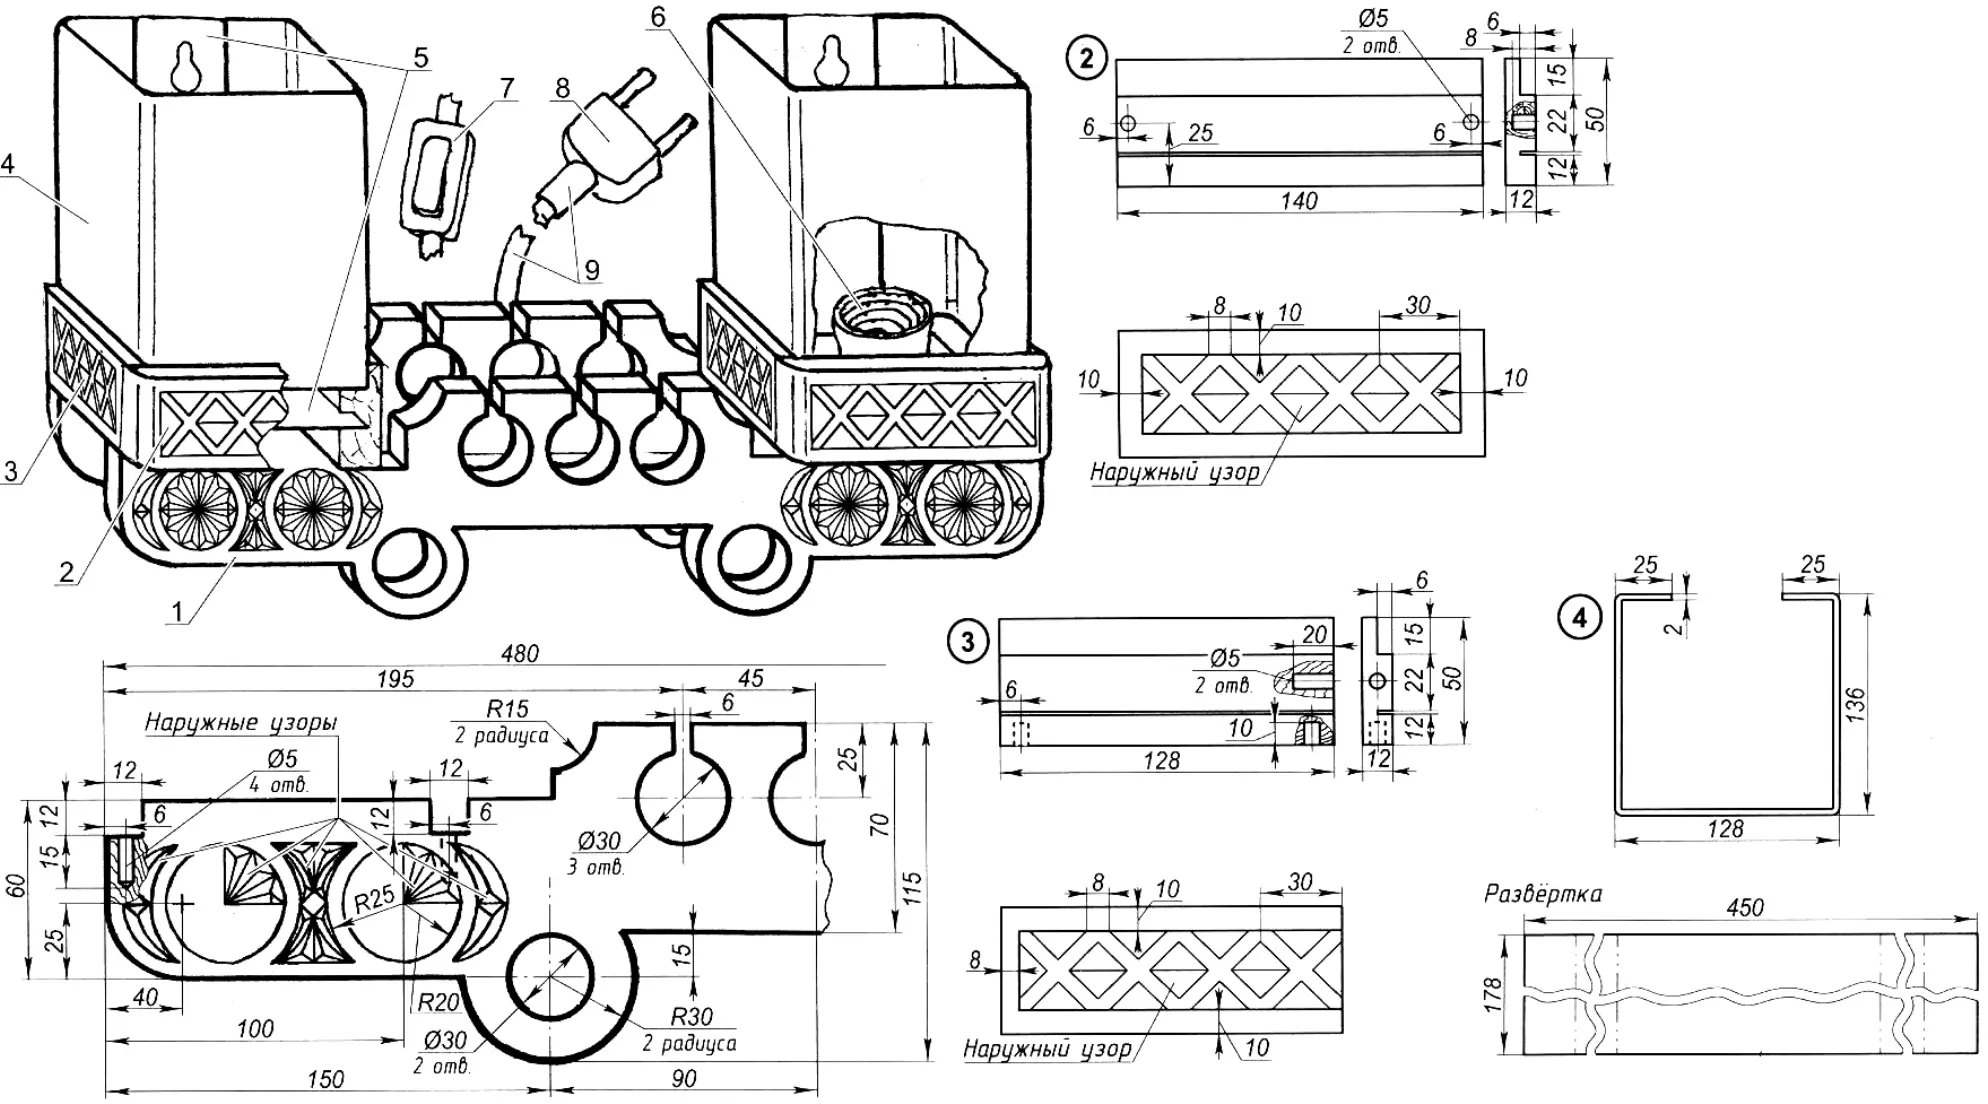
1 — base (board s12, 480×115, 2 pcs.); 2 — front strip (board s12, 140×50, 2 pcs.); 3 — side strip (board s12, 128×50, 4 pcs.); 4 — shade (matte acrylic s4, 450×170, 2 pcs.); 5 — reflector (sheet metal s1, 350×135, 2 pcs.); 6 — lamp socket (2 pcs.); 7 — switch; 8 — plug; 9 — power cord (two-wire)
The cost of the sconce is low, since even scrap materials can be used to make it: leftover birch (aspen, linden) boards, scraps of white or galvanized sheet metal. Electrical fittings: lamp sockets, plug, cord with switch — will surely be found in any DIYer’s stash.
A complete list of parts and materials for the light fixture is given in the specification. Note that the decorative box and the shade have no bottom or back walls — they are replaced by the metal reflector plate.
Since the operations for making individual parts are simple and do not require detailed explanations, I will present them as process charts — similar to those compiled for workers at factories.
Making the base (item 1)
| No. | Operations | Tools |
|---|---|---|
| 1. | Select a blank from birch board measuring at least 480×115×20 mm | ruler |
| 2. | Machine the blank to size 480×115×12 mm | handsaw, plane |
| 3. | Mark out the blank according to item 1 | square, ruler, compass |
| 4. | Drill Ø30 mm holes according to the layout (7 pcs.) | drilling machine (drill), first Ø30 mm drill bit |
| 5. | Saw the blank along the outer contour (straight section) | jigsaw (handsaw) |
| 6. | Make 12×12 mm cutouts (4 pcs.) | jigsaw (handsaw), chisel |
| 7. | Make 6 mm wide slots (3 pcs.) | jigsaw (handsaw) |
| 8. | Saw R30 mm arcs (2 pcs.) | jigsaw (rasp) |
| 9. | Mark blind Ø5 mm holes (2 pcs.) according to item 1 | ruler |
| 10. | Drill two blind Ø5 mm holes to a depth of 15 mm | (drill), Ø5 mm drill bit |
| 11. | Mark the “Radiance in a circle” pattern (4 pcs.) according to item 1 | compass, square, ruler |
| 12. | Cut out the “Radiance in a circle” pattern | cutting knife |
| 13. | Mark the “Moon” pattern (4 pcs.) according to item 1 | compass, square, ruler |
| 14. | Mark the “Central” pattern (2 pcs.) according to item 1 | compass, square, ruler |
| 15. | Cut out the marked patterns | cutting knife |
| 16. | Sand the patterns | sanding machine, set of sandpaper |
| 17. | Apply stain to the patterns | brush, wood stain |
| 18. | Varnish the patterns. Repeat operations 1 — 10 and 16 — 18 for the second part | brush, varnish |
Making the front and side strips (items 2, 3)
| No. | Operation name | Tools |
|---|---|---|
| 1. | Select a birch blank measuring at least 850×60×20 mm | ruler |
| 2. | Machine the blank to size 850×50×12 mm | ruler, plane |
| 3. | Mark a 15×6 mm quarter | ruler |
| 4. | Cut the 15×6 mm quarter | plane |
| 5. | Mark a 6×1 mm groove | ruler |
| 6. | Cut the 6×1 mm groove | handsaw, acrylic cutting knife, ruler |
| 7. | Mark the part length on the blank according to item 2 (2 pcs., allowing for kerf width) | square, ruler |
| 8. | Saw off the front strip (2 pcs.) according to the layout | handsaw |
| 9. | Mark the part length on the blank according to item 3 (4 pcs., allowing for kerf width) | square, ruler |
| 10. | Saw off the side strips (4 pcs.) according to the layout | handsaw |
| 11. | Mark the centers of blind holes according to item 2 (on two parts) | ruler, square |
| 12. | Drill two blind Ø5 mm holes according to the layout (on two parts) | drilling machine (drill), Ø5 mm drill bit |
| 13. | Mark the centers of three blind holes according to item 3 (on four parts) | ruler, square |
| 14. | Drill three blind Ø5 mm holes according to the layout (on four parts) | |
| 15. | Mark the pattern on parts items 2 and 3 | square, compass, ruler |
| 16. | Cut out the marked patterns on parts items 2 and 3 | cutting knife |
| 17. | Sand parts items 2 and 3 | sanding machine, set of sandpaper |
| 18. | Apply stain to parts items 2 and 3 | brush, wood stain |
Making the shade (item 4)
| No. | Operations | Tools |
|---|---|---|
| 1. | Select a blank of matte acrylic measuring at least 450×200 mm | ruler |
| 2. | Mark a 450×200 mm rectangle on the acrylic piece | square, ruler |
| 3. | Cut out the marked strip | cutting knife |
| 4. | Bend the shade box according to the layout | acrylic bending fixture |
| 5. | Finish the shade edges | square, straightedge, sandpaper |
Making the reflector (item 5)
| No. | Operations | Tools |
|---|---|---|
| 1. | Select a blank of white sheet metal (galvanized) 350×135×1 mm | ruler |
| 2. | Mark out the part according to item 5 | square, marking gauge |
| 3. | Center-punch hole centers according to the layout | center punch, hammer |
| 4. | Scribe a Ø16 mm circle according to the layout | compass, ruler |
| 5. | Cut out a Ø32 mm circle | paddle bit |
| 6. | Punch four Ø2 mm holes | punch, hammer |
| 7. | Punch Ø4 mm and Ø10 mm holes | punch, hammer |
| 8. | File the punched holes | file |
| 9. | Saw through the bridges between Ø4 and Ø10 mm holes | needle file |
| 10. | Trim the blank along the contour and blunt the edges | tin snips, file |
| 11. | Bend the blank at a right angle | vise, mallet (bending fixture) |
The front and side strips of the decorative box are joined butt-to-butt at a right angle. So that the side edges of the front strip do not interfere with the perception of a uniform pattern across different parts, they (the edges) must be rounded to a radius of 12 mm after assembly.
Such a light fixture, made with your own hands, not only gives light but, one might say, also warms — it warms the soul.
In conclusion, I would like to remind beginner craftsmen that when creating their own piece, they must observe the laws of composition: proportionality and unity of parts, repetition of elements, and completeness of images. The aesthetics of applied art — neat execution and careful finishing — also matter greatly. Without meeting these conditions, it is hardly possible to expect a beautiful object, let alone a work of high artistic quality.
«Modelist-Konstruktor» No. 9’2010, V. PUSHKIN
Recommend to read
 NOT TO SPOIL THE WALLPAPER
Thin metal plate of the type "dovetail" will provide you with invaluable assistance when cutting wooden plugs hammered into a wall and designed to secure them screws will prevent the... ASSISTANT WELDING
Thank you so much, friend magazine, for the development of welding transformers. Inspired by the publications took a chance and made themselves compact, but quite powerful "svarochnik"...
