Probably unlikely pharmacist Leeuwenhoek invented the microscope, not whether it is a variety of lenses. In our time, for those who want to make a microscope, may be more difficult: telephoto lenses, increasing only two-three times in the pharmacy enough, but short-much harder to find. But most are not.
However, there is a way — and even complex grinding work is not required. It is only necessary to take a strip of sheet metal the size of 10X60 mm, in one end drill a hole d 3 mm IV to introduce… a drop of water. Yes, it is the almost perfect short-focus lens — lens microscope of the future. Please note that the hole should be perfectly round, and its edges should be free of burrs. After processing a strip of sheet metal in the area of the hole is lubricated by any oil and slightly promocoes cloth.
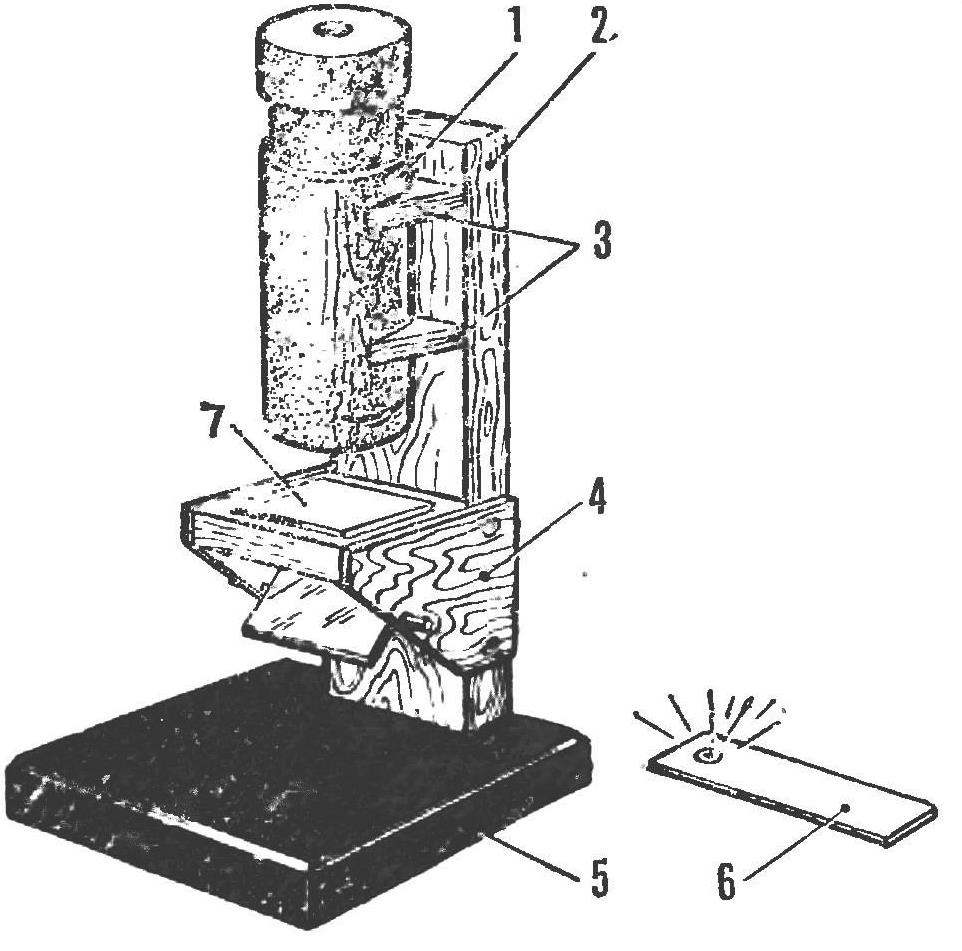
Fig.1. Homemade microscope :
1 — tube.2 — upright,3 — brackets.4 — object table.5 — the base, the holder hydrolysis.7 — glass.
Now you can take and for the manufacture of the device. Let’s start with the Foundation. It requires a piece of chipboard or plywood with a thickness of 20 mm size of 100×100 mm. Vertical strut with a fixed specimen stage and lens tube of a microscope, hardwood (oak or beech) section 15X50 mm. As connect all of these parts shown in the drawings. Assembly is conducted on any glue — casein, polyvinyl acetate, synthetic or bone.
One of the main parts of the microscope — stage. Make it from desyatiletnego plywood, cut from it a square of side 50 mm, with 30×30 mm hole in the middle. To the vertical upright of the table is secured by two plywood (3 mm thick) gussets, and IIH — axis mirrors, which can be used to direct a beam of light on the slide table. The mirror itself is fixed on the axis, pieces of cloth or paper, coated with glue BF-2.
Fig. 2. Object table :
1.3 — side. 2 —table, 4 — axis mirrors (steel, 0 to 3 mm), 5 —mirror 40X40 mm.
The tube of the microscope consists of two tubes glued together from cardboard or from several Stoev heavy paper. Diameter less decide on telephoto lens. In accordance with it, choose a suitable wooden or plastic mandrel and vilate through it the inner tube of a tube. It is best to use polyvinyl acetate glue. After drying the obtained wind on top of another tube. To the second is not connected firmly with the first fight between them a few turns of paper.
Now we have to estimate merlincove distance. On the vertical rack mount the ruler on the stage put, for example, a hair or thin wire, prepare hydrolyze — pipette dispense drop of water in the hole tin strip, and took two lenses in hand, move as long as the lens does not appear a clear image of the object. Fixing this position, the line mark the length of the future tube.
After cutting the tube to a smaller attach the eyepiece lens, and more have the hole designed to accommodate gidroliz. To exclude the illumination of the inner surface of the tube tape the black paper.
Fig. 3. The tube of the microscope :
1 — outer tube 2 — inner tube.3 — cover. 4 — the lens. 5 — ring.
To facilitate the guidance of the slide on eyepiece cover with d hole of 4-6 mm. Microscope this design increases the objects in the 60-80 times.
To review the structure, for example, plants must have the thinnest slice. This can be done with a razor blade. By placing the preparation on the slide, perform the focussing by moving the inner tube of a tube with eyepiece.
I hope that you will largely be able to improve the design of this microscope will make it more versatile with zoom.
A. САМ0ФАЛ
Recommend to read “NUT” FOR THE SCREW It is known that in friable material such as drywall or particle Board, the screws holding bad and under load falls. However, it will bind details not worse than a bolt with a nut, if... POSTWAR FIRSTBORN "We have mastered the car ZIS-110 the machine is very complicated. Besides the fact that it requires a high level of culture of manufacture, it requires great technical maturity." These... 
 Probably unlikely pharmacist Leeuwenhoek invented the microscope, not whether it is a variety of lenses. In our time, for those who want to make a microscope, may be more difficult: telephoto lenses, increasing only two-three times in the pharmacy enough, but short-much harder to find. But most are not.