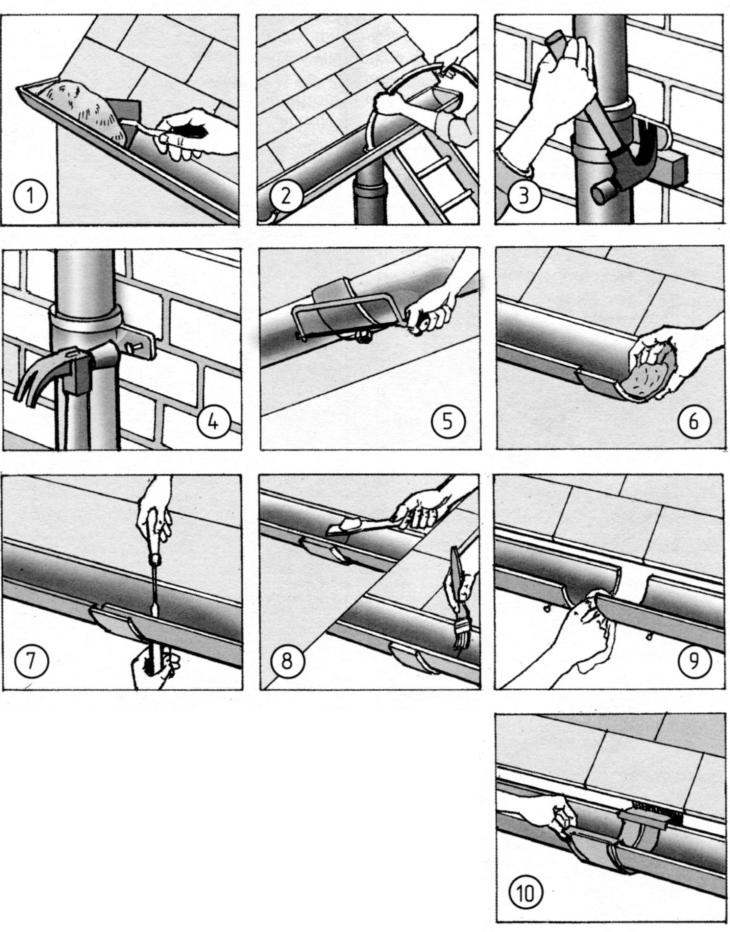
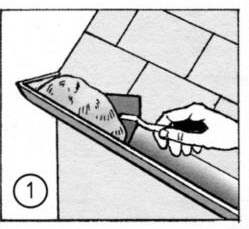
If both of the abutting part of the trough does not have end widening, at the time of formation of their compounds should retain both parts at one level to drive in that nail (Fig. 1, 9) and then install the regular or the pipe connecting bracket (Fig. 1, 10).
How’s the roof?
A prudent owner will not wait until the thunder burst: periodically checks if there are any damages on the roof. Modern roofing materials, require less attention, for example, plastic coating when used correctly, is designed for decades of reliable operation. You can not say about the common perception in the past until today, such roofs as a roofing material or slate.
Fig. 3. Sealing of the bottom of the wall with plastic tape:
1 – Department of waxed substrates adhesive tape layer; 2 – applying and pressing adhesive plastic tape; 3 – rolling tape roller; 4 – extraction of the defective bricks with a chisel; 5 – restoration of the mortar joint after gluing tape
Somewhere in an intermediate position in terms of reliability is ceramic tile or tile, but it requires attention and monitoring, because the plank at each other in a checkerboard pattern, the tiles guarantee reliable protection only if they are all integers: even cracked or chipped one of them threaten to leaks.
However, such coatings are convenient in that easily replaceable. If the detected any violation of one of the tiles – is it even on their own it is easy to install a new one.
Defective tiles with the help of available devices carefully removed from under the next (Fig. 2, 1, 1A, 1B), but instead under the adjacent tiles are substituted for the wedges (1B).
Later in the middle of a place that was occupied by the defective tile, nailed valve (metal strip) (Fig. 2, 2), with which it will be possible to pin the tile is”patch”. It is laid on top of him and slips under the adjacent tiles to replace new defective (Fig. 2, 3). Further, the wedges, temporarily supported adjacent tiles are removed, new hard pressed to the roof, and protruding from under the edge of the tile valve is bent on it, keeping the “patch” (Fig. 2, 4).
Instead of the slope
If the bottom of the wall systematically suffers from the spray, not only brick, but even the cement coating it is pretty quickly destroyed, and the ground part of the building is in disrepair. To avoid this, use a variety of special ways to protect the lower part of the brick wall.
Now it’s easy enough operational methods, including using industry new material for quick repairs on their own sticky tape corner.
Relief after removing the wax paper from the adhesive layer (Fig. 3, 1), unfold the plastic tape and pressed evenly on the bottom of the wall (Fig. 3, 2), forming a kind of a plastic zone, which will play the role of a shield from the destructive rain spraying. And to increase the strength bonding tape is rolled across the length of paint roller (Fig. 3, 3), pressing it with the necessary effort.
However, this technique is suitable only at the early stage of operation of the building when the wall or coating have not lost integrity, “smoothness” of its surface.
In case, if the bottom of the wall has already suffered greatly and has no smooth surface, it is advisable using a chisel to chop off the affected part of the bricks (Fig. 3, 4), then fill the resulting gap with cement mortar, and after alignment, and thorough drying you can glue the plastic tape. Upon completion of this operation it is necessary to restore the upper edge of the tape prior to the cement bead (Fig. 3,5), applying the solution and leveling with a trowel.
B. VLADIMIROV

 In our latitudes, with a sharp seasonal shifts in temperature and high rainfall, as a rule, roofs of buildings and walls suffer most: and therefore they need attention and the necessary preventive repairs.