The lamp will look especially good if the ceiling insert the box in the base with almost no clearance (sizes in the diagram the approximate, since they depend on the diameter of the existing ball).
Many now adorn the interior of the metallic elements: openwork shelves, grates, stamping, furniture on tubular bases, a notched fittings of polished colored metal. In such an environment will fit well with the original table lamp from the small ball of light and… a great spring playing the part of the rack. To blend manufactured from strips of soft metal (copper, aluminum) ring clamp, tighten the spring. If the diameter of the neck of the balloon is larger, make a second ring connected to the first with two goals through the spokes; the resulting d-pad can be used for mounting the cartridge. Under the base of the lamp would be a disk of polished metal, for example a hood of a vehicle wheel, if necessary, its diameter is correspondingly adjusted.
LAMP-IMPROMPTU
In addition to direct their destination, the lights in the house can play a purely decorative role. Here are two designs of lamp that will decorate the area in the apartment, despite the ultimate simplicity of their devices and using only scrap materials.
For the first lamp you will need 10-12 sheets of drawing paper or colored plastic size 30X40 mm. Can be duplicate with Whatman membrane filters. In any case, at the corners of the sheet, stepping back from its edges of approximately one centimeter, hole puncher punch holes. Now prodavnice have a thick colored thread, cord, or thin wire colored insulation and pull the entire accordion in the ring — get a cylindrical cover with a beautiful wavy surface. The bracket does not need to: put the lampshade on the stand mounted on the cartridge with a lamp and decorative lamp ready. Particularly impressive it will look on the polished or coated glass surface of a table or tables.
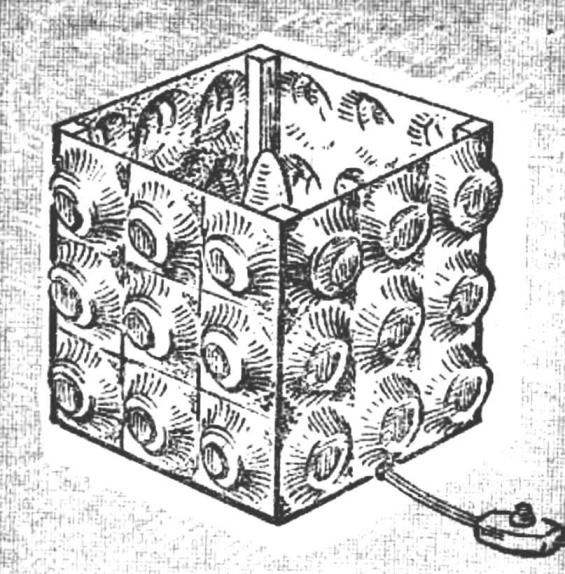
The second option is going from really good material — mesh inserts chocolate sets. Made of thin, usually brown, sheet plastic, they have a beautiful texture, and as if they are asking to use in any crafts. Take four such sheet, carefully cut them to get equal squares. Then make strips or cubes of the same size as the frame-base, collecting it on glue or thin nails. In the middle put another rack — mount cartridge. And in the grooves at the corners of the frame glue or nail four thin bar: the thin nails to fasten the sheets of inserts. Get the lamp, each cell is lit in a special way: depending on the angle you look at it.
Lamp spring:
1 plate-base, 2 — front coil springs, 3 — cord, 4 — yoke, 5 — shade.
Decorative lamp:
1 — wooden base cartridge, 2 — plate stock, 3 — thread lace.
In both constructions it is recommended to use bulbs with a capacity not exceeding 40 W and the light will be softer, and the shade does not overheat.
In the room where there are wicker furniture (for example, rocking chair) and required the dim light — say, when you watch TV, you can make an original wall of a shallow basket, baby basket, wicker food. If you already have fittings, sconces, install ceiling would be no problem. If not, you only have to strengthen the wall nail hook, and basket — wire loops; the light bulb just hang inside it, having missed the wire on top between the bars.
“CRINOLINE” BELOW THE CEILING
Now in Vogue again entered a fabric lampshades. One minute, you can improvise chandelier from… the right scarf or piece of cloth. It does not have to suffer with the “netting” wire frame and sheathe it. Bend the wire ring back-struts and secured to the cartridge, the fabric will fold into a square, and the top of the bend cut off. Get the hole for the passage of the cartridge. Put the cloth on the frame and it will fall in soft folds. This “chandelier” with a low, slightly above seated head suspension is particularly good over the dining table. The fabric is not overheated, the power of the bulb must not exceed 40 watts.
Muted, diffused light and ceiling light, reminiscent of a crinoline. A cascade of broad rings of different diameters, the largest of which, after Assembly, is in the middle, but the smaller ones occupy the upper and lower position. Depending on the desired effect and material used, light can penetrate through the entire surface of the shade or to leak just up and down between the rings. Therefore suitable transparent or semi – opaque sheet: colored or frosted Plexiglas, a film filter used for decorative highlights, drawing paper or laminated them with plastic sheet and thin plywood.
Prepare strips with a width of 80 mm, one with a length of 861 mm, two at 735 mm and two of 610 mm. If it’s a plexiglass or plastic, gently heat each strip over the gas stove and on any round object (say, on the pan) fold in the ring. For other materials such preliminary preparation is not required: rings are formed directly in the Assembly on a frame of thin boards or plywood with a thickness of 3-5 mm (see Fig.).
The framework consists of three staggered vertical ribs and two struts, the design of which can be of several options: three-blade, circle, triangle frame, etc. Spacers with edges connected by nails or glue (carpenter’s. PVA, casein). If the shape of the spacers is elected, the round — bottom better to make a perforated, like a colander, so he was not detained light.
Every ledge of the edge of the frame — a mounting location appropriate for the diameter of the ring: first, small studs, wire brackets or glue — depending on material — sets the smallest of them, that is, upper and lower.
Then just attached the two intermediate and the last — the large middle ring.
After assembling the lamp, if required, additionally decorated with paper rings painted or sprayed from a spray in a different color; border rusbridge will give soft transitions of colors. Rings made of plywood can be tinted and varnished.
The bulb is installed in accordance with the material: for film and paper rings she’s not supposed to be more powerful than 40 watts.
TURN ON SITEPAD
Looks wonderful cascading another lamp, not having a single rigid frame: his lines staggered flowing down like a waterfall, intricate alternating narrow and wide forms. It will only need a piece of stretchy tissue about the size 1500X900 mm thick copper or steel wire.
Chop of the last segments of different lengths (from 950 to 1500 mm), bend the hoops connecting the ends of the tube or by them.
Now sew the fabric at the lower edge so that it was possible to preteroti cord, then stitch along the long edges and remove the resulting “sleeve”. Spread harvested hoops so, how do you see the planned cascade of forms of chandeliers, and in this sequence begin to push them in the “sleeve”. If the tissue wraps wraps fairly tightly, hang over the entire structure draped with lace neck in a convenient place (e.g. in a doorway), and finally tweak. Now grab the thread and fabric together with hoops in several places, so as to avoid the shift, and the lower edge of the panel past the Hoop — chandelier ready.
Chocolate lamp:
1 — wooden frame, 2 — roll rake, 3 — cartridge, 4 — sheet pad, 5 — angled rail.
Chandelier-shawl:
1 — fabric 2 — cartridge, 3 — frame.
Tiered lampshade:
1, 2 — horizontal and vertical framing members, 3 — ring.
Lamp-cascade:
1 — cord attachment cord, 2 — neck, 3 — “wrap”, 4 cloth, 5 — seam under the neck cord, 6 — side seam;
And the sealing of the ends of the hoops in a tube and threads.
The most advantageous place for such a lamp — a cozy corner of the room with a low table. For the suspension you can make an l-shaped wooden bracket, and the cord is free to pull on the wall, embedding it slightly above the table suspended switch. During installation it is necessary to consider that the lamp looks better if the light bulb inside it to drop to the middle or slightly below, preferably in the space the largest Hoop: then you can screw it more powerful, up to 100 W (preferably krypton, “mushroom”, a milky or opaque).
The design is also interesting because it allows to vary its elements, and depending on this — and the whole General pattern. Rings can be taken with increasing, same or decreasing diameter; or instead of the hexagons; or not individual elements, and spiral. Built at the top of the unit, you can pull the lower section, changing the height of the cascade. That is, the scheme is favorable for various kinds of combinations — in accordance with your capabilities and Imagination.
In addition, the ka of this principle is permissible to make the most of different shape lamps, lamps, nightlights. The scheme is quite suitable for the floor lamp, with two main variants: with external l-shaped and the internal counter. In the first case, the cascade is suspended, as in a ceiling embodiment, directly on the cord. And in the version with internal bar from the top, around the lamp, up appear two rods of thick wire ending by a ring — under covered the neck of the shade. By the way, the length and the shape of the cascade is easy to use and fluorescent lights.
Recommend to read DESIGN FOR YOUNG At all times man has sought to equip, to improve the dwelling. People with money are buying fashionable imported furniture, decorate the walls of expensive Wallpaper, equipped with... THE AMPHIBIAN ON THE ICE TRACK The prototype model has served as a snowmobile amphibian created in 60-ies a group of young professionals under the leadership of the Soviet aircraft designer A. N. Tupolev. This car... 
 Perhaps the desire to dress up the light source comes from the primitive worship of the miracle of fire. Even the torch could just be stuck in a split stick, and you can revive the thread and patterns of vertical Board designed for this, and a primitive lamp not only gave light, but decorated home. Today, perhaps no one kind of industrial products for everyday life has such a diversity, such as lamps: chandeliers, table lamps, floor lamps and wall sconces, lamp shades, lampshades, diffusers of all kinds, lamps, different from each other at a common decision, form, material, colour. But to satisfy our demand is impossible — so the effect here individual taste or particular living conditions: purpose, place, environment furniture, existing light sources.