Holes for M6 nut in the cross members and shelves is also desirable to drill the conductor. The latter is bent from steel strip section 20×2 mm, after which the resulting area are two holes in lower shelf is 6 mm in diameter (it is fixed guide screw), and a larger — diameter 0,5 mm less than size of “turnkey” used nuts with M6 thread. Typically, such nuts the size of “turnkey” is 10 mm, respectively, the hole diameter of the nut is equal to 9.5 mm.
Assembly Secretary — that, in fact, the connection bolts M6 side panels with shelves and crossbars. Previously in the last zapressovyvajutsja nuts and centered relative to the holes 6 mm in diameter at the ends of the shelves and cross-beams by means of a rod with pointed end. After completion of the Assembly the geometry of the design is carefully checked with a tape measure, for this the Secretary laid face down on the floor and he measured diagonally. If they are equal in size, to the rear of the Cabinet (side panels, shelves and crossbars) small screws and glue (casein, Phili “liquid nails”) is attached a sheet of hardboard with a thickness of 5 mm.
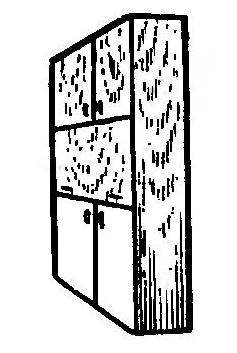
Width of Desk is large enough workshop to 1.2 m, so the shelves particleboard can SAG. To avoid this, it makes sense to strengthen them with wooden strips section mm. 35×25 Reiki these, moreover, will not allow tools and materials to fall from the shelves.
The next step is hanging doors and countertops. The first set by standard furniture hinges providing fixing of doors both in open and in closed position. But the top connects to the crossmember reinforced hinges, as the hinge nodes will have to experience increased load. It is best to use three or four Vostochnye loop with the size of 60×40 mm. card to Mount them to the top and the crossmember you can, of course, the usual screws, but it is better to buy the plastic dowels with a diameter of 5 mm to extrude them in detail in drilled holes and then drive the dowel screws. The fact that the screws are badly kept in the CPD and at the slightest axial loads fly from their nests.
As can be seen from the drawings, the door of the lower branch of the Secretary-workshop were the pillars of the tabletop when the latter is in the horizontal position. The load from her and settling down on her hard tool was perceived not flimsy furniture hinges and is transmitted to the floor, doors are equipped with swivel feet of wooden bars, which are fixed both in the working and in the retracted position of the bolt with a spherical head and the wing nut. And to open the doors accidentally slammed shut, they are fixed metal pins-FIC-story with a diameter of 6 mm, and the top drilled holes, which are enhanced with metal or plastic bushings with an inner diameter of 6.5 mm.
It remains to equip the Secretary with four screw jacks, and work on its Assembly will be completed. As can be seen from the figure, the Jack is arranged almost in the same way as the docking station, soedinyayutsya shelves-crossmember with the side panels. The only difference in the diameter of the bolt and nut for jacks, you will need fasteners with thread M8 or M10. During the installation of the Secretary under the bolt head goes on the back of sheet rubber of a thickness of 2-3 mm.
If particle Board was not lined with plastic, the easiest way to decorate their adhesive foil, picking up its texture under the surrounding furniture. The ends of the pre-panels are puttied, sanded and painted small the right color.
On the table is fixed a sheet of 6 mm plywood: practice shows that the surface of the workbench in the workshop deteriorates quickly enough, well, plywood panel, if necessary, can always be replaced.
Compartment in the middle of the writing table set Desk lamp or fluorescent light lamp and single socket.
I. EVSTRATOV
Recommend to read
 AST WATER HEATING IN THE SAUNA
To obtain hot water in a bathhouse, a tank-register on the stove pipe (or a boiler in the stove itself) and an external tank in the washroom are often used. Water circulation between them...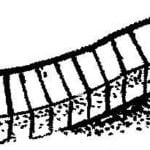 THE PATHS THAT WE CHOOSE
With a green lawn and plantings in the suburban area especially well laid garden paths. Of the gate or the gate to the house, they are usually short and wide enough to be able to...