
No matter what your city apartment is like — prestigious or ordinary, large or small, comfortable or inconvenient, it is extremely difficult to allocate space for a home workshop in it. However, with great desire and sufficient carpentry skills, a DIY craftsman can equip a quite convenient workspace that easily transforms into a flat cabinet with a floor area of only 0.36 m2.
Such a cabinet is best made from floor to ceiling and fixed between them using four screw jacks; there is no need to drill concrete walls, drive dowels into them, and secure the structure to the wall with screws. Moreover, a tall cabinet with the same floor area has maximum useful volume.
In design, the transformable workshop resembles an ordinary secretary desk with a folding tabletop. To make it, you will need particleboard (chipboard) 16—20 mm thick (all dimensions on the drawings are for 20 mm thick chipboard), some plywood and hardboard.
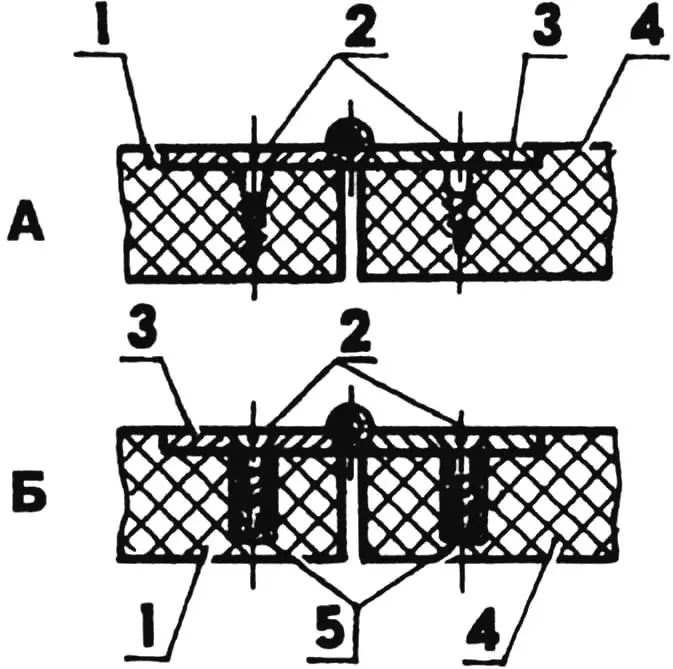
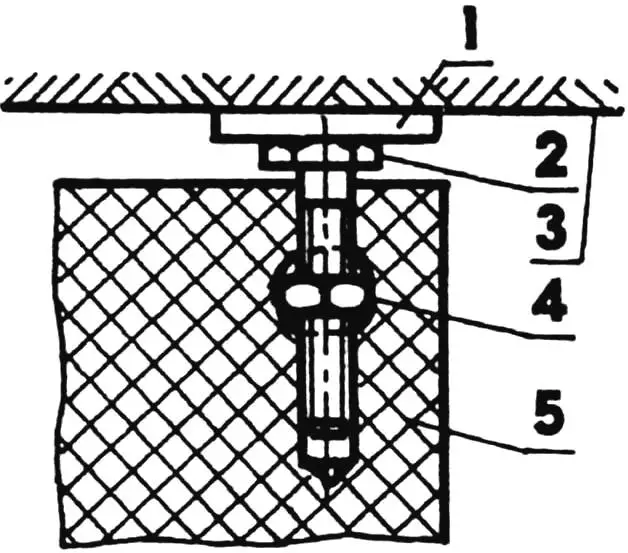
1 — cross member; 2 — screws; 3 — hinge; 4 — door-tabletop; 5 — dowels
The manufacture of the secretary-workshop begins with side panels (their width is about 300 mm, and the length should be 15 mm less than the distance from floor to ceiling), shelves and cross members made of chipboard.
When processing workpieces, the most important thing is to strictly maintain their dimensions and perpendicularity of the sides. Even small deviations from the drawing can cause irreparable distortions when assembling the secretary.
For connecting parts, it is best to use a very strong and technological joint assembly consisting only of an M6 bolt with a spherical head and a nut. In this case, a hole for the nut is drilled in the shelf or cross member, the diameter of which is slightly smaller than its “wrench size”, which allows the nut to be press-fitted into it with some tension. Corresponding holes with a diameter of 6 mm for joint bolts are drilled in the side panels, cross members and shelves. To ensure neat connection of the secretary parts, it is necessary to strictly follow a certain sequence of operations.
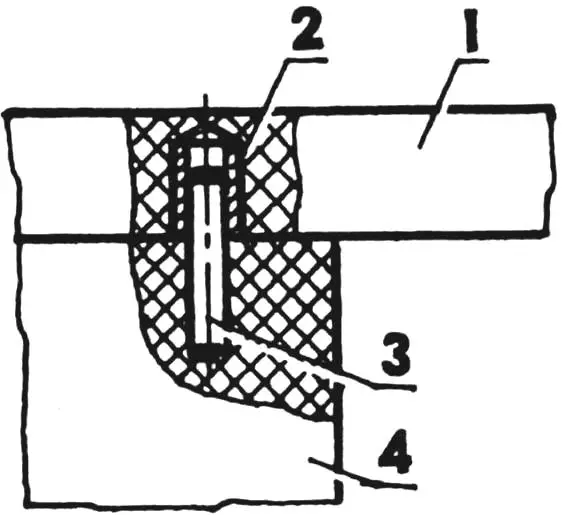
1 — tabletop; 2 — bushing (metal or plastic); 3 — fixing pin (steel); 4 — lower compartment door of the secretary
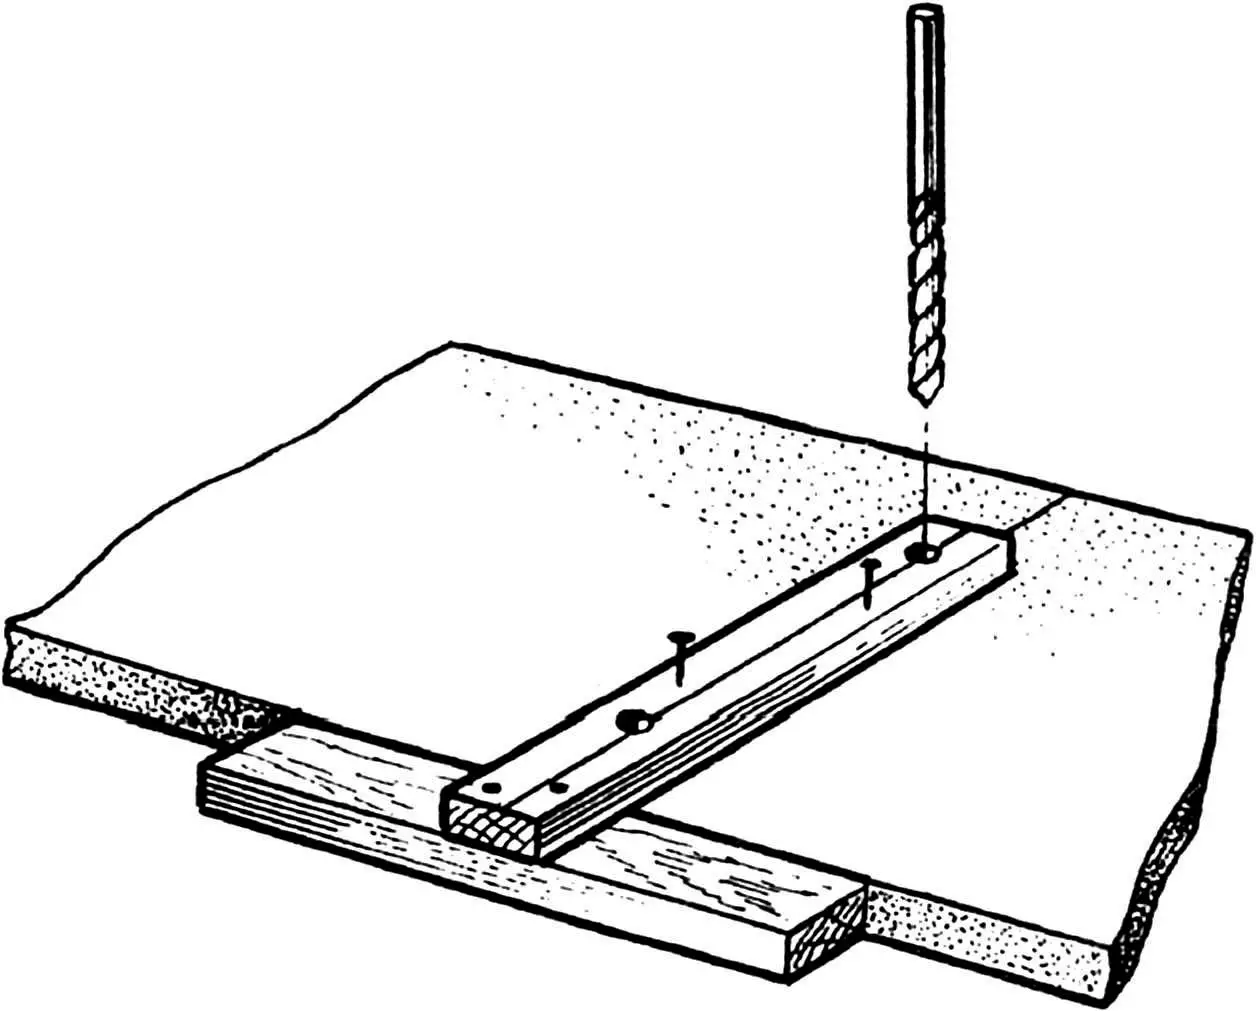
First, one side panel is marked — the axes of all holes for the joint bolts are drawn on it. It is desirable that the distance between the holes be the same: in this case, you can use a simple jig that will allow you to easily align the axes of the corresponding holes on the side panels, shelves and cross members.
Next, both side panels are clamped with clamps and all holes for the joint bolts are drilled through the jig sequentially.
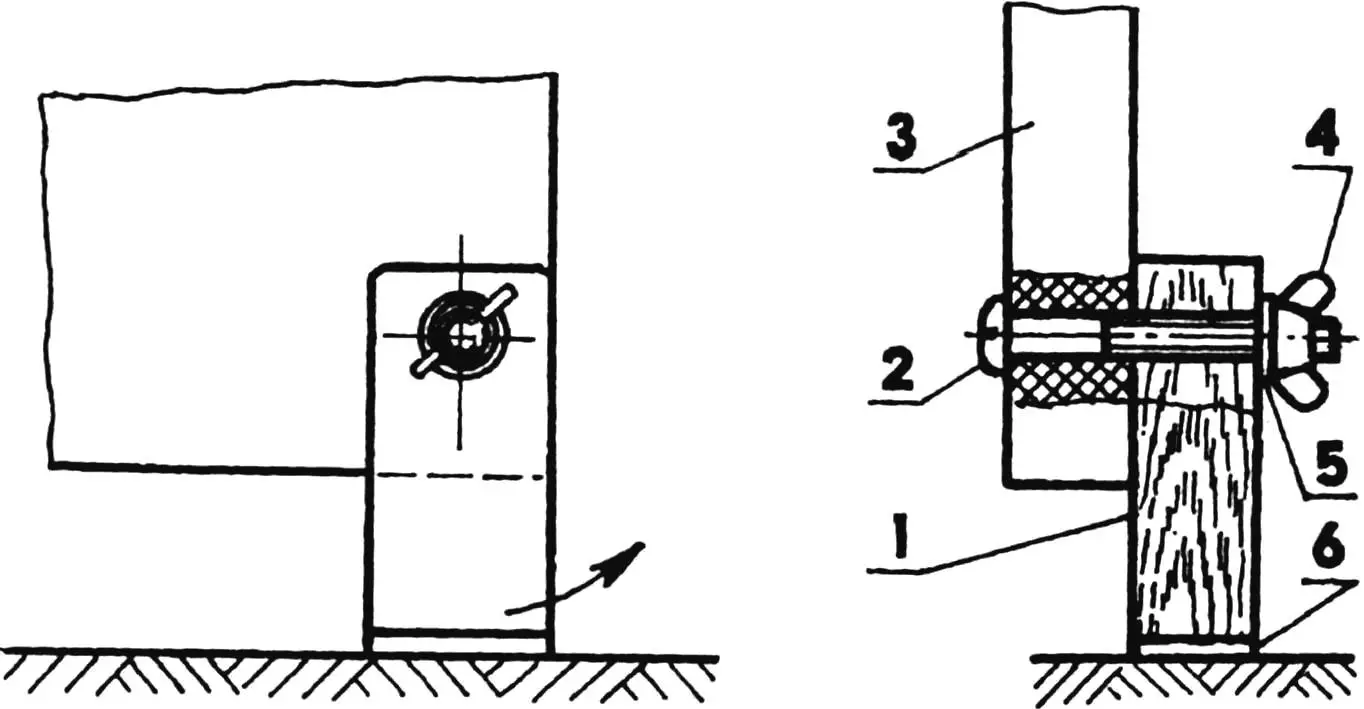
1 — pivoting leg (birch or beech, block 50×30); 2 — M6 bolt; 3 — lower compartment door of the secretary; 4 — wing nut M6; 5 — washer; 6 — gasket (rubber s3)
The jig itself is assembled from two slats in the form of a kind of T-square. A mark is made along the axis of the holes, which, when installing the jig on the panel, is aligned with the mark on the panel. The jig is fixed on the parts with a pair of small nails.
Holes for the M6 nut in cross members and shelves should also be drilled using a jig. The latter is bent from a steel strip with a cross-section of 20×2 mm, after which two holes are made in the resulting angle: in the smaller shelf — with a diameter of 6 mm (a guide screw is fixed in it), and in the larger one — with a diameter 0.5 mm smaller than the “wrench size” of the M6 threaded nuts used. As a rule, such nuts have a “wrench size” of 10 mm, respectively, the hole diameter for the nut is 9.5 mm.
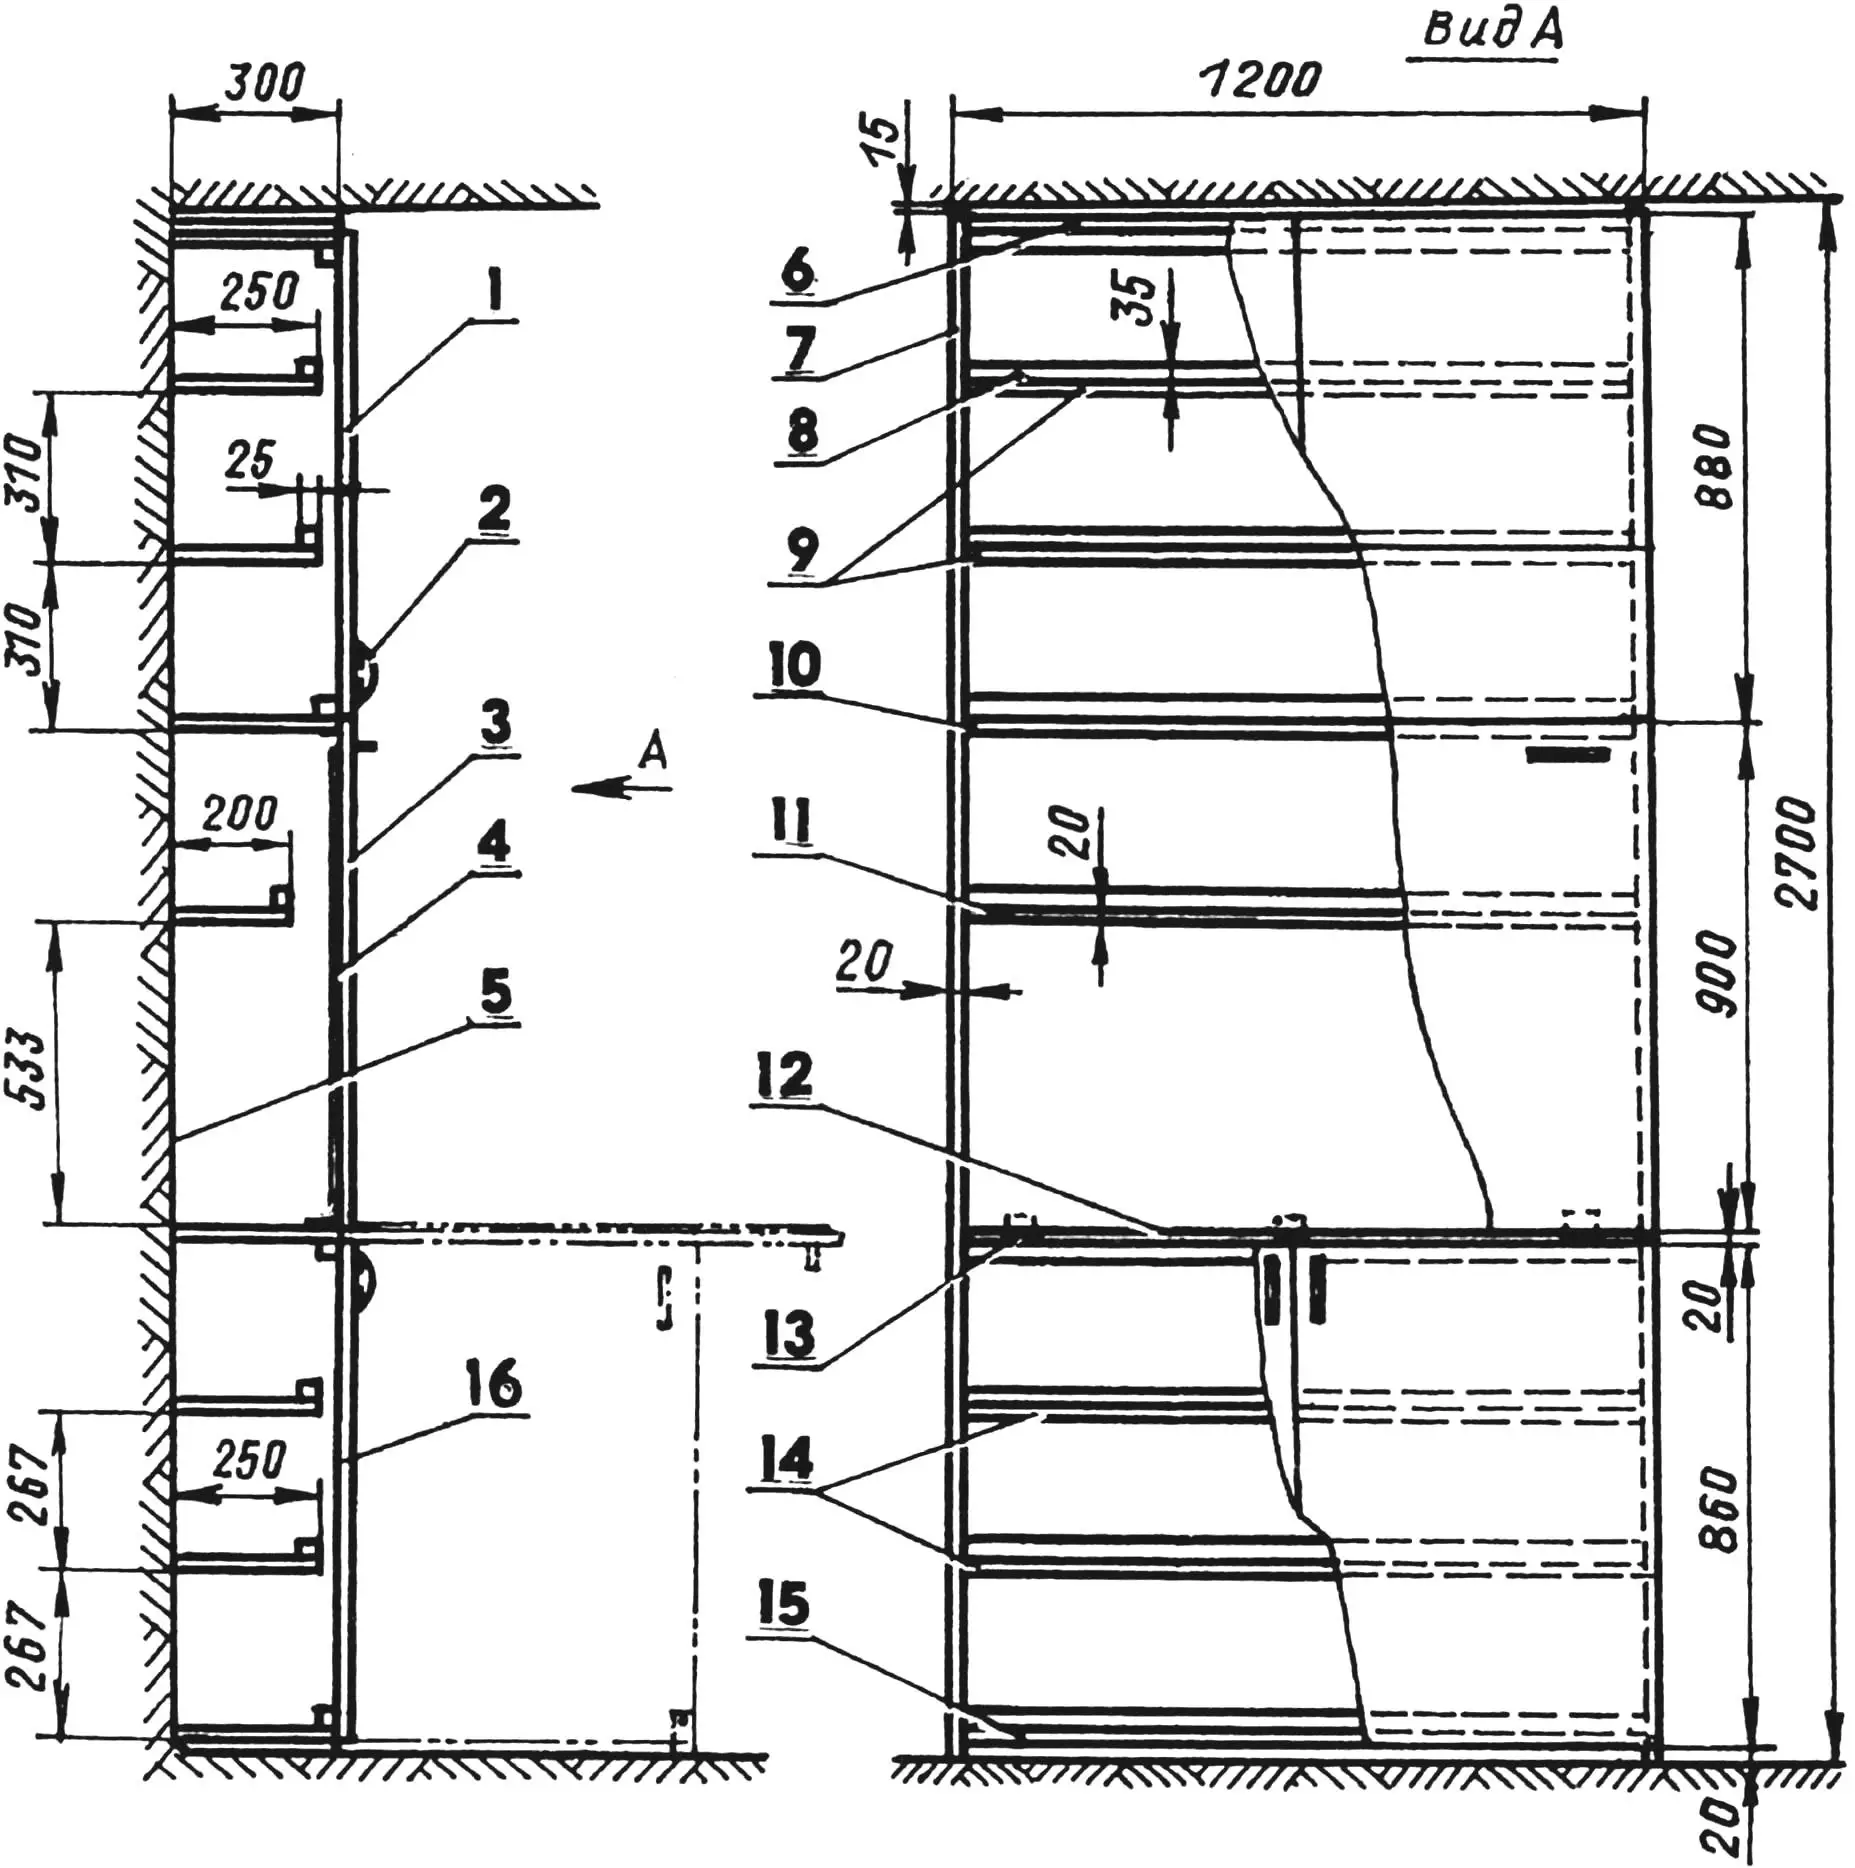
1 — upper compartment door (chipboard s20, 880×600, 2 pcs); 2 — handle (6 pcs.); 3 — door-tabletop (chipboard s20, 1200×900); 4 — overlay (plywood s6, 1150×850); 5 — back wall (hardboard s5, 2660×1190); 6 — upper cross member (chipboard s20, 1160×300); 7 — side panel (chipboard s20, 2685×300); 8 — reinforcing edge (wooden slat 35×25); 9 — upper compartment shelves of the secretary (chipboard s20, 1160×250); 10,12 — middle cross members (chipboard s20, 1160х300); 11 — middle compartment shelf of the secretary (chipboard s20, 1160×200); 13 — cross member reinforcement (wooden slat 35×25); 14 — lower compartment shelves of the secretary (chipboard s20, 1160×250); 15 — lower cross member (chipboard s20, 1160×300); 16 — lower compartment door (chipboard s20, 860×600, 2 pcs.)
The assembly of the secretary is essentially connecting the side panels with shelves and cross members with M6 bolts. Nuts are pre-press-fitted into the latter and centered relative to 6 mm diameter holes in the ends of shelves and cross members using a rod with a pointed end. After assembly is completed, the “geometry” of the structure is carefully checked with a tape measure; for this, the secretary is laid face down on the floor and its diagonals are measured. If their values are equal, then a 5 mm thick hardboard sheet is attached to the back of the cabinet (to the side panels, shelves and cross members) with small screws and glue (casein, PVA or “liquid nails”).
The width of the secretary-workshop is quite large — 1.2 m, so chipboard shelves may sag over time. To prevent this, it makes sense to reinforce them with wooden slats with a cross-section of 35×25 mm. These slats will also prevent tools and materials from falling off the shelves.
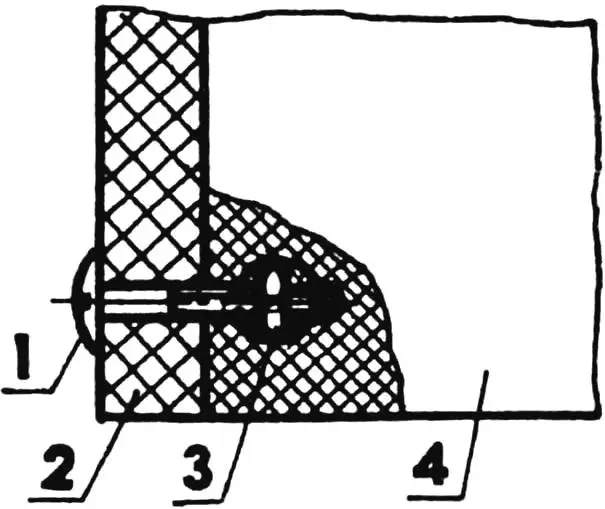
1 — gasket (rubber s3); 2 — M8 or M10 bolt; 3 — ceiling; 4 — nut; 5 — side panel
The next stage is hanging the doors and tabletop. The former are installed using standard furniture hinges that provide door fixation in both open and closed positions. The tabletop is connected to the cross member with reinforced hinges, since these hinge assemblies will have to withstand increased loads. It is best to use three or four casement hinges with card dimensions of 60×40 mm. They can, of course, be attached to the tabletop and cross member with ordinary screws, but it is better to purchase 5 mm diameter plastic dowels, press them into holes drilled in the parts, and then drive screws into the dowels. The fact is that screws do not hold well in chipboard and fly out of their sockets at the slightest axial loads.
1 — M6 bolt; 2 — side panel; 3 — M6 nut; 4 — shelf or cross member
As can be seen from the drawings, the lower compartment doors of the secretary-workshop serve as supports for the tabletop when it is in a horizontal position. So that the load from it and the heavy tool placed on it is not taken by flimsy furniture hinges, but is transferred to the floor, the doors are equipped with pivoting legs made of wooden blocks, which are fixed in both working and stowed positions with a bolt with a spherical head and a wing nut. And so that the open doors do not accidentally slam shut, metal fixing pins with a diameter of 6 mm are attached to them, and holes are drilled in the tabletop, which are reinforced with metal or plastic bushings with an internal diameter of 6.5 mm.
It remains to equip the secretary with four screw jacks — and the assembly work will be completed. As can be seen from the drawing, the jack is arranged almost the same as the joint assembly connecting the shelves-cross members with the side panels. The difference is only in the diameter of the bolt and nut — for jacks, fasteners with M8 or M10 thread will be needed. When installing the secretary, sheet rubber 2—3 mm thick is placed under the bolt heads.
If the particleboard was not faced with plastic, then the easiest way to finish it is with self-adhesive film, matching its texture to the surrounding furniture. The panel ends are pre-filled with putty, sanded and painted with enamel of a suitable color.
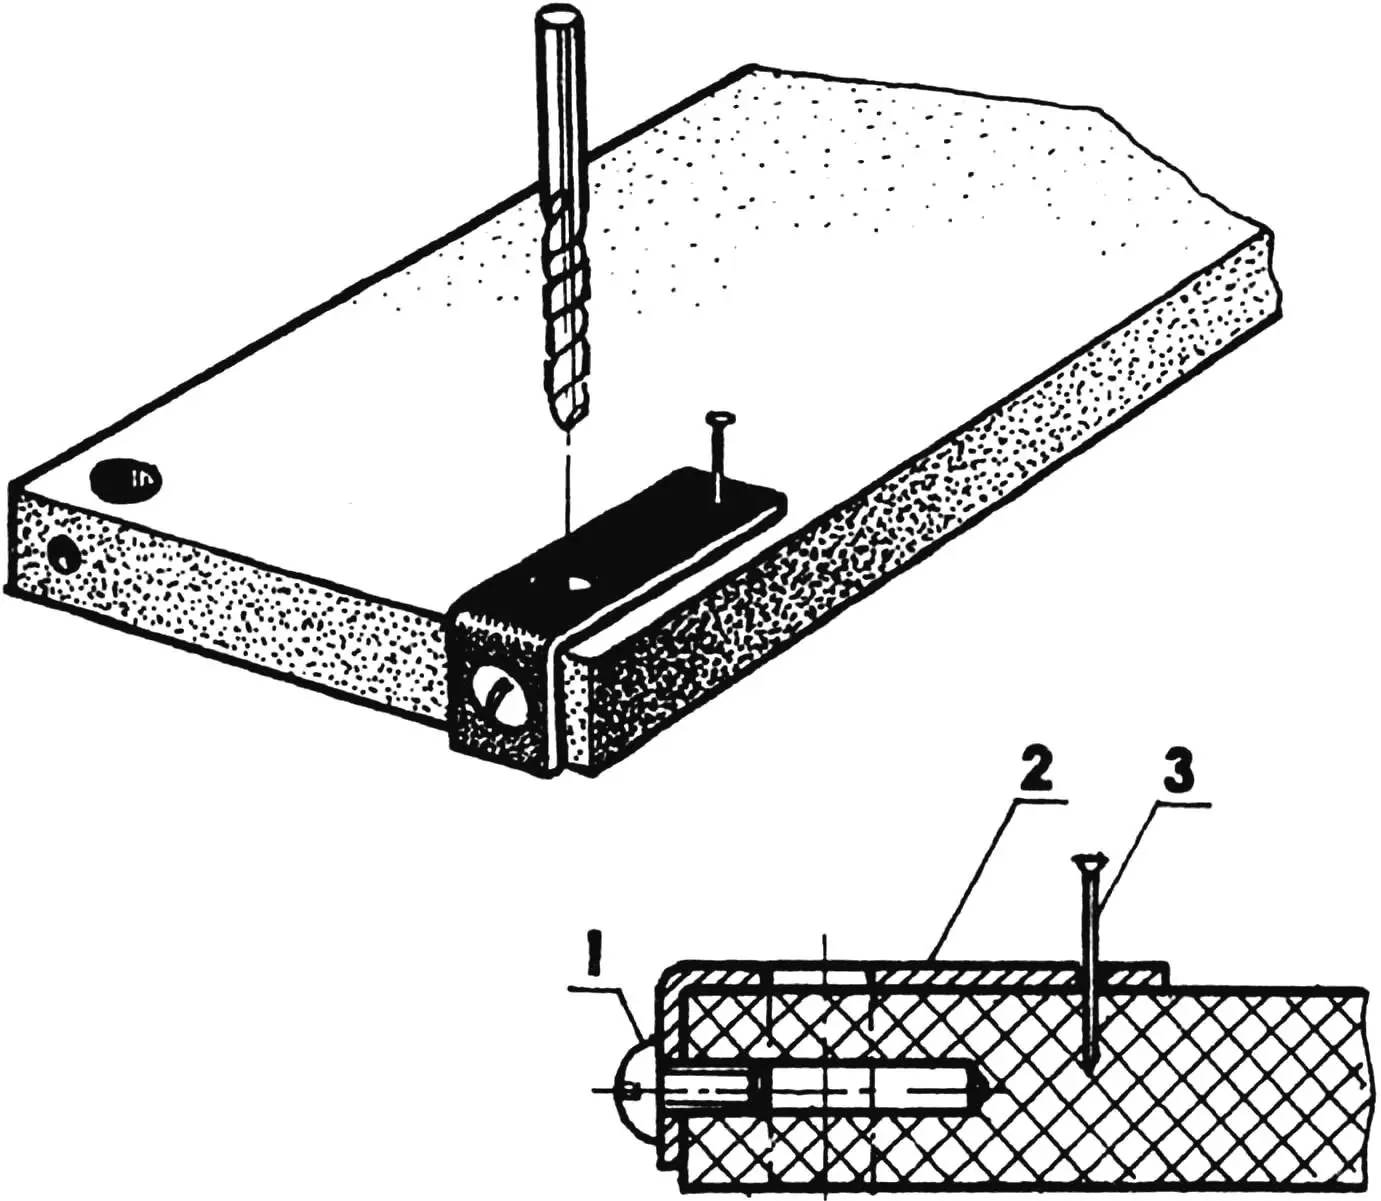
1 — guide screw; 2 — jig (steel, strip 20×2); 3 — fixing nail
A 6 mm thick plywood sheet is attached to the tabletop: practice shows that the workbench surface in the workshop deteriorates quite quickly, and the plywood overlay can always be replaced if necessary.
A desk lamp or fluorescent light fixture and a multi-outlet electrical socket are installed in the middle compartment of the secretary.
I. YEVSTRATOV
Recommend to read
 TRAINING GLIDER MODEL
Serious modeling starts with a small design. Noteworthy experience in the construction of the simplest models of gliders have gained members in the House of pioneers and school students... “HUT” OF YOUR GARDEN
Mini-house, which we'll tell you now, perfectly fits on any garden plot. If necessary, this can be a key or a temporary shelter for you and your family (if you build another big house)....
