You know what’s most annoying about a burnt-out light bulb? It stops shining — and immediately goes in the trash, even though its shape is already perfect. Round, neat, almost like a mini vase, only empty for now. I once caught myself thinking: why throw away something that literally begs to become décor? That’s how this simple idea was born — to turn an ordinary light bulb into a stylish vase for a single flower.
This isn’t about complex master classes with a dozen tools. Here everything is down-to-earth: a couple of minutes, a little patience, and a bit of care. In the end you’ll get a miniature vase that looks great on a windowsill, desk, or in a gift arrangement. One flower — and instant coziness, without extra fuss.
Why make a vase from a light bulb at all
In short — it’s eco-friendly, cheap, and beautiful. You’re not buying something new; you’re giving a second life to what you already have at home. Plus, such a vase looks unusual: clear glass, a familiar shape, but a new role. It’s like dressing up an old thing and suddenly realizing it became fashionable.
For SEO and for practical purposes: this DIY project from a light bulb suits those who love handicrafts, minimalism, and small decorative accents. One tulip, a sprig of lavender, a mini rose — and the arrangement is ready.
What you’ll need: materials and tools
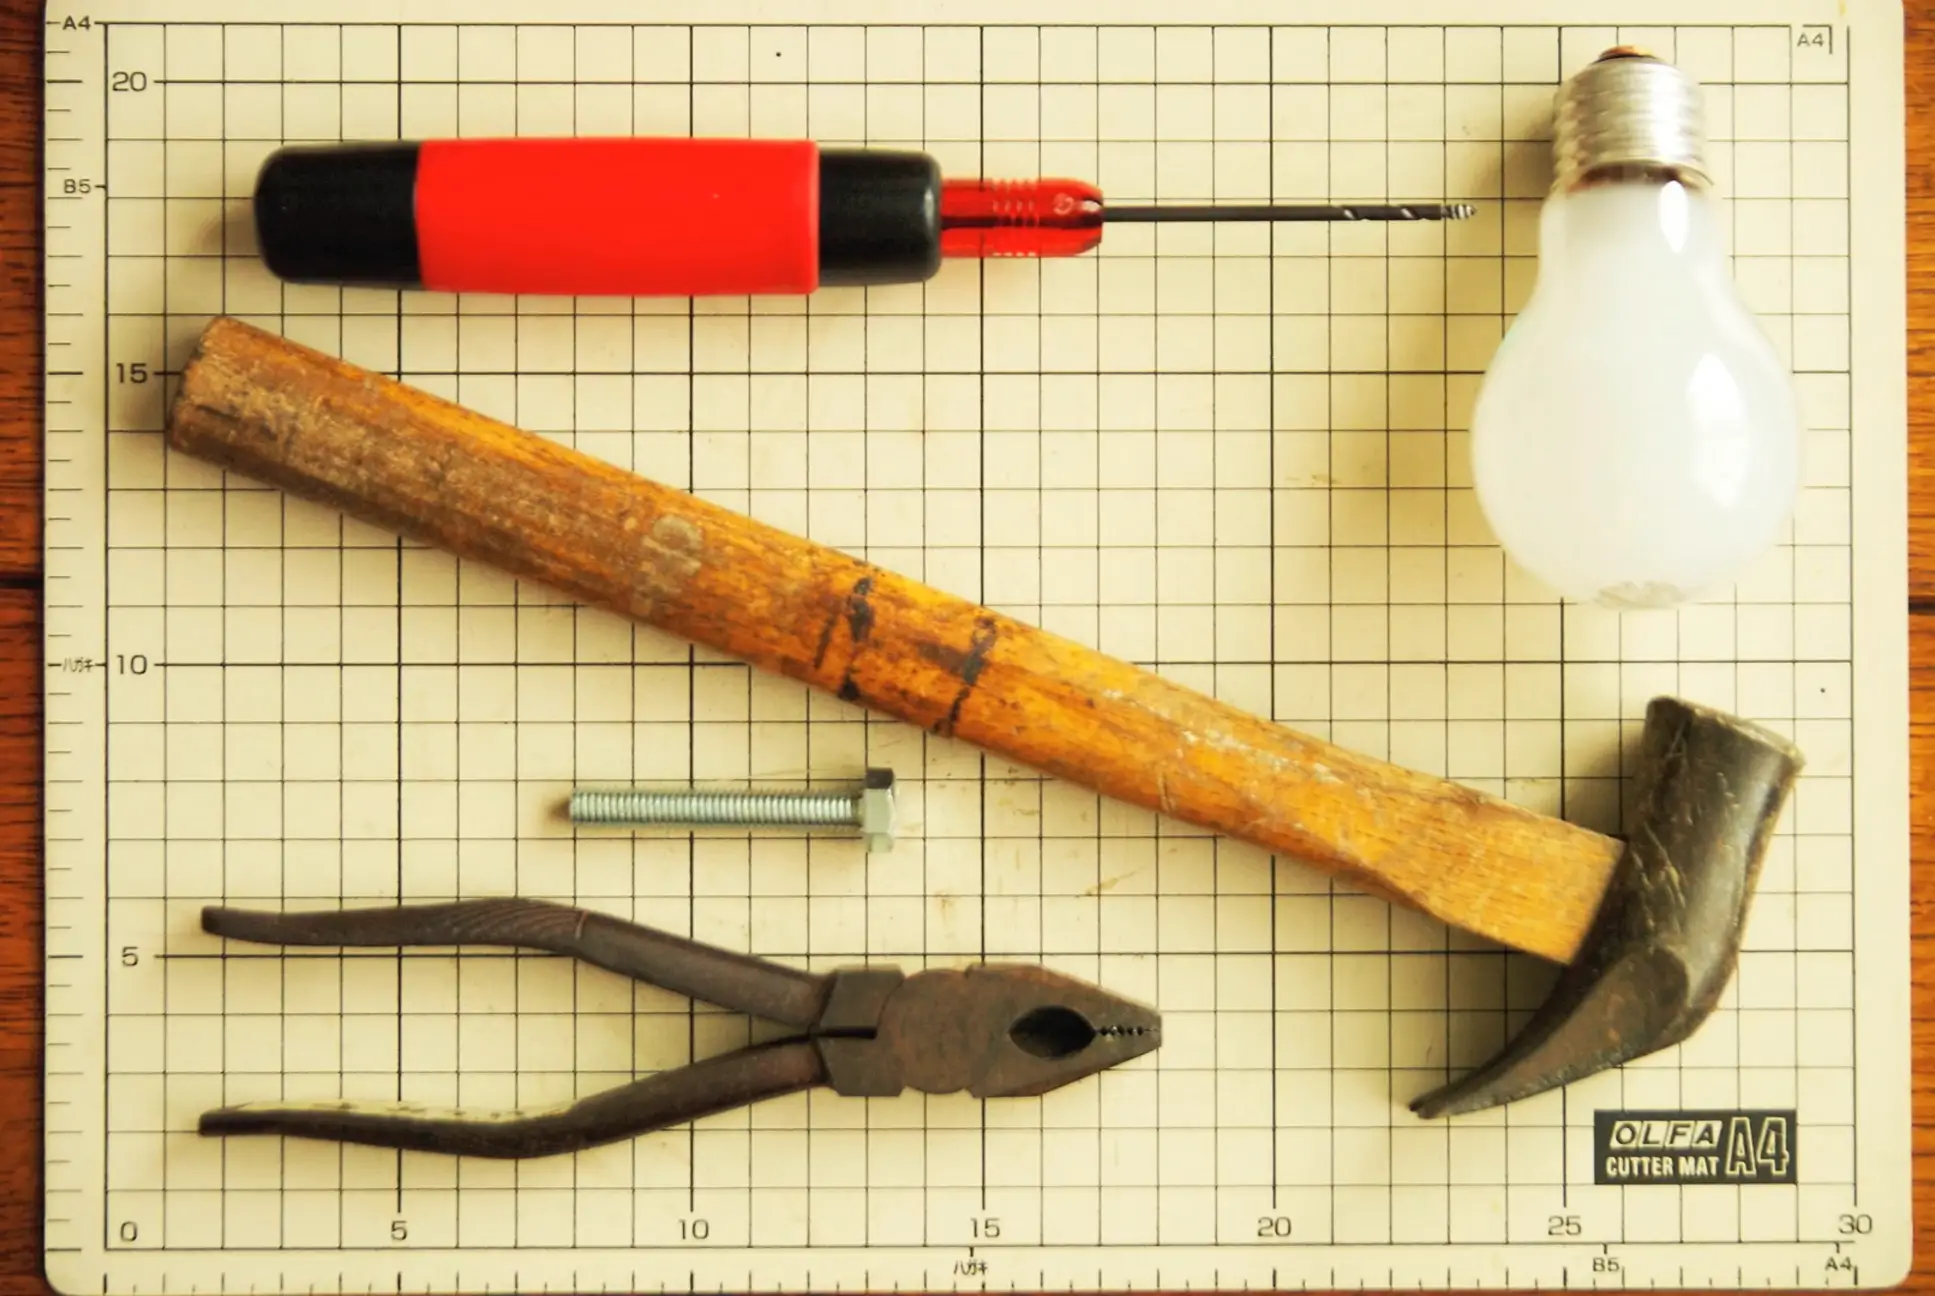
Before you start, gather everything in one place. When tools are at hand, the process goes more calmly — without running around the apartment looking for pliers.
- Burnt-out light bulb — preferably a regular clear one, not an energy-saving model with a complex “white” housing.
- Pliers — to remove the metal part at the top.
- Awl or sharp punch — for carefully removing the glass “tip.”
- Hammer — useful for a controlled tap if the glass doesn’t yield right away.
- Bolt — convenient to use as a stop or for fixing while working.
- Cloth — to wipe off internal residue and powder remains.
- Gloves and safety glasses — not a formality, but real protection for hands and eyes.
By the way, if you’re doing this for the first time, choose a bulb you won’t mind ruining. The first attempt is always practice, like the first pancake — only glass.
Step-by-step instructions: how to make a vase from a light bulb
Step 1. Prepare your workspace
Lay everything out on a table, cover it with thick fabric or cardboard. Glass loves surprises; you love predictability. Good lighting matters too: it’s easier to see exactly where the material cracks and where shards fly.
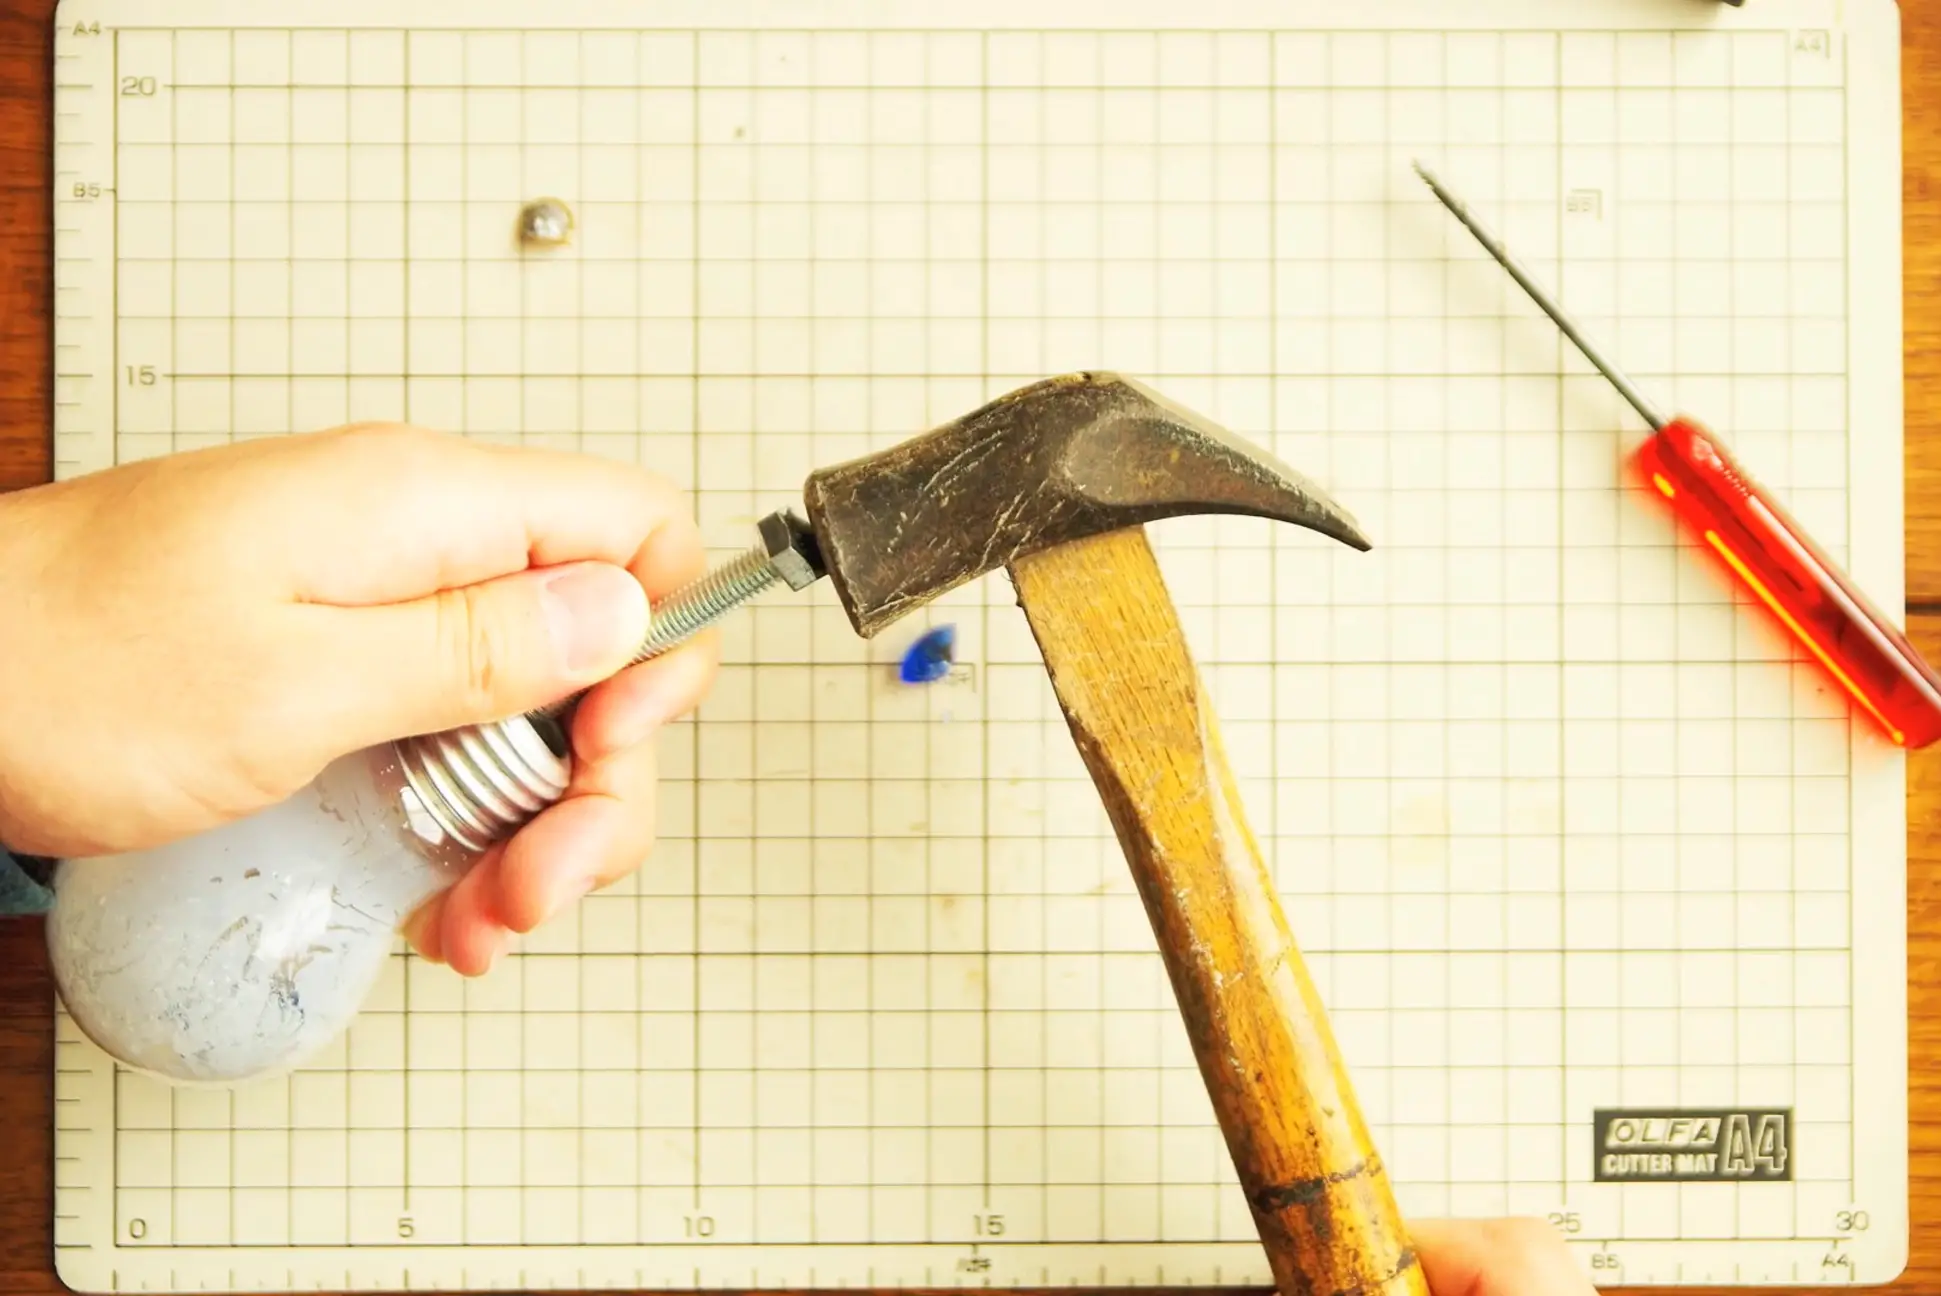
Step 2. Remove the metal base
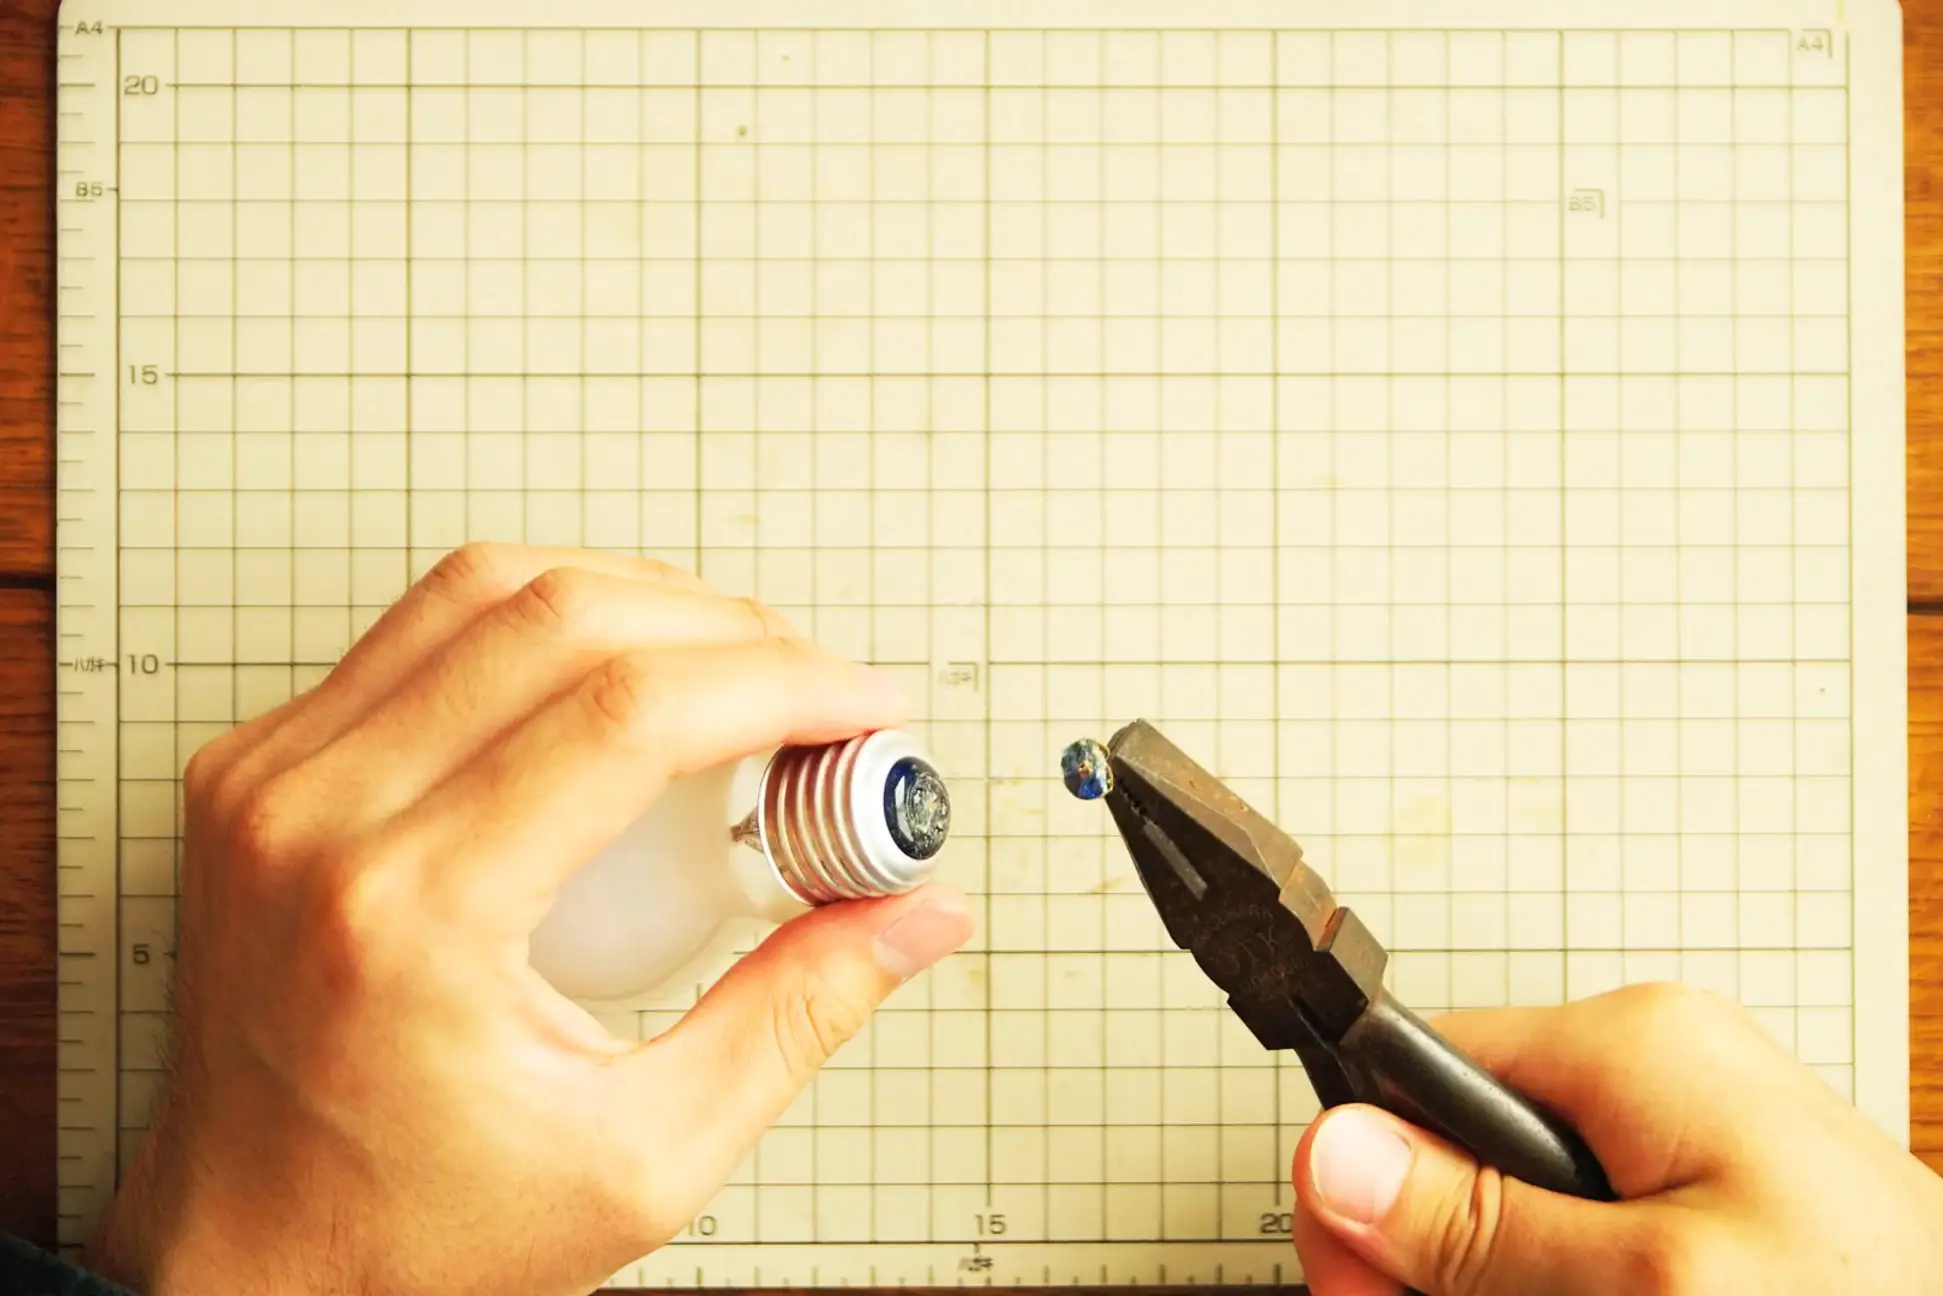
Take pliers and carefully remove the metal parts at the top of the bulb. Don’t pull sharply, as if opening a vacuum-sealed jar — better little by little, with control. The metal usually yields if you fix the bulb in place and work from different sides.
Step 3. Carefully remove the glass “tip”
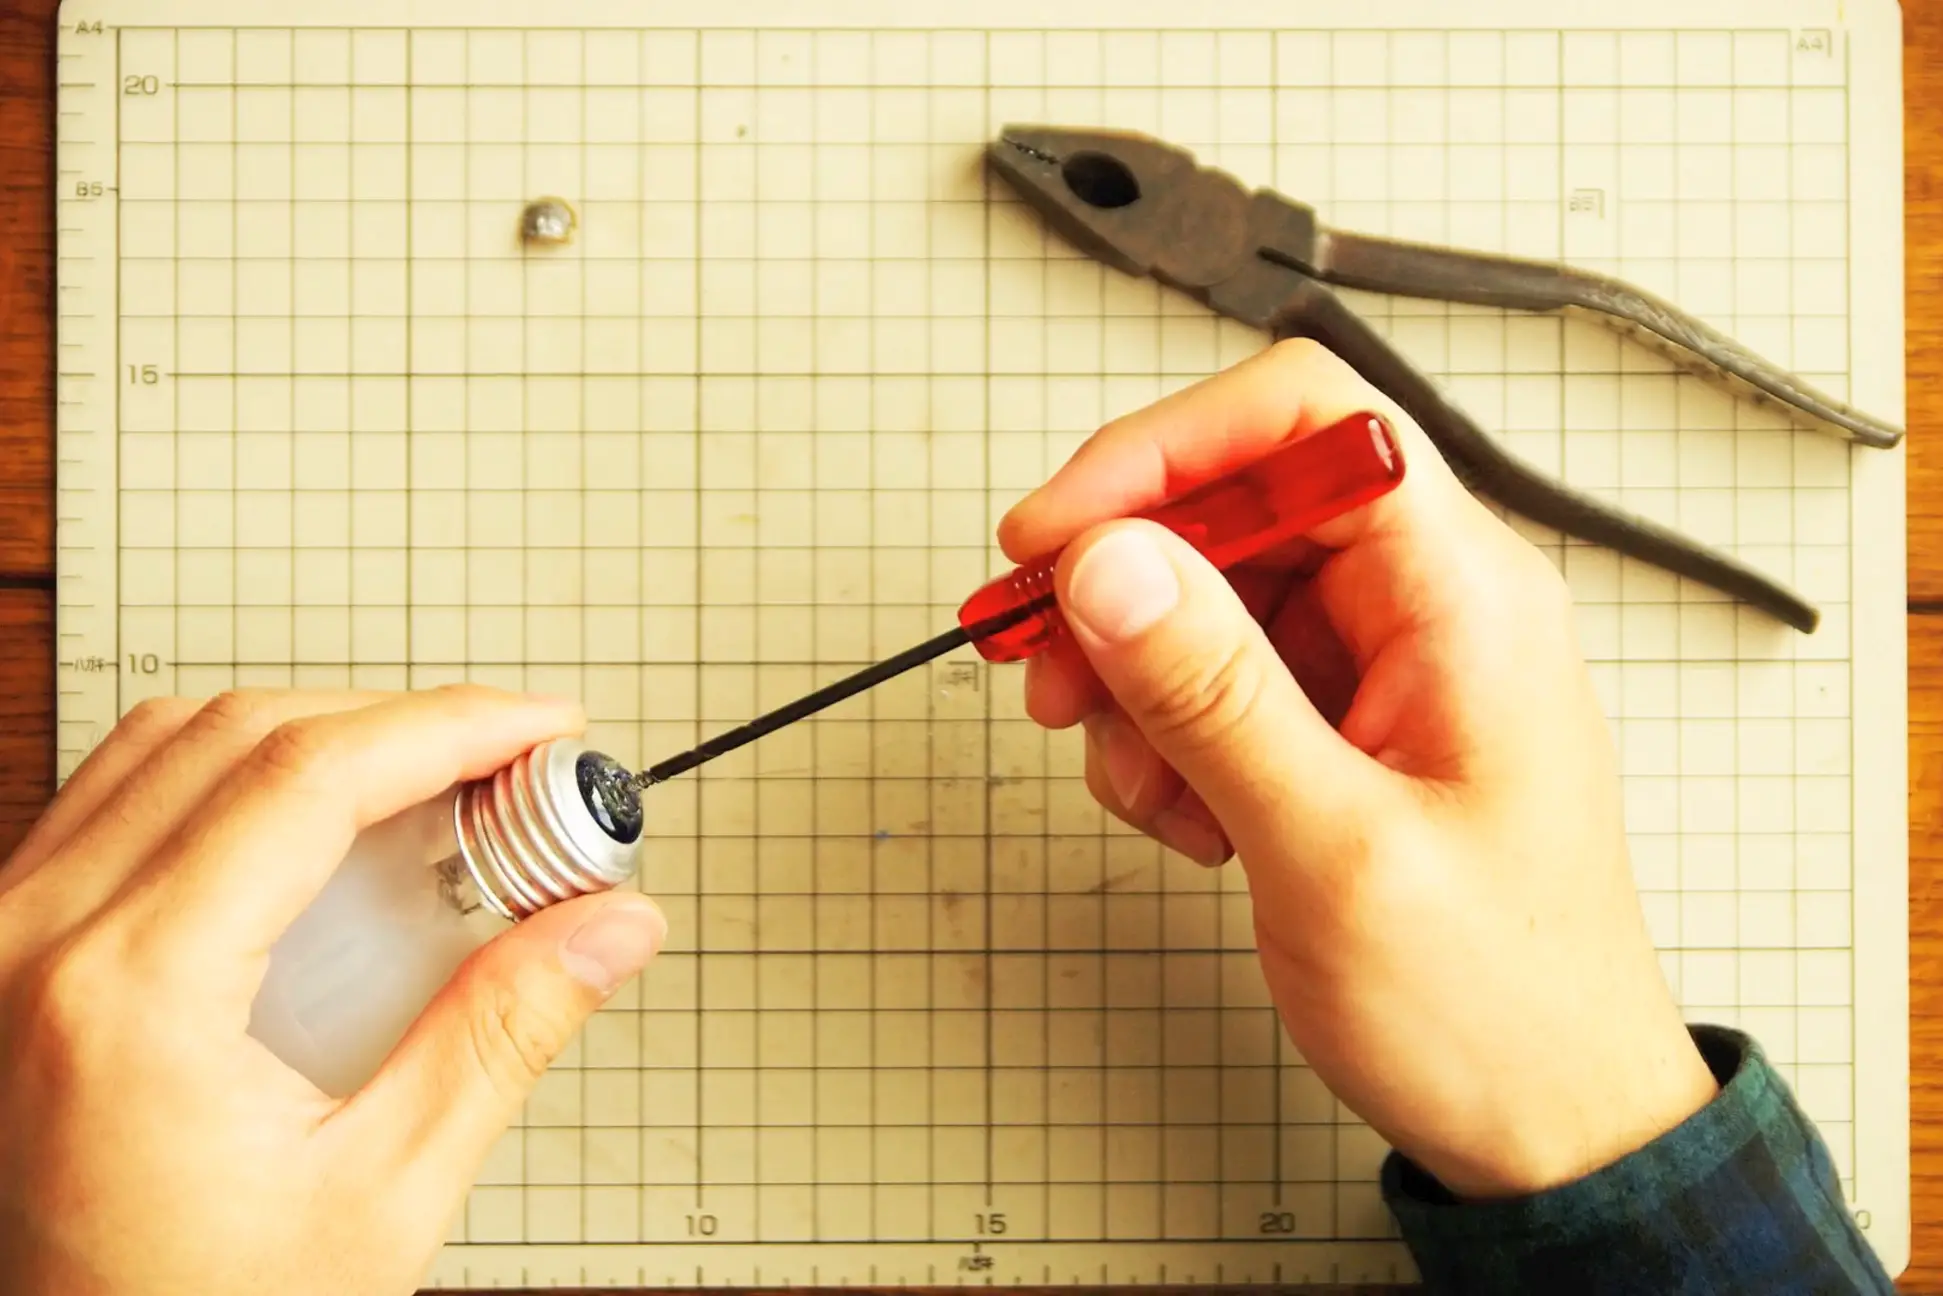
Now the most delicate moment. With an awl or punch, you need to remove the glass part at the end of the bulb — the one air passed through. Do this slowly, with short, precise movements.
And here I must say straight: protect your fingers. Glass shards are sharp as mini blades. If you feel you’re not in control — stop, put on gloves, and continue. Better to spend an extra minute on safety than treat a cut later.
Step 4. Remove the internal stem (filament)
When the top “tip” is removed, a stem and small parts remain inside. Make an opening and carefully pull out the filament. Imagine you’re disassembling a tiny mechanism: don’t rush, don’t press too hard — the glass body is still intact, and that’s what matters.
Step 5. Wipe the bulb from the inside
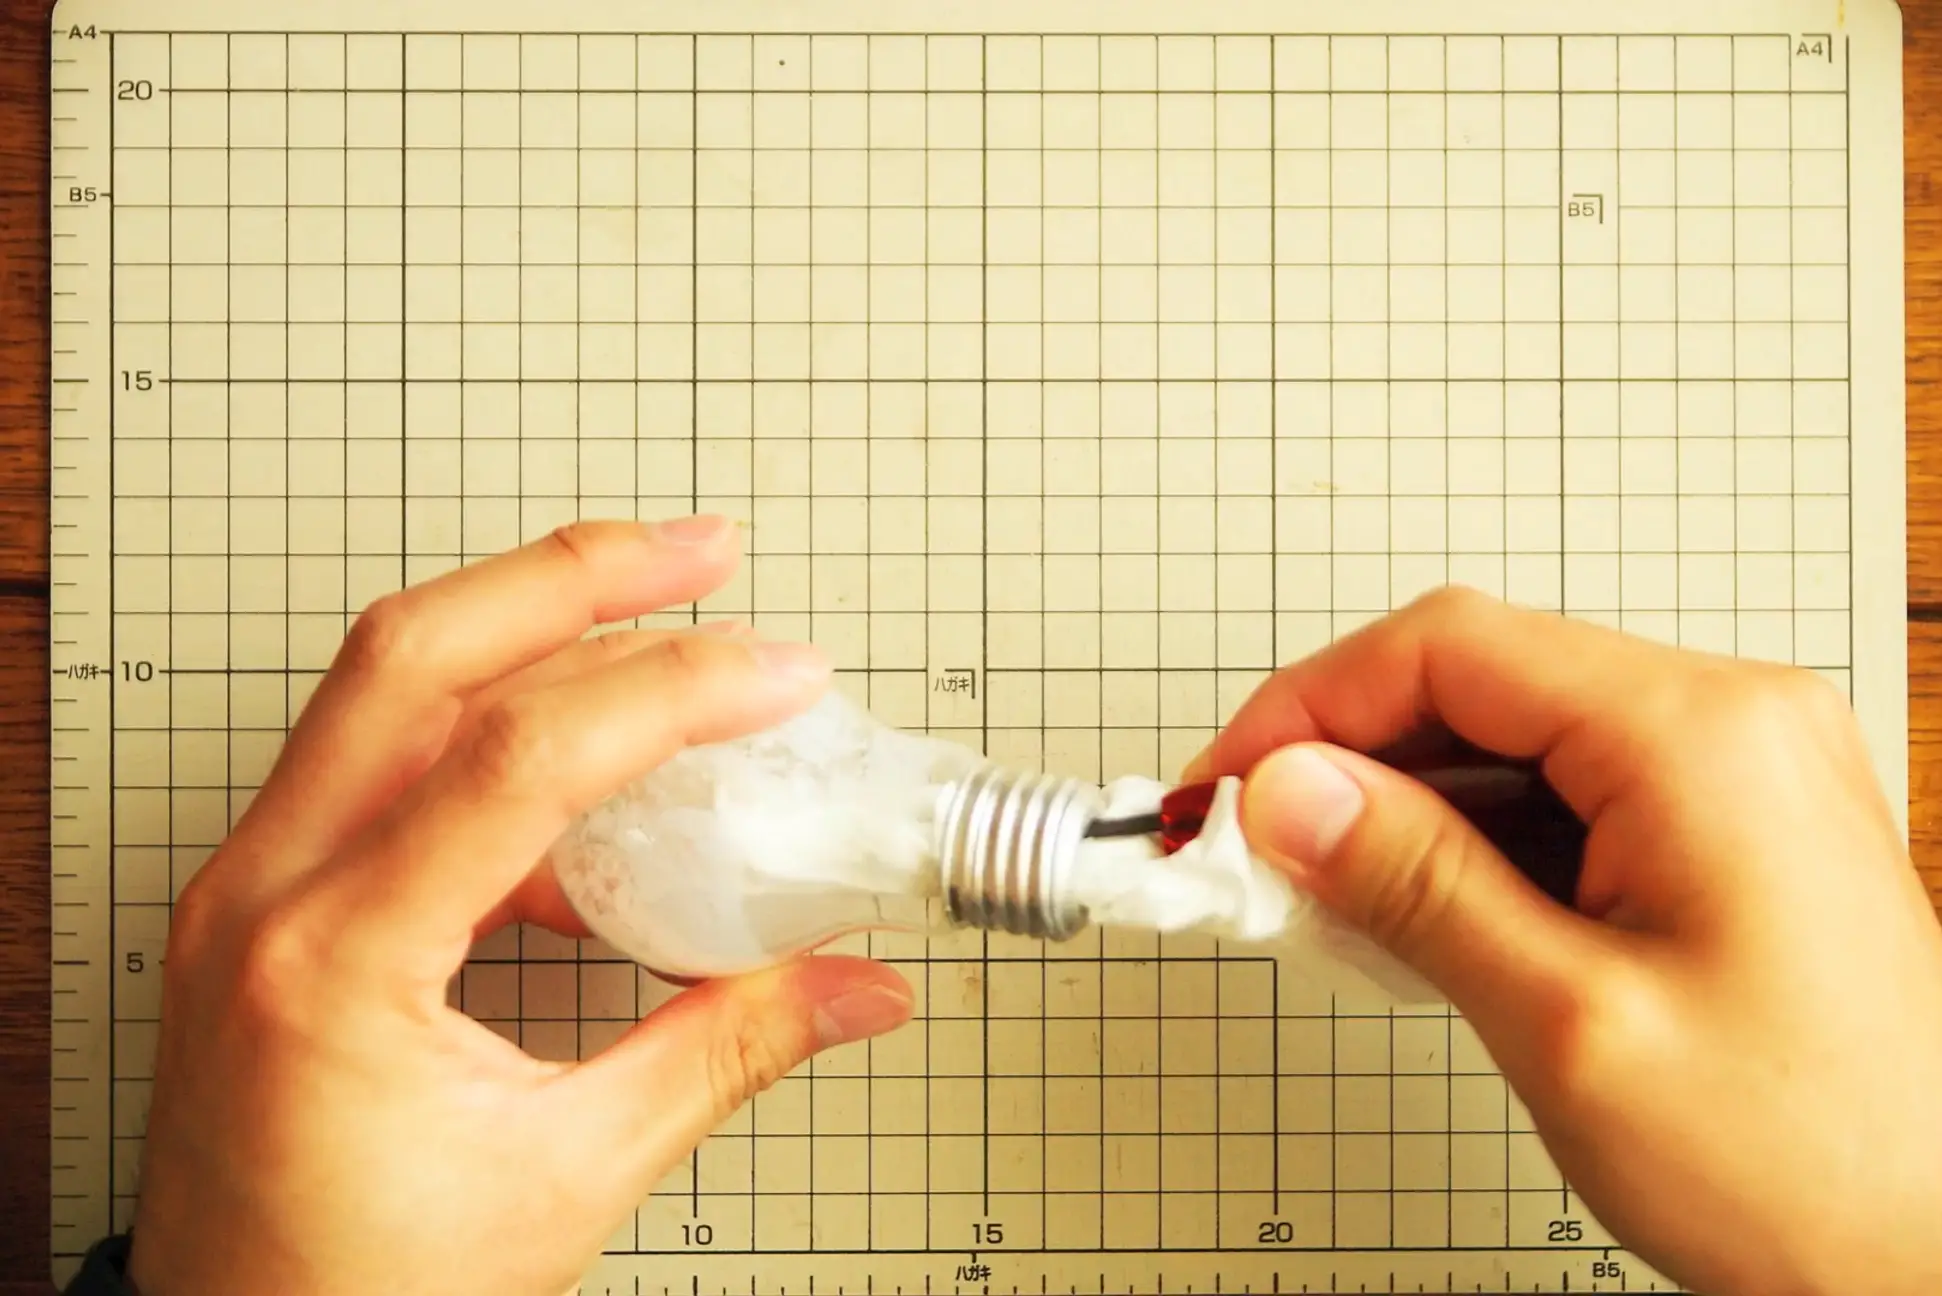
White silicate powder often remains inside — that’s normal, many bulbs are built that way. Take a cloth and thoroughly wipe the interior. If the residue is dense, you can slightly dampen the fabric with water and wipe again. Your goal is a clear, clean “bulb” where it’s pleasant to look at a flower.
Step 6. Check transparency and shape

Hold the bulb up to the light. If the glass is clean, without cloudy spots and extra shards — congratulations, the base is ready. Now it’s no longer a light bulb, but a mini vase with character.
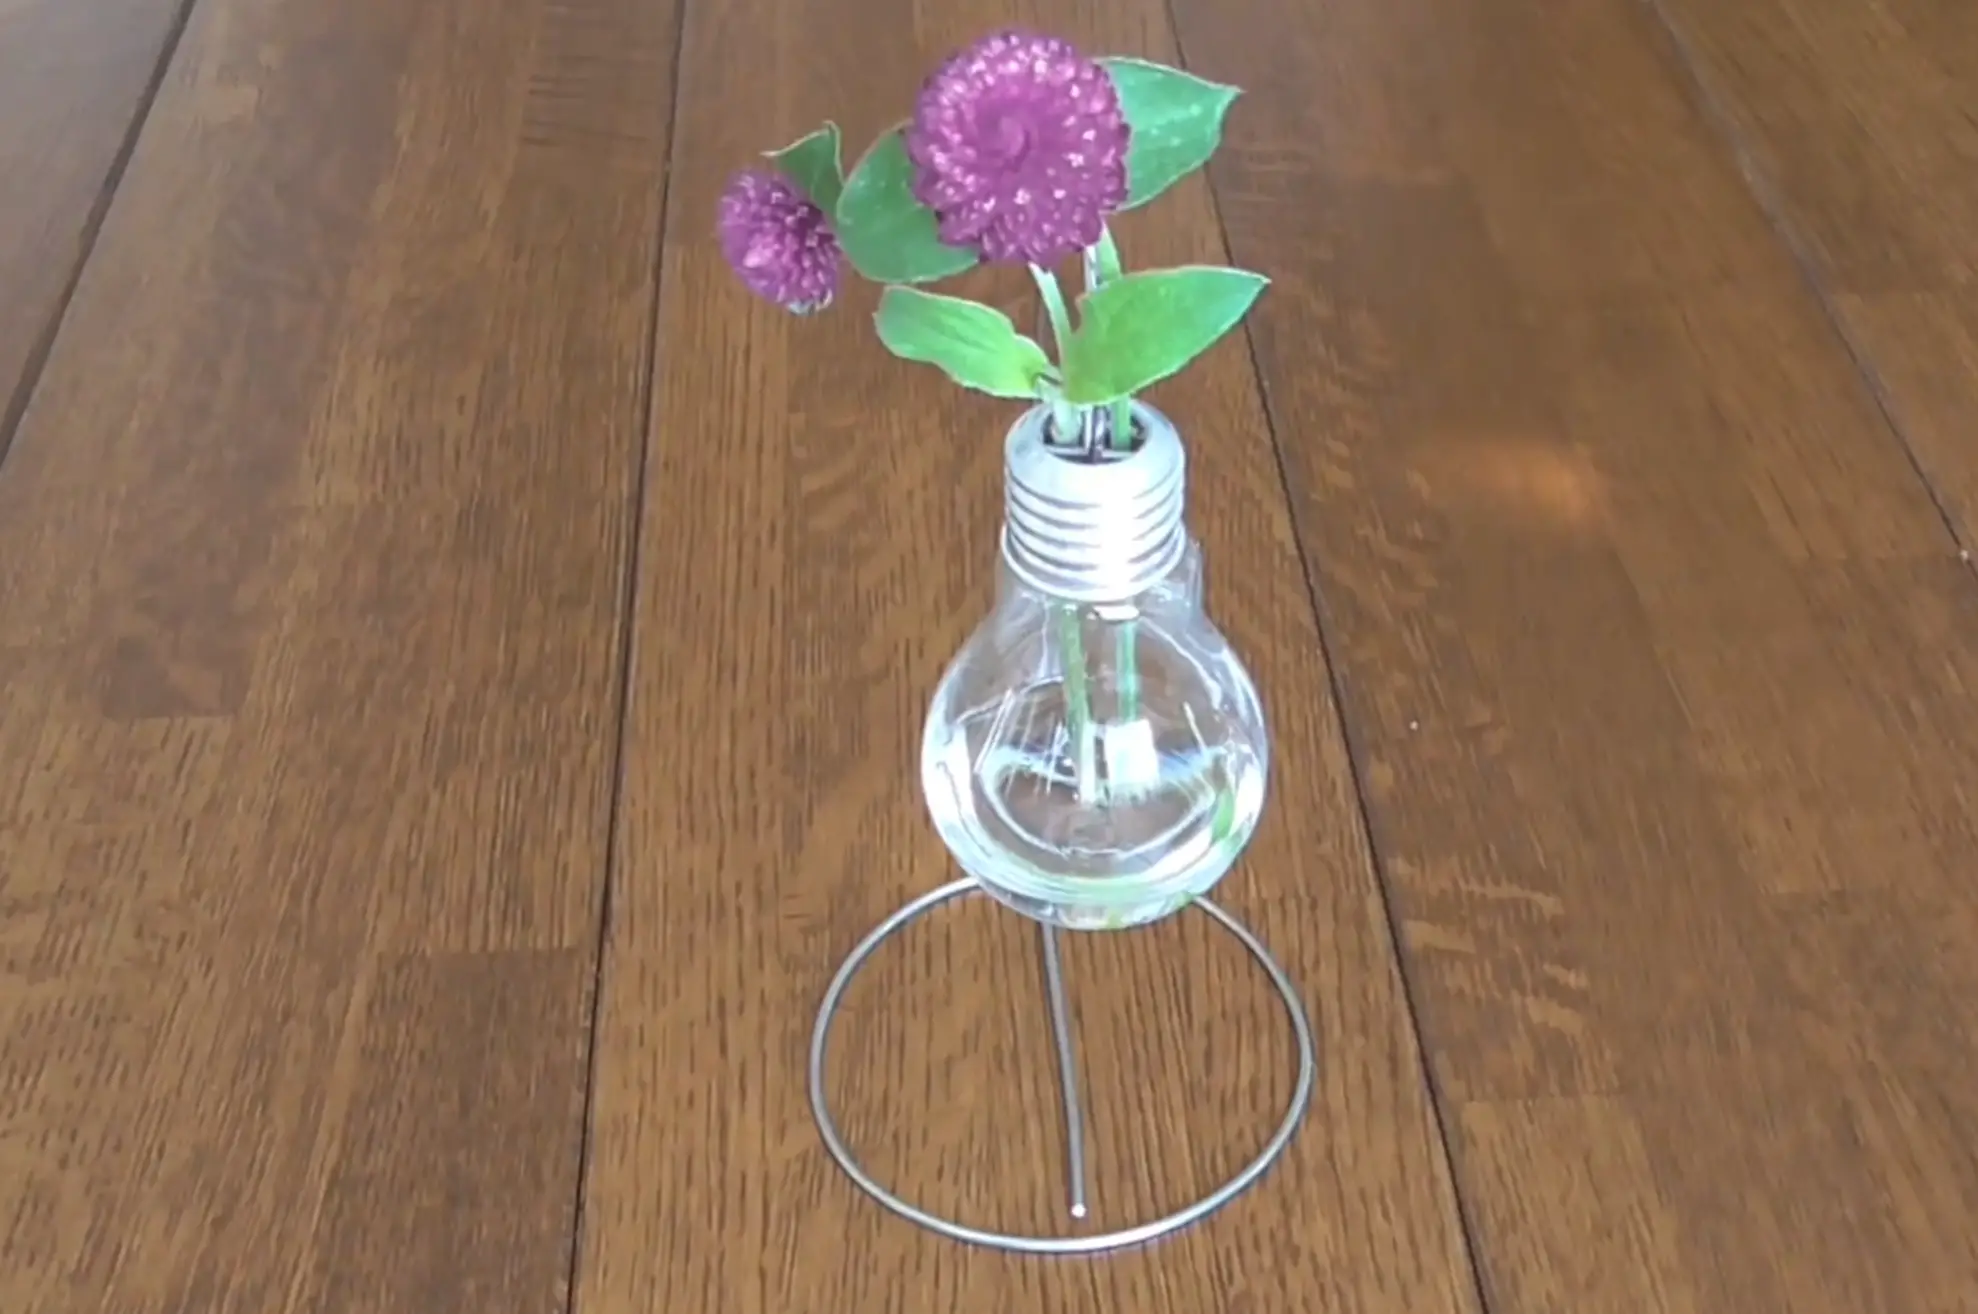
Step 7. Done — you can place a flower
Pour in a little water, place one flower, and see how the whole table changes. Sometimes one sprig is enough to make the space feel alive. Seriously, this is one of the simplest ways to add coziness without buying new décor.
Safety: what to remember when working with glass
Any light-bulb craft involves sharp shards, so I always repeat the basic rules:
- work in gloves;
- use glasses or at least turn away when chipping glass;
- don’t do the project on a bare floor — shards are hard to collect later;
- clean up debris immediately, don’t put it off “for later”;
- don’t let children perform glass steps without adult supervision.
Glass doesn’t forgive haste. But if you act calmly, the risk is minimal — like ordinary kitchen work with fragile dishes.
Styling ideas: how to use such a vase
One bulb vase is already interesting; several make a whole mini collection. Here are a few easy ideas to repeat:
- One bright flower — tulip, chrysanthemum, gerbera; minimalism works best.
- Dried flowers — lavender, field grasses, branches without water; the vase lasts for months.
- Tabletop arrangement — 2–3 bulbs of different shapes on a wooden stand.
- Handmade gift — tie with twine and add a card.
- Seasonal décor — delicate branches in spring, a bright single bud in summer, dry elements in winter.
If you want to enhance the effect, place the vase on a small mirror or a wooden ring stand. The bulb will seem to “float,” and the arrangement looks more expensive than it actually cost — that is, zero, if the bulb was already at home.
Common mistakes and how to avoid them
Even a simple DIY project sometimes fails on small details. I’ve collected typical missteps so you don’t repeat them:
- Movements too sharp — the bulb cracks along the body. Solution: work gently and step by step.
- Didn’t remove the entire glass “tip” — the flower won’t fit, water won’t pour in. Solution: carefully widen the opening, check with a gloved finger.
- Didn’t wipe internal powder — the vase looks cloudy. Solution: wipe 2–3 times with dry and slightly damp fabric.
- Too much water — for one flower a small level is enough, otherwise the arrangement looks heavy.
If the first bulb didn’t work out — that’s not failure, it’s a test drive. The second usually turns out noticeably better.
Can you use any light bulb
Classic clear incandescent bulbs work best. Energy-saving and LED models are trickier: different construction, sometimes plastic and non-standard housing. If in doubt, take a regular round bulb — the process is clearer and the result cleaner.
Frequently asked questions
How long does the whole process take?
Usually 10–20 minutes if tools are already at hand. The first time may take a bit longer — you’re getting used to the material.
Do you need to drill a hole at the bottom?
No, for one live flower an open top is enough. For dried flowers, water isn’t needed at all.
How do you wash such a vase?
Carefully, with warm water, without aggressive brushes. A soft cloth is better so you don’t scratch the glass.
Can you paint the bulb?
You can, but then you lose the main advantage — transparency. If you want décor, try decorative tape, twine, or a stand, and keep the glass clean.
Conclusion: a small vase with big meaning
From a burnt-out light bulb you’re making not just a craft, but a small gesture toward conscious consumption. One flower, clear glass, a little handwork — and an item with history appears on the table. It already lit your home, and now it holds living beauty.
If you were looking for a simple way to make a single-flower vase with your own hands, this option is one of the most accessible. Try it tonight: one bulb, one flower — and you already have mini décor you’ll want to show friends.
«Modelist-Konstruktor» No. 6’2026, V. SAVCHUK, Dnipro
Recommend to read
 “SLALOM” SLALOM
Someone had to ride on a sled, knows that the particular manoeuvrability from them should not wait: in the best case they can be deployed on a steep slope, but changing the direction... SELECT THE KRUPORUSHKA
Have in the farm or on a personal farmstead of a good high-performance kruporushka not a fad, but rather a vital necessity. Especially when you consider the high cost of ready to...
