For individual use it is necessary to design the tillers — one – or two-wheeled with engines from the “Vyatka”, “Tula 200” motorcycle or the same power with forced air cooling, for example, taken from the sidecar С3А.
Fig. 1. The layout of components and Assembly MT-5:
1 — muffler, 2 — engine, 3 — gear hub, 4 — gearbox, 5—gimbal bearing b— rear axle, 7 — gear control mounted guns, 8 — hoist chain attachments, 9 — frame of the tractor, 10—frame, 11—frame agricultural implements.
Mini-tractor — rather a collective means of tillage. It is preferable to collect from the most common automobile and motorcycle parts. The engine power is required more than the tillers: suitable Izhevsk, K-750. The difficulty of cooling such a motor is overcome by the installation of a water pump or a pump with synchronous motor fan. Such SEL’khozagregat will ensure a speedy processing of multiple plots. Not ordered and low-power homemade type tractors vladimirets. It will be a truck of public use for the horticultural cooperative.
ORIENTATION — FOR SERIAL NODES
My MT-5 fits the second type. MT — means mini-tractor and 5 suggests that this is the fifth model, so much of it, as they say, squared away. It is assembled primarily from components and assemblies produced by industry. I tried to compose it so that access to all components and units was not. hampered, of course, ensuring safety requirements: all rotating mechanisms are closed by easily removable covers and panels.
Put the engine from IZH-56 P with the “blower” to cool from motorized С3А (water cooling system I did not). The rear axle of the “Volga”, only cropped. Transmission from GAZ-51. Steering column and seat from Oise. There are two gearboxes. One with a ratio of 1.3:1 had to put to change the direction of transmission from the engine to the transmission at an angle of 90°. The other with a ratio of 15:1 — to control the hinged equipment: lifting, lowering by means of a chain transmission.
Front axle home-made, from water pipes, the type of “cacheimage pendulum”, as wheel tractors, fenders, hood, frame for mounted implements — from metal parts and scraps of leaves. Front wheels with hubs and tires taken from С3А, rear — MTZ-52 (front).
MT-5 is the correct set of front and rear gears and neutral. Speed from 0.5 to 40 km/h Track 0,9 m with extension if necessary (for example, for hilling potatoes) to 1.3 M.
ASSEMBLY: THE OPPOSITE
Amateur homebrew often complain of frustration, which gives them the Assembly of structures, bearing in mind numerous of rework and rework. Most try to copy someone else’s samples. However, it is more rational to focus on the selected system, and to use those items, that are available. The work will go faster and cheaper — need to buy only the necessary minimum, and, importantly, there remains scope for creativity.
The Assembly usually start with the frame, front end, engine mounting, etc., but I advise you first be taken behind the rear axle. Need to put in place all its parts, to connect to the transmission, bonding the flanges. Before tightening the mounting bolts several times, rotate the gears, adjust free play, and also make sure h box stood straight out strictly along the imaginary center line passing through the connecting part of the tractor.
Connect with them the gearbox or the engine itself. Do this, as they say, the weight on stands, placing them so that all the nodes are in the same horizontal plane. Having the lack of runout of the shaft, fasten the bolts in couplings and flanges. Left to decide where to place the front axle, as it will be attached to the frame, and set it to the expected place.
Now proceed to that operation, which is usually carried out first, the layout of the frame (chassis), but “open” “where is”, and to its manufacture. Other Assembly usually leads to the “care” of the installation to “fail” in size, which results in a repeated shifting of the units.
you are already set on the frame and chassis of the power nodes, it is necessary to test the entire structure. Let the engine some time to work in vain, what when you” lift the rear wheel above the ground on trestles.
Finally, mark places, and then secure the knots and detail:” whether the steering control, engine control and gearbox, clutch, shrouds, fenders, hood, seats.
This build order I have repeatedly recommended to me turned to Amateur designers and their feedback has always been positive.
HOW TO MOUNT A PLOW
Another common difficulty is failure to install the equipment on the tractor. In my opinion, the reason often lies in not quite the right choice of the place of a hitch. For example, where there should be a plow? After plowing, as is known, the operation requiring a return motor of high power. If the plow is stronger than necessary, is shifted to any wheel or is behind it, the hitch will be bring in the direction of that wheel. But two or three plow that with their arrangement could allow the actors in a certain balance, a tractor will not pull.
The output of the following. First, to reduce the gauge to 90— 100 cm is the maximum for ploughing. Secondly, to shift the mounting of the plow to the center so that the wheels with his hand walked down the furrow. The tractor in this case there is a certain angle of inclination. For example, MT-5 right wheel in the furrow. Therefore, before plowing I set the plow with the same deviation from the vertical to the right so that when he was in a vertical position. Respectively, and sock it in this case to be rotated 1-2°, but to the left. Then the “resistance” of the earth will choose all gaps will deploy the car back (again, right) and the tool will be in the longitudinal plane of the tractor. Thirdly, there is the need to respect a certain ratio between the distance from the subframe, tractor mounted plough, put on the frame, and a height of the connection point of the subframe and the frame above the ground. It must be at least 3:1, otherwise the plow POPs up spontaneously rises out of the furrow, buried in the soil. The MT-5 this led to the fact that the frame length has exceeded meters, and the height of the connection points above the ground, on the contrary, decreased to 30 cm.
Fig. 2. Installation of the plow:
α is the mounting angle due to the roll MT-5, β — the angle of rotation of the sock.
Fig. 3. Installation of a hinged plow:
1 — sub-frame of the tractor 2 — point connection, a 3 — frame plow 4 — plow.
A few words on the rational use of tractors with different equipment. When growing, for example, potatoes in the spring with MT-5 is produced by plowing the land with simultaneous harrowing of the soil. Harrow is hung on a special bracket on the chain immediately behind the plow, and simultaneously to rise with it. Since the right wheels of the tractor go through the previously made furrow and take part plowing for the right rear wheel, set strelley cultivator for repeated partial loosening “damaged” strips. Cutting ridges lead from three Hillers. The next time one of them has been used as a guide. In this operation for the rear wheel again have to raise the cultivator. The potatoes are planted, so to speak, “in semi-native mode”, that is, the tubers are laid manually into the trench, held the extreme Hiller, and the next time she collapses to the ground to both sides of the other two, and the extreme of them again leads—opens a new furrow.
Hill ridge also three instruments, and track MT-5 is increased to 130 cm and the wheels go between the ridges (the distance between them in my garden 65 cm). Vypuchiv crops plow horse — pravootnosheny, so start with the left side of the site with left the garden, moving earth and exposed the tubers to the right in the absence of another nearby flower bed. It has its advantages: when collecting potatoes easier to dump the earth from above and down, back and just made furrow. At the same time and leveled the garden.
V. CHIRKOV, G. Lotoshino,Moskovskaya.
Recommend to read COMPASS — DRILL ASSISTANT If you need to drill through wall, out the other side exactly in the right place — use...a compass. Of course, in collaboration with the magnet, which should be put behind the wall... “SLEEPING” BABIES On a lovely summer day it would be good to get out with baby on the nature, but with a stroller is not very removed from the tracks — not that she's "passing". And without strollers how... 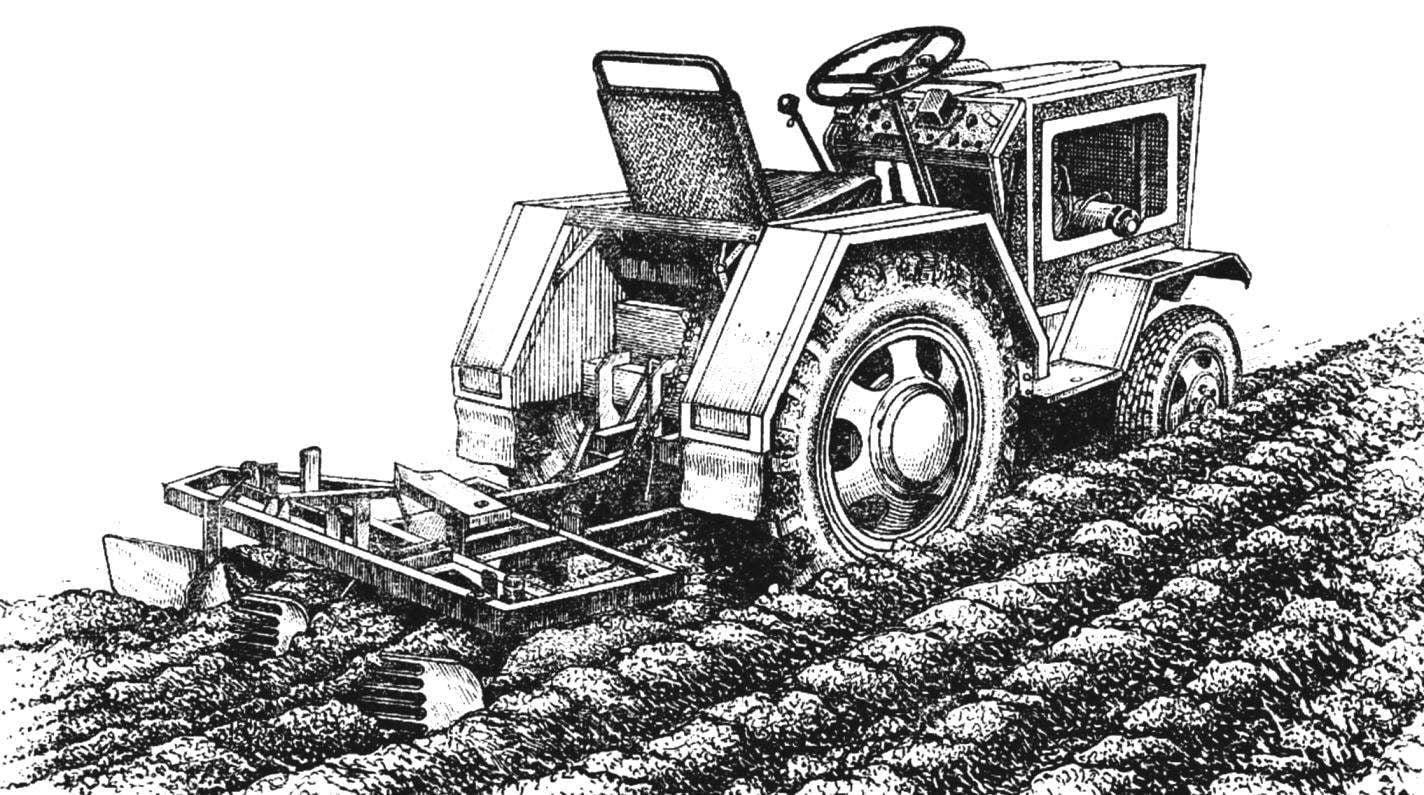
 “Manual labor is performed by machines!” — under this title was published in our journal materials from the all-Union conference VISKHOM named after V. P. Goryachkin (see “M-K”, 1982, № 8). The performances of the participants on the importance and necessity of development of means of mechanization of cute, the editors have opened a correspondence “round table” at the same time, we invited readers to send drawings and diagrams of their machines and asked to share the experience of their construction, manufacture, operation.