 Many people, especially those who live in rural areas, had to build, and those who had, perhaps still have, because man by nature loves to build is not only a necessity but a pleasure from the creative process. Here if it would be possible to mechanize here is a time-consuming work…
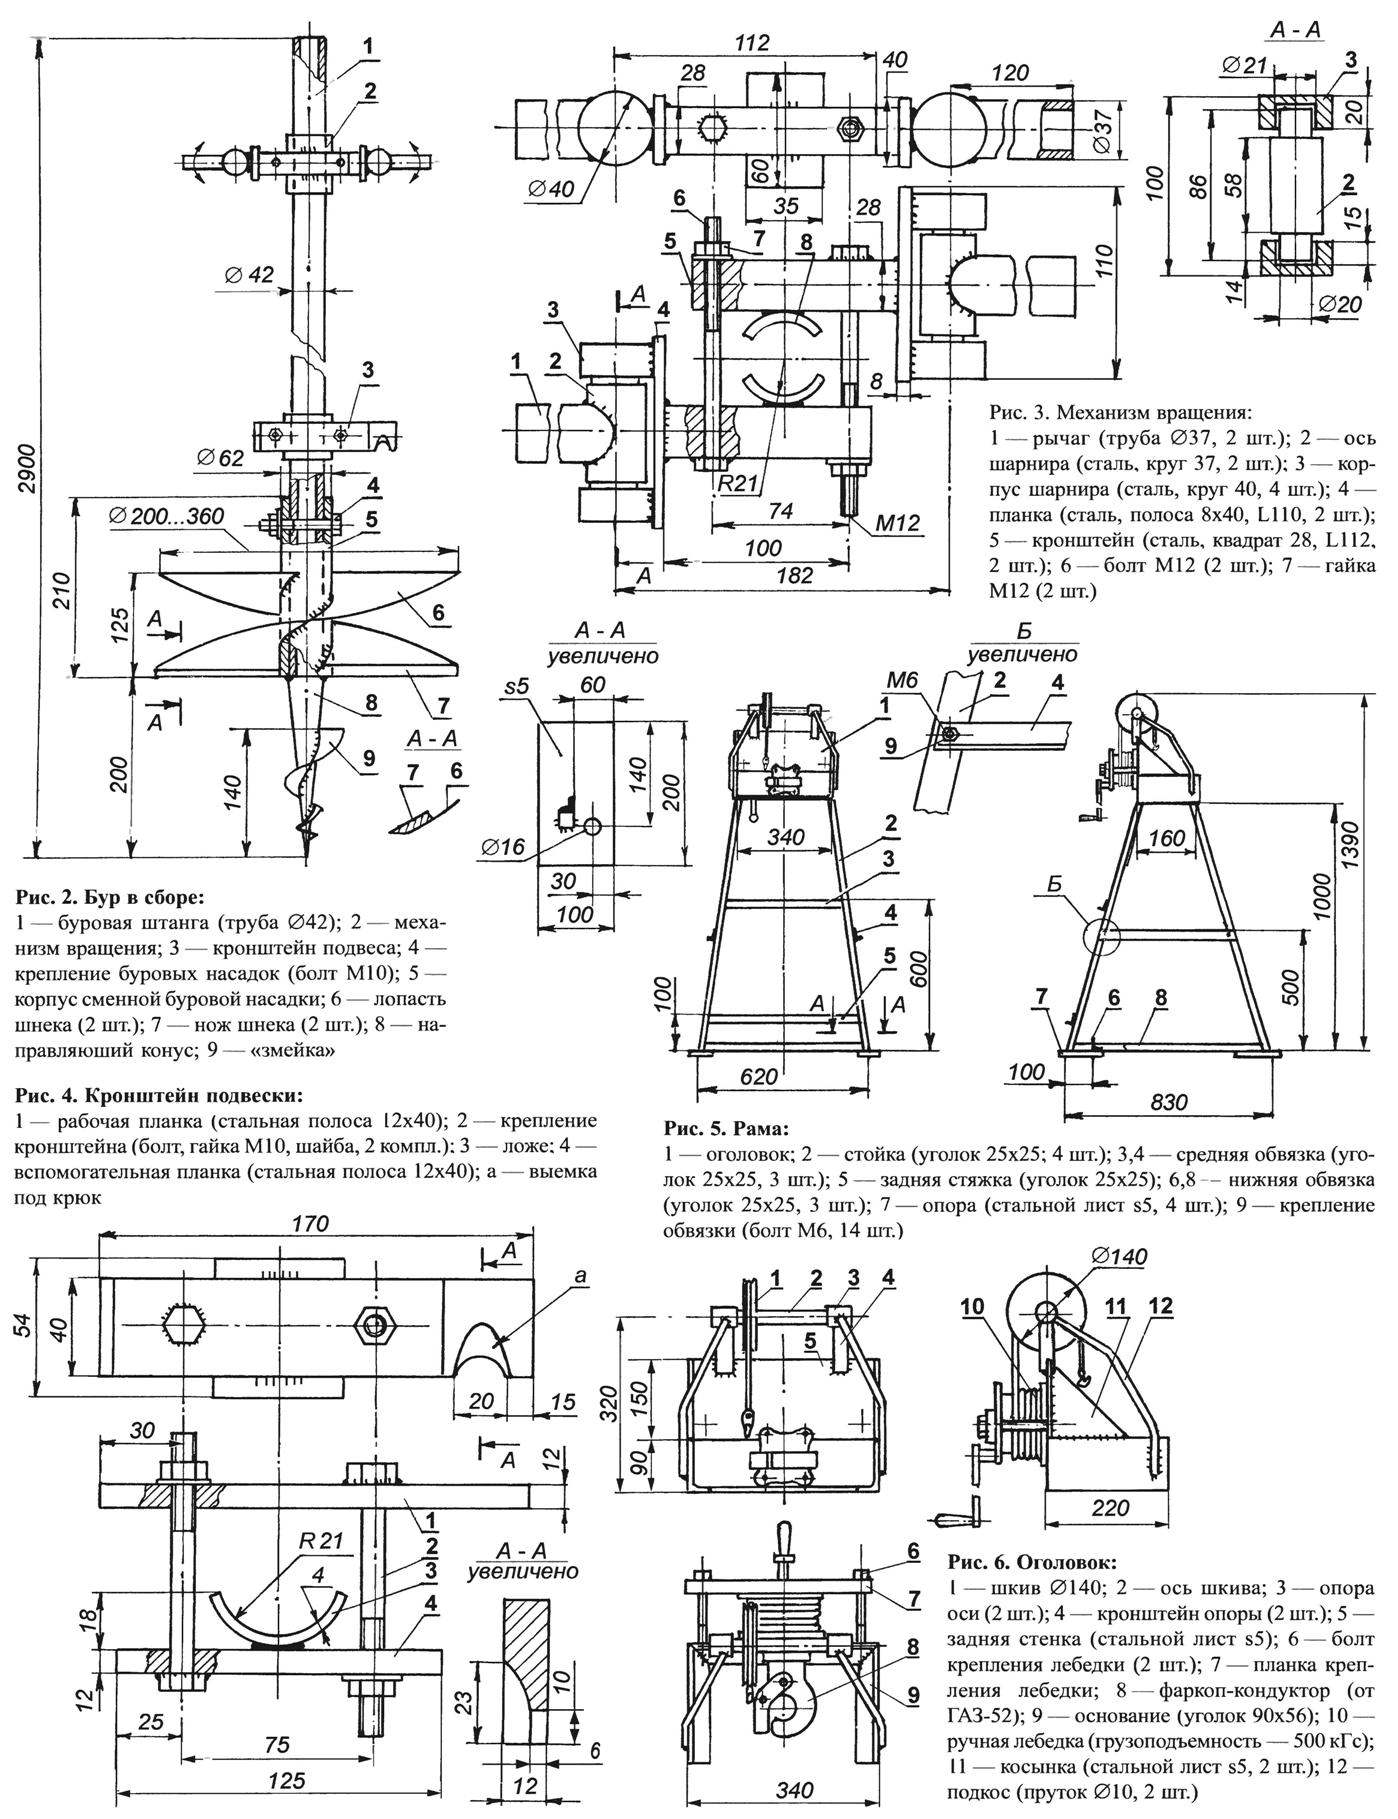
Drilling rig
The offered machine is used just to facilitate the work and improve its performance on the most difficult construction work — excavation. It can be used to drill wells with a diameter from 4 to 36 cm to a depth of 1.5 m (with extension rods drill deeper). The machine design allows to work both together and alone. This is important: a attendant at hand is not always the case. And although performance is reduced, but not half as it would be possible to assume, and twenty per cent, not more.
The farm wells are often drilled for cast-in-situ or precast concrete or reinforced concrete foundations. Useful the machine and for installation of poles (wood, steel, concrete) in the construction of various frame structures, the installation of gates and fences for the construction of various utilities — sewer, water, grounding, electricity, etc. So if such a machine is to stand idle from a skilled master, he will not.
The performance of the unit depends on the diameter of the working body (drilling nozzle replacement), soil density, depth of wells, number of employees. If you take the most difficult conditions (the maximum size of the drill, the stratum of heavy clay, one worker), then driving the 1.5-m wells (this is the optimal depth for shallow Foundation pillars in our climatic conditions) will require 40 — 45 minutes. Together — faster. Without a press, using only hand tools, to dig a hole of appropriate diameter in such depth just technologically impossible
The machine is simple to make it, having skills in design, easy. And the materials needed are few: a few meters of a 25×25 area on the frame, a little sheet metal on the headband and support, dozens of meters of pipe with a diameter of 42 mm on the drill itself, extending to him and the levers of rotation. From ready-made parts and components will need the tow bar from the car (I have GAZ-52), manual windlass, designed for a force of at least 500 kg (for lifting the drill), four pin-holder (you can use the teeth of the harrow) and augers of different diameters for drill bits.
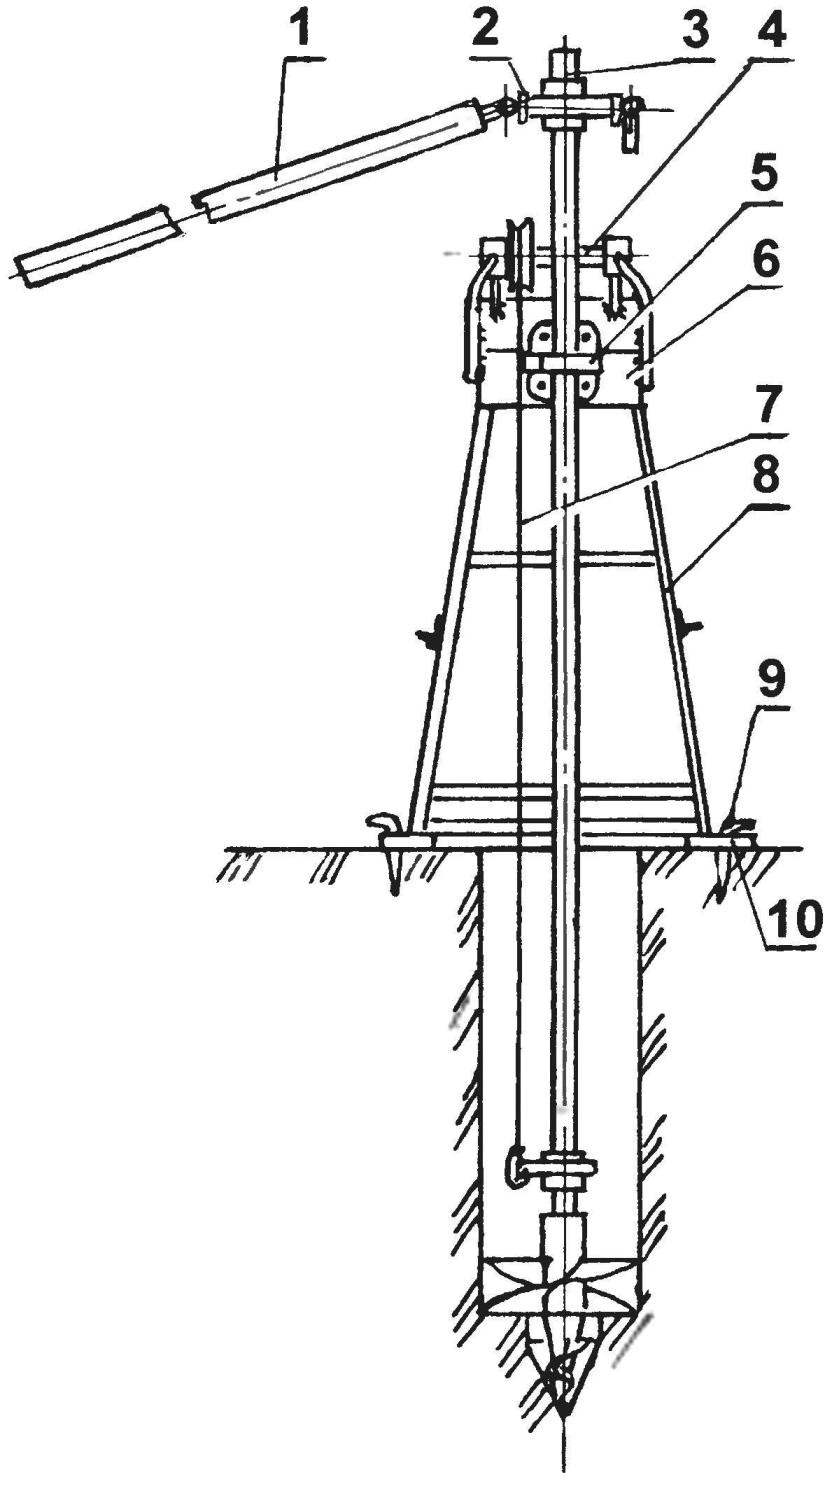
Fig. 1. Machine for drilling:
1 — the lever extender; 2 — swivel; 3 — drill in gathering; 4 — the axis of the pulley; 5 — hitch-conductor; 6 — the headband; 7 — wire rope hoist; 8 — frame; 9 — pin holder (4 PCs); 10 — pole (4 PCs.)
The main element of the machine itself Bur. It is the Foundation of a pipe diameter of 42 mm and a length 2700 mm. At the lower end of the pipe welded conical nozzle length 200 mm with welded screw it “snake” from a strip of metal 2 mm thick. “Snake” is a very useful item it ensures high performance as well as the opportunity to work on the machine alone. During the rotation of the “snake” itself tightens Bur into the ground — it does not need to make any extra effort (and I have seen similar structures on top of even put a person’s “weight”)
Replaceable drilling nozzles, with a diameter of 20, 28 and 36 cm; they are attached to the drill pipe through M10. You can run without the attachments, only the “snake” — for example, for grounding or bore of the driven tube. Knives nozzles are made of cultivator Lancet feet, sharpened and welded to the blades of the auger. Borax are attached to two small units: the suspension bracket, which clings to the rope of the winch when lifting and rotation mechanism of the tool. The design of these nodes is clear from the drawings. I will only add that hinged levers rotation is very convenient to use, otherwise it would always be necessary to move them as penetration, which inevitably would reduce performance.
The frame of the machine consists of four pillars, connected by studs in the middle and at the base. Stands are based on 5-mm plate with drilled holes in them for pins-holders. The headband is attached to the tow-conductor front and hand winch to lift the drill back. On top of the headband is welded on the support 2, which rotates the axis of the pulley, transmitting the tension of the cable from the hoist to the borax.
This is the device machine. But the technology of the drilling process. Outlining the center of the well, a wooden peg punched in the ground a small recess in which is guided the tip of the rod and make a few turns. Solubilis thanks to the “snake” for 10 — 15 cm, the drill firmly without support. The soil around the drill if necessary, align to machine stood steadily on all supports. Now for the installation of the machine. After the lock the tow bar-the conductor will close around the rod, check the verticality with a plumb and, if necessary, exposed vertically, moving the machine slightly in one direction or another. Then the supports of the machine, hammering pins-holders. You can get to work.
With each revolution of the drill more and more deepens into the ground. First, effort is almost not required, but gradually the resistance to rotation increases. The larger the diameter of the working nozzle and the heavier the soil, the more often it is necessary to pull the tool and release it augers from the ground. Under the most severe conditions it should be done every 25 — 30 cm of penetration. To pull the drill just. The hook on the cable end touches the bracket of the suspension. The notch on the lever is exactly the same with the shape of the hook, and after a short stretch of the hook sits tight on the lever. It now remains only to rotate the handle of the winch.
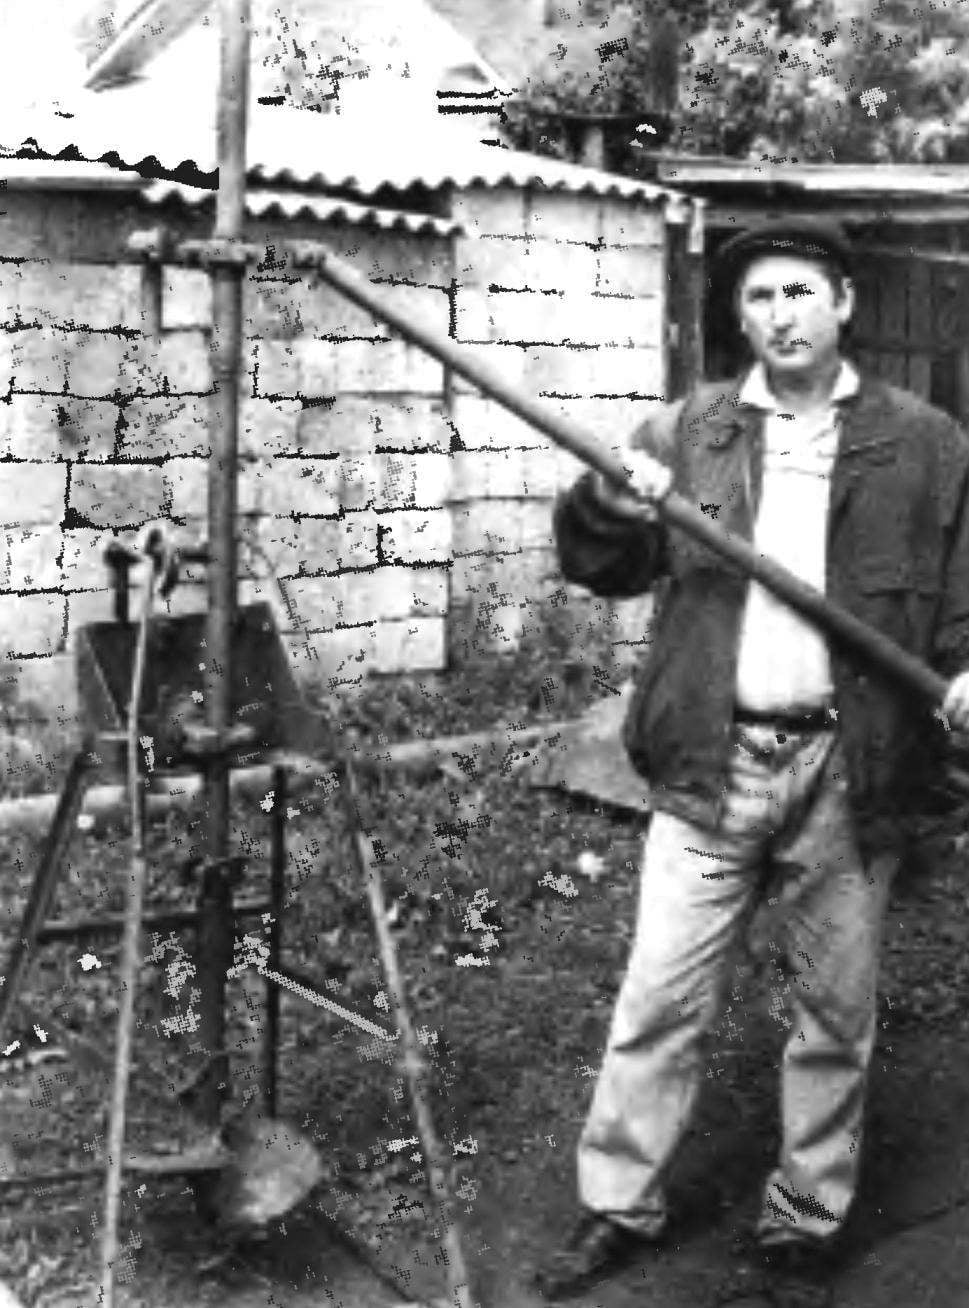
Any homebrew knows that any design rarely works flawlessly after manufacture. Often in the process of testing something you have to do, to change, to adjust or to change the individual nodes. The same thing happened before and I have. But this machine was pleased: he earned on the first attempt as it was intended. All the calculations were correct, no reason nor finishing, nor even to the alteration arose. On the one hand, this is due to the simplicity of the design, on the other — a thorough study of all the nodes in the design stage. And, of course, workmanship. During the three years of its operation I did with this machine a lot. The main thing — almost single-handedly prepared all the Foundation piles for the construction of the house (for this purpose, mainly the machine was made).
Pier Foundation
After the well is drilled, begins another job ready for pouring concrete. The base of the wells needs to increase to widen, to bring the diameter up to 60 — 70 cm, but can be more — more pressure will be able to carry a Foundation pillar.
Tool widening the bottom of the hole was the chisel on a long handle, made of an axe welded to the butt cut of the pipe it is inserted into a long stalk. To the bit was “stronger” (better skived the soil from the side of the pit), the axe blade should bend degrees for ten to fifteen heating it in a furnace or flame torch. As for removing the abrasion of the soil, I use a homemade fixture. To the metal plate 30 cm in diameter is welded with the edge of the same section of pipe and planted six-foot stalk. Omit this simple line on the bottom of the hole and chisel begin to stesyvat clay from the walls, more venturing out to the side. Soil accumulates on the wafer, and as filling it is necessary to raise and release. A dozen such operations and the base of the pit is increased enough.
Now you need to seal and strengthen the bottom of the well. For this I hammered into the ground to a half to two medium-sized buckets, from 5 to 10 cm of stone. Half of the wells, where the ground is loosened with a “snake” and the rest evenly all around the base. Drive in with a hammer, also mounted on a long stalk, until, until you feel — all, base itself now the density will not yield the concrete. You can then begin to fill. Concrete mix (stiff: the stiffer the mixture, the stronger will be the concrete) laid in a hole about a foot so that it filled the whole of the widened part of the base. Then put four pin-Armaturen diameter 12 — 16 mm. from the Bottom ends of them are bent parallel to the base, and the top ends should be longer than the post 30 — 40 cm then They will be United in a common reinforcement cage of the beam-grillage, which will combine all the posts into a single structure.
Fig. 7. Concrete pole foundations:
1 — valves (Ø12 — 16, 4 pieces); 2 — form (roll material); 3 sand filling; 4 — a concrete column; 5 — the widened base of pole; 6 — compaction of the base (stones)
Setting the pins to engage in the manufacture of formworks for post. It should be made of roofing felt, paper, roofing — from any roll, sufficiently strong material having water resistance. Column diameter — 25 — 30 cm Below the formwork did not break up under the pressure of the concrete mix, at the same time fill you need to fill up the space between the formwork and the wall of the borehole with sand or sand-gravel mixture. This filling plays a role and a kind of “lubricant” when the winter pole will push the forces of frosty swelling.
It must be remembered that the work associated with the Foundation, do not tolerate frivolous attitude. The Foundation carries a huge load. On top of him pushing his weight building, and below it is trying to squeeze out of the land forces of the frosty swelling. If the Foundation is wrong, it will subside or it will squeeze out. In any case, this will lead to deformation and cracks of the building walls. And for pier Foundation first attack probably second.
So to pour the Foundation by eye, without calculation — too risky. But to calculate it quite easy. Need to know only one check digit — bearing capacity of the “mainland” of soil, that is, how much mass per unit of area can hold the soil to the depth of the bottom of the Foundation. On our soil the figure is one and a half kilograms per square centimeter. So, if the footprint of the pillar is equal to two thousand square centimeters (diameter 50 cm), design load will amount to three tons. Calculate the mass of the future building together with the mass of the Foundation (and make it too easy, knowing the volume and volume weight of used materials), it is possible to calculate how much, adjusted for double margin of safety, need of supporting pillars. And here it is better not to save: the higher the margin, the better.
Often, when applying Foundation make a typical mistake — constructing a kind of hybrid — a combination of strip and columnar foundations. The posts are set, as expected, below the depth of freezing, but the ribbon between them is filled to a depth of only 40 — 50 cm, the savings can be costly. You need to understand that the sole Foundation — whether a pole or tape — does not have to be in the frozen layer of soil, and certainly below it. Forces frost extruding huge, especially in tough, raw, deep freezing soils. Many of you probably have seen their destructive work.
To protect the pier Foundation from punching, it is necessary to calculate the optimum and maximum number of poles and to reduce the risk of frosty extruding to a minimum. No need to feel sorry for rebar in each post and linking all the posts between a reinforced concrete beam. Between it and the soil should be a small air gap to the increased winter frozen ground is not pressed on the beam from below. And the soles of the pillars without reinforcement frost can just cut and squeeze the top of the Foundation, leaving the supports in the ground. In order to neutralize these forces are particularly difficult soils, even resorted to such reception: the formwork arrange two or three layers of roofing material, filling the space between the layers of mineral grease. And most importantly — never superfluous to consult with a specialist Builder who is familiar with local conditions.
…The machine always in the case, and not only as a drill. For three seasons he was regularly used on a variety of heavy work. For example, it is helpful to lift the ends of heavy logs, poles, or pipes, rails, beams in order to put them on rollers or logs. You can pull out of the ground columns dismantle fences, uprooted shrubs and tree stumps buried in the ground or boulders, the remains of wooden buildings. In General, the machine took its rightful place on my homemade mechanical helpers that facilitate the work.
Any creative work is a joy, and such — using devices that are invented and made myself — twice…
G. LEGOSTAEV, Bashkortostan
Recommend to read
 A ROCKET WITH A STREAMER
The design sports a model rocket with a streamer class Б6А traditional. Athletes rocketmodeler repeatedly noted that models in this class closer to a kind of optimum. Now much depends on... AT THE START — R-14
Rocket 8К65 - single-stage, liquid-propellant rocket engine and with load-bearing fuel tanks. As propellants were first used hypergolic in contact with nitric acid (AK-27AND oxidizer)...
