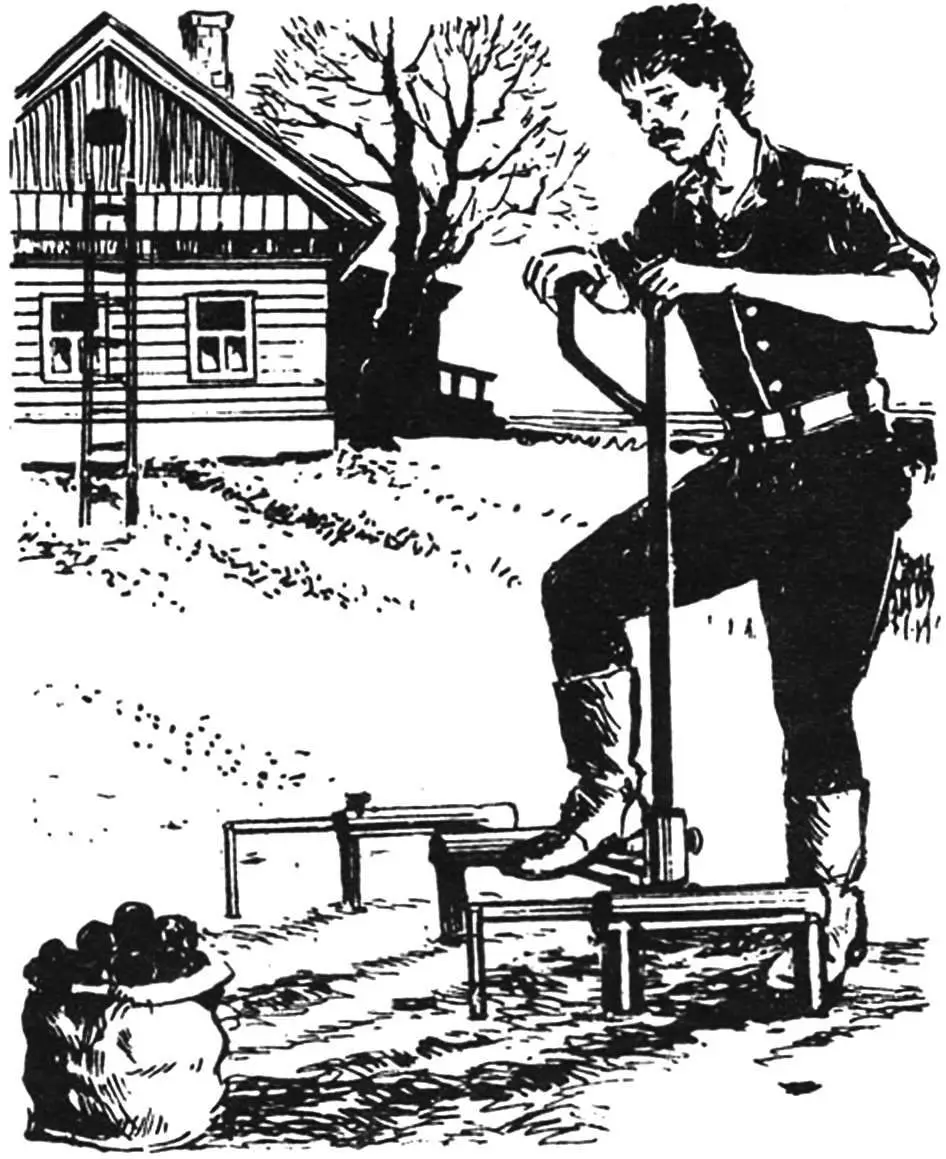
“Potatoes are often called the second bread. But this bread is not easy to come by. Especially without using prohibitively expensive tillers and mini-tractors, relying only on a shovel and a hoe.
About a year ago, “Modelist-Konstruktor” decided to help, publishing a good development about a tracer-potato planter made from water and gas pipes. But then, it seems, forgot about the promise to return to the topic of small-scale mechanization in the cultivation of this labor-intensive crop, which is a pity.
V. Ivankov”.
The editorial board does not forget its promises. Evidence of this is the next publication. Its author is well known to readers from his previous development, on which the editorial board received many responses.
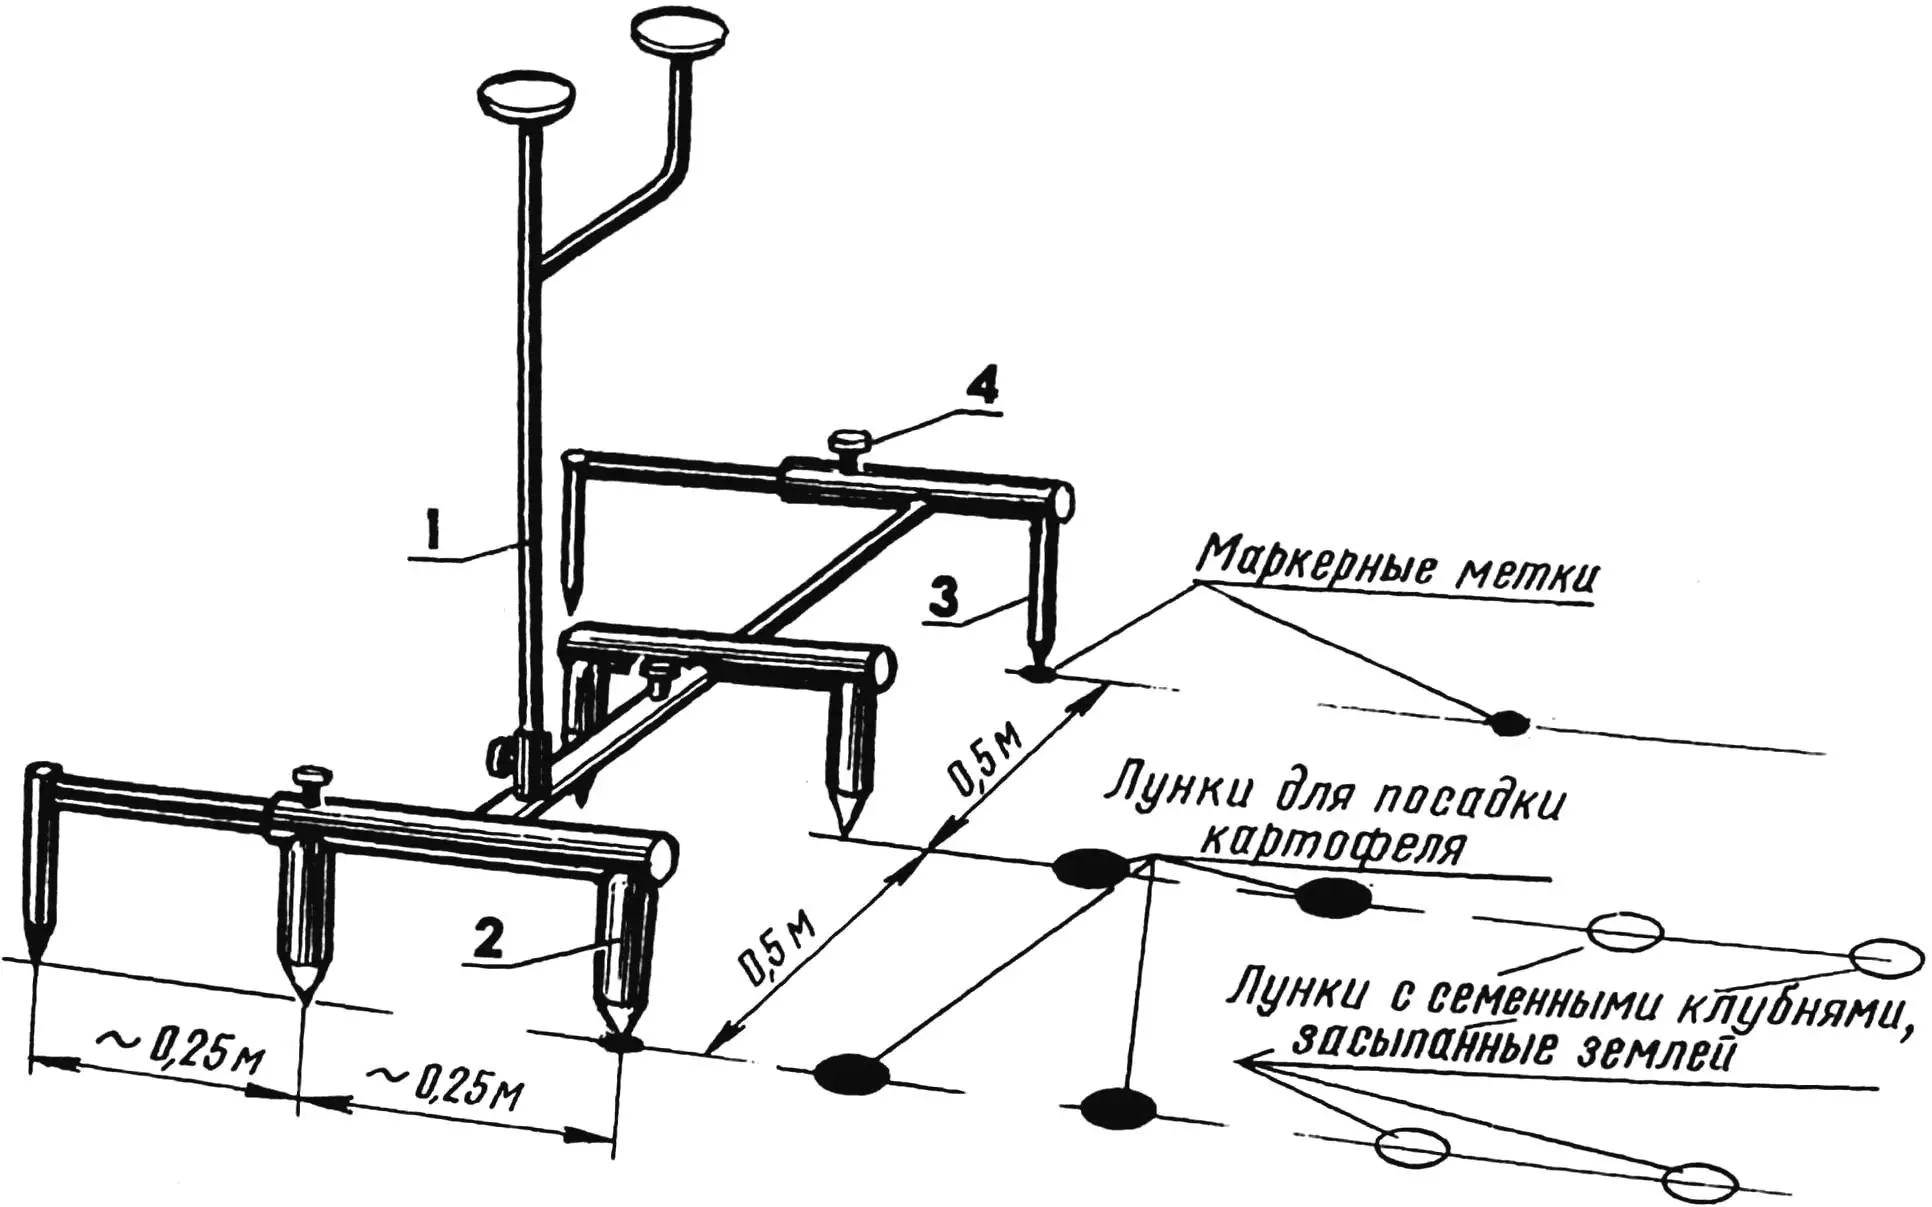
1 — handle, 2 — hole former (4 pcs.), 3 — marker (3 pcs.), 4 — stop bolt (M8, 4 pcs.).
One swallow, as they say, does not make a spring. It is unlikely that noticeable changes should be expected from the application of a single development, even if it is a highly rated tracer-potato planter by gardeners (“Modelist-Konstruktor” No. 5 for 1996). A complex of modern specialized mechanisms and manual agricultural tools is needed to facilitate sowing, cultivation and harvesting of such a labor-intensive crop as potatoes.
I, for example, use a whole set of homemade devices. But from it I can recommend to those who wish only what has passed strict field and time testing.
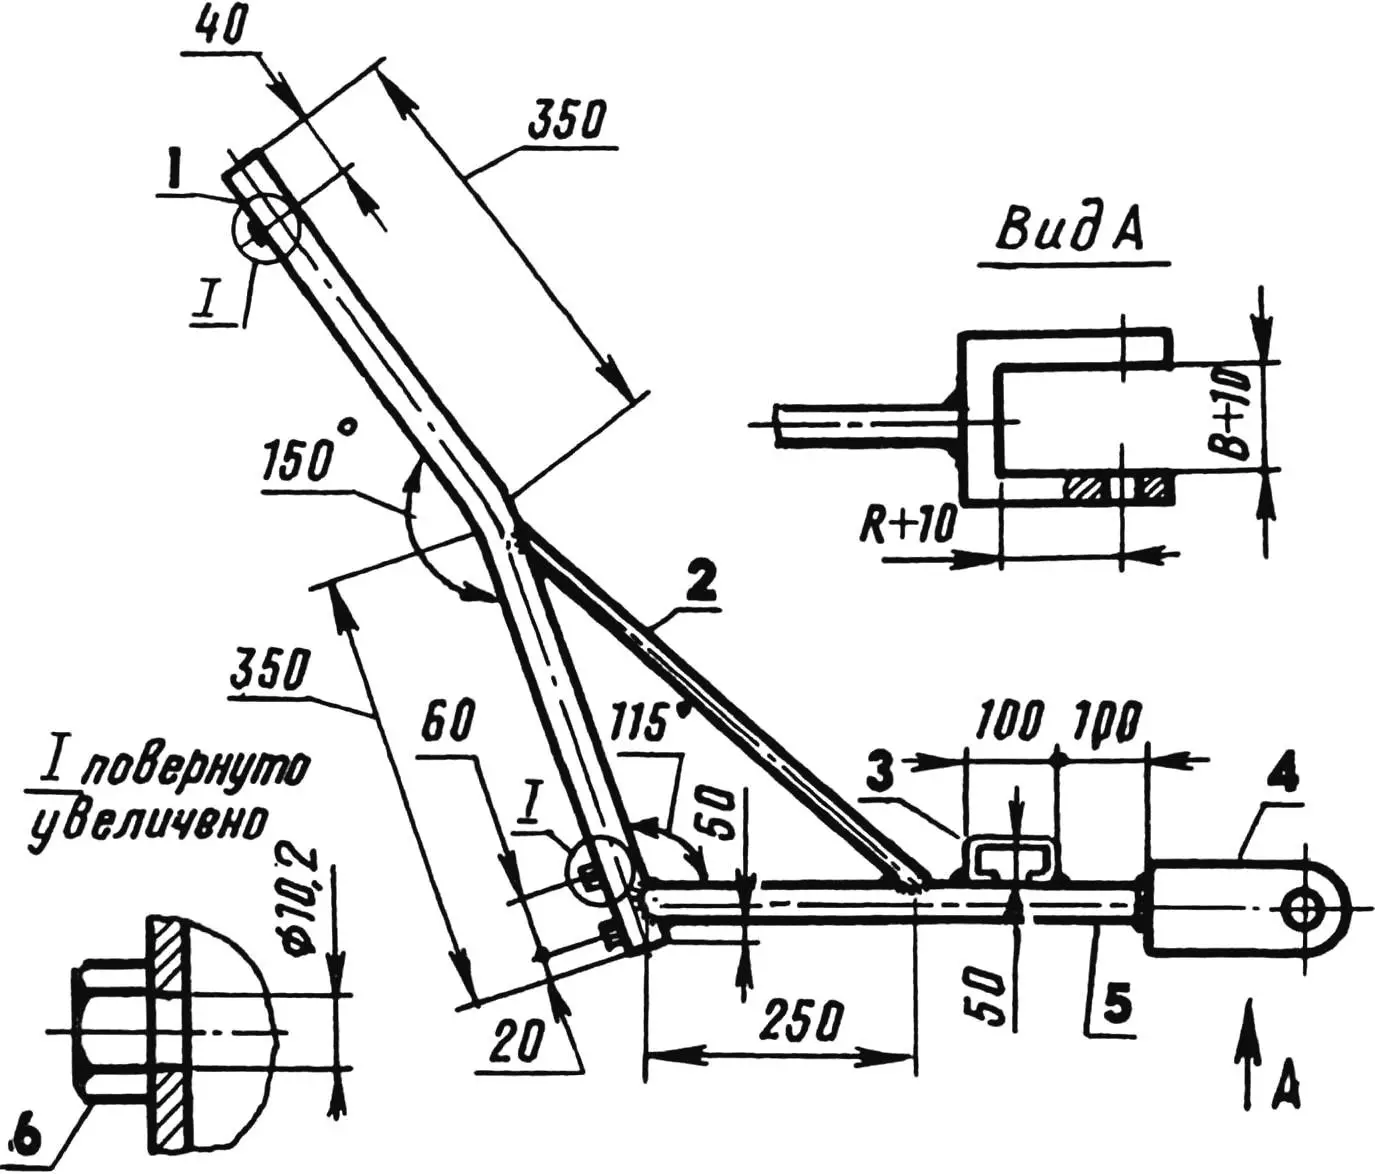
On a plowed, rain-compacted garden, it is good to work with a tracer-potato planter with a doubled number of hole formers (Fig. 1). If the ground is additionally loosened with a rake, then the pointed elements of the tracer enter it even without special pressure with the foot on the support platform. Labor productivity increases by almost one hundred percent! True, provided that the device is made of thin-walled steel pipes to make it lighter.
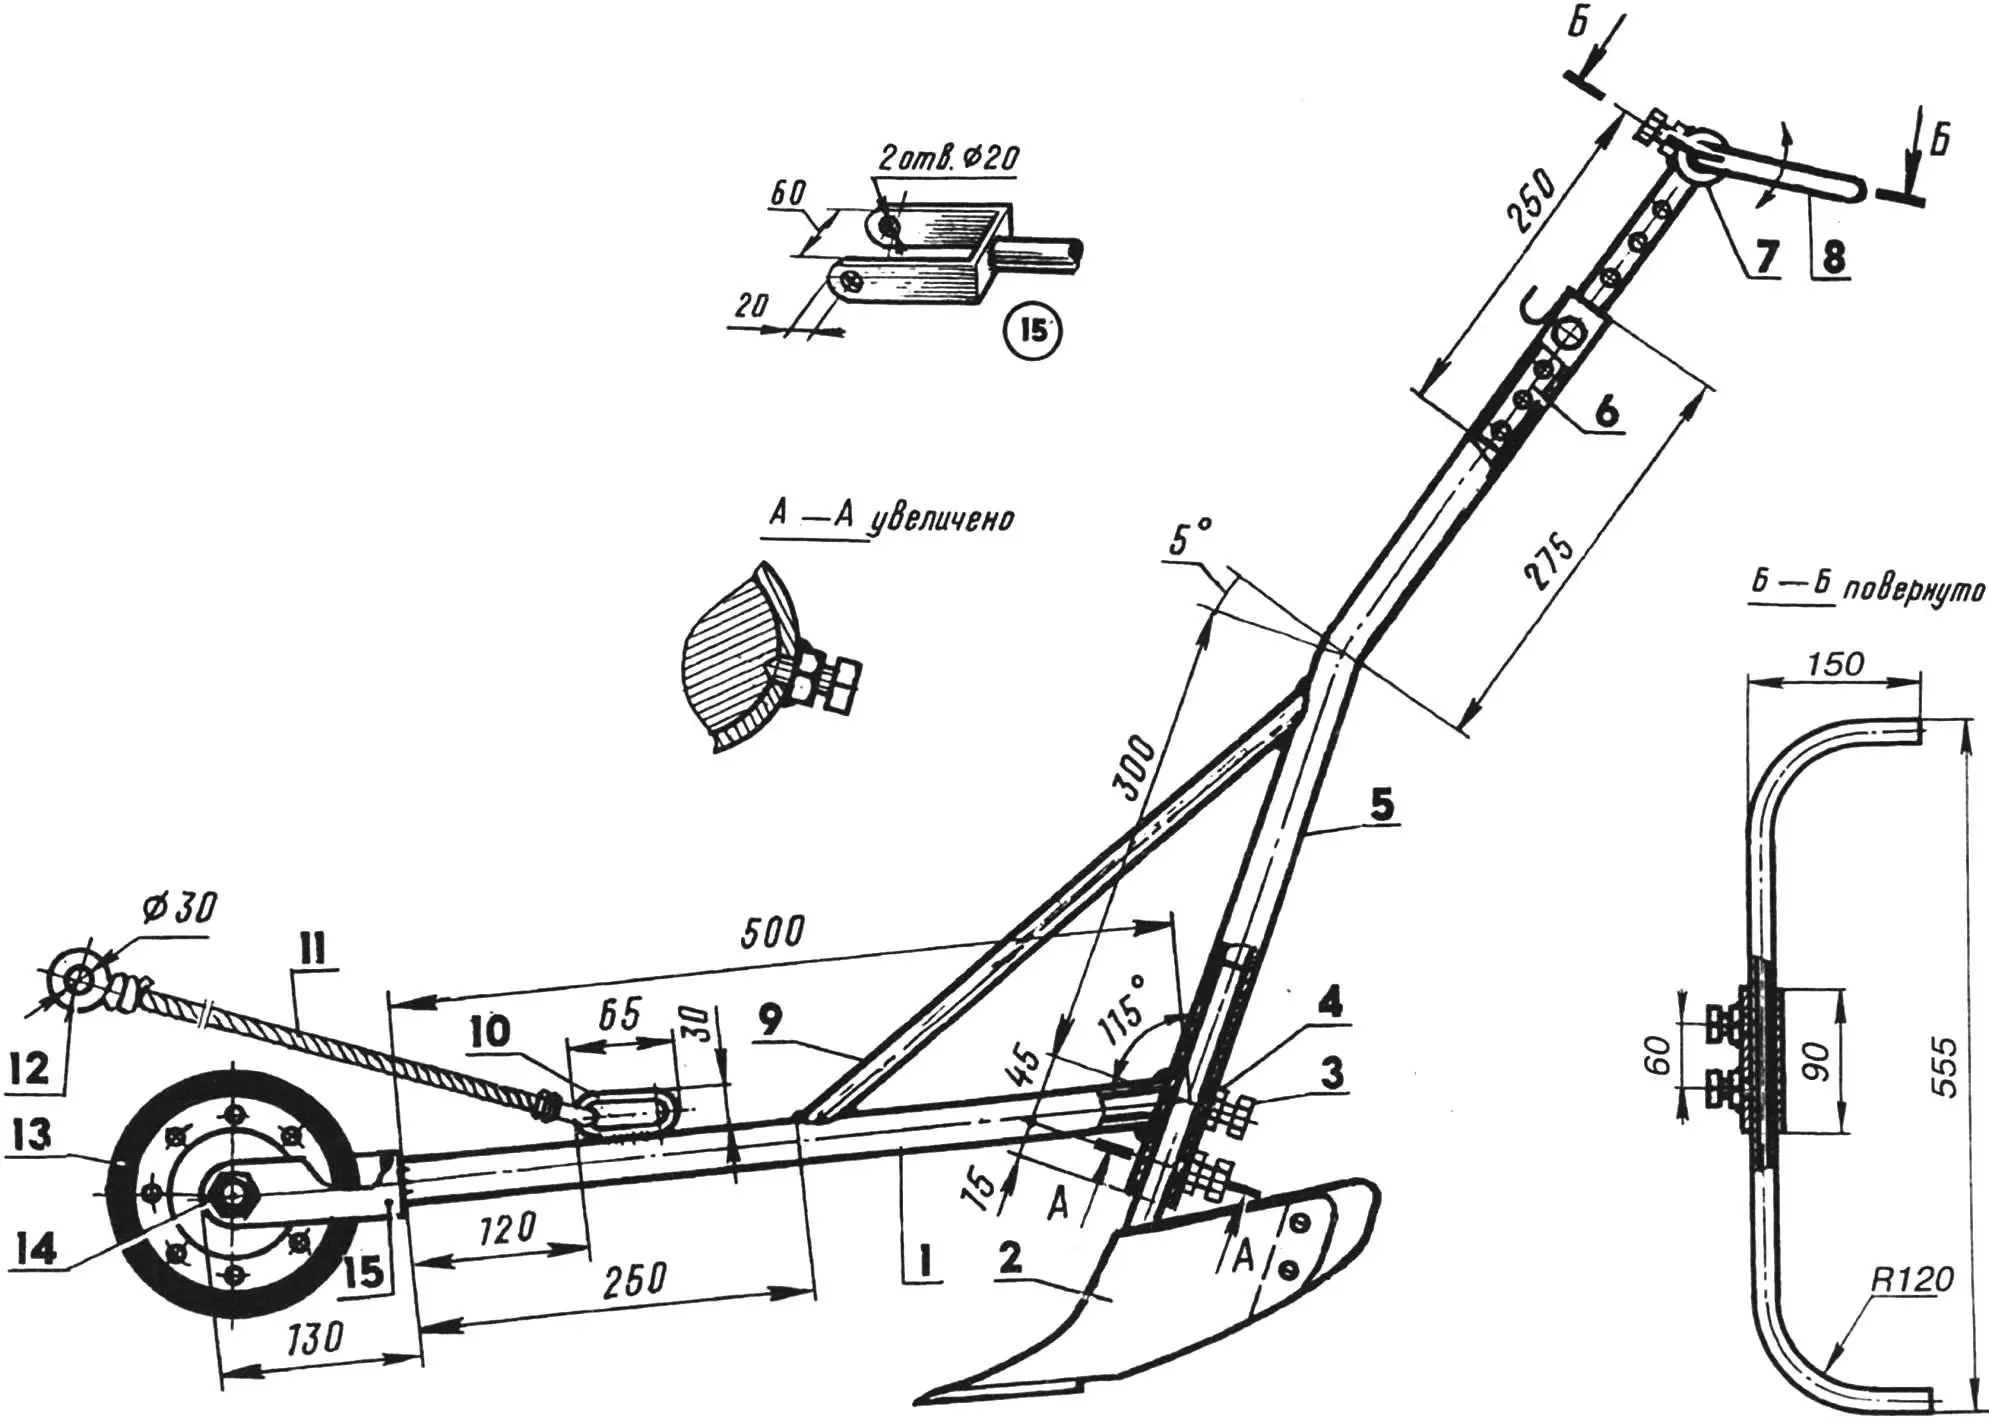
1 — longeron (steel pipe 27×3), 2 — small plow, 3 — fixing bolt M12 (4 pcs.), 4 — nut M12 (4 pcs.), 5 — bracket (steel pipe 27×3), 6 — telescopic rod (steel pipe 21×2.5), 7 — handle bushing (steel pipe 27×3, L90), 8 — swivel handle (pipe 21×2.5), 9 — brace (rod Ø20, L450), 10 — drawbar (steel rod Ø6), 11 — nylon rope, 12 — wooden handle, 13 — wheel with rubberized rim, 14 — axle (bolt M18 with locknut), 15 — housing (steel strip 40×4).
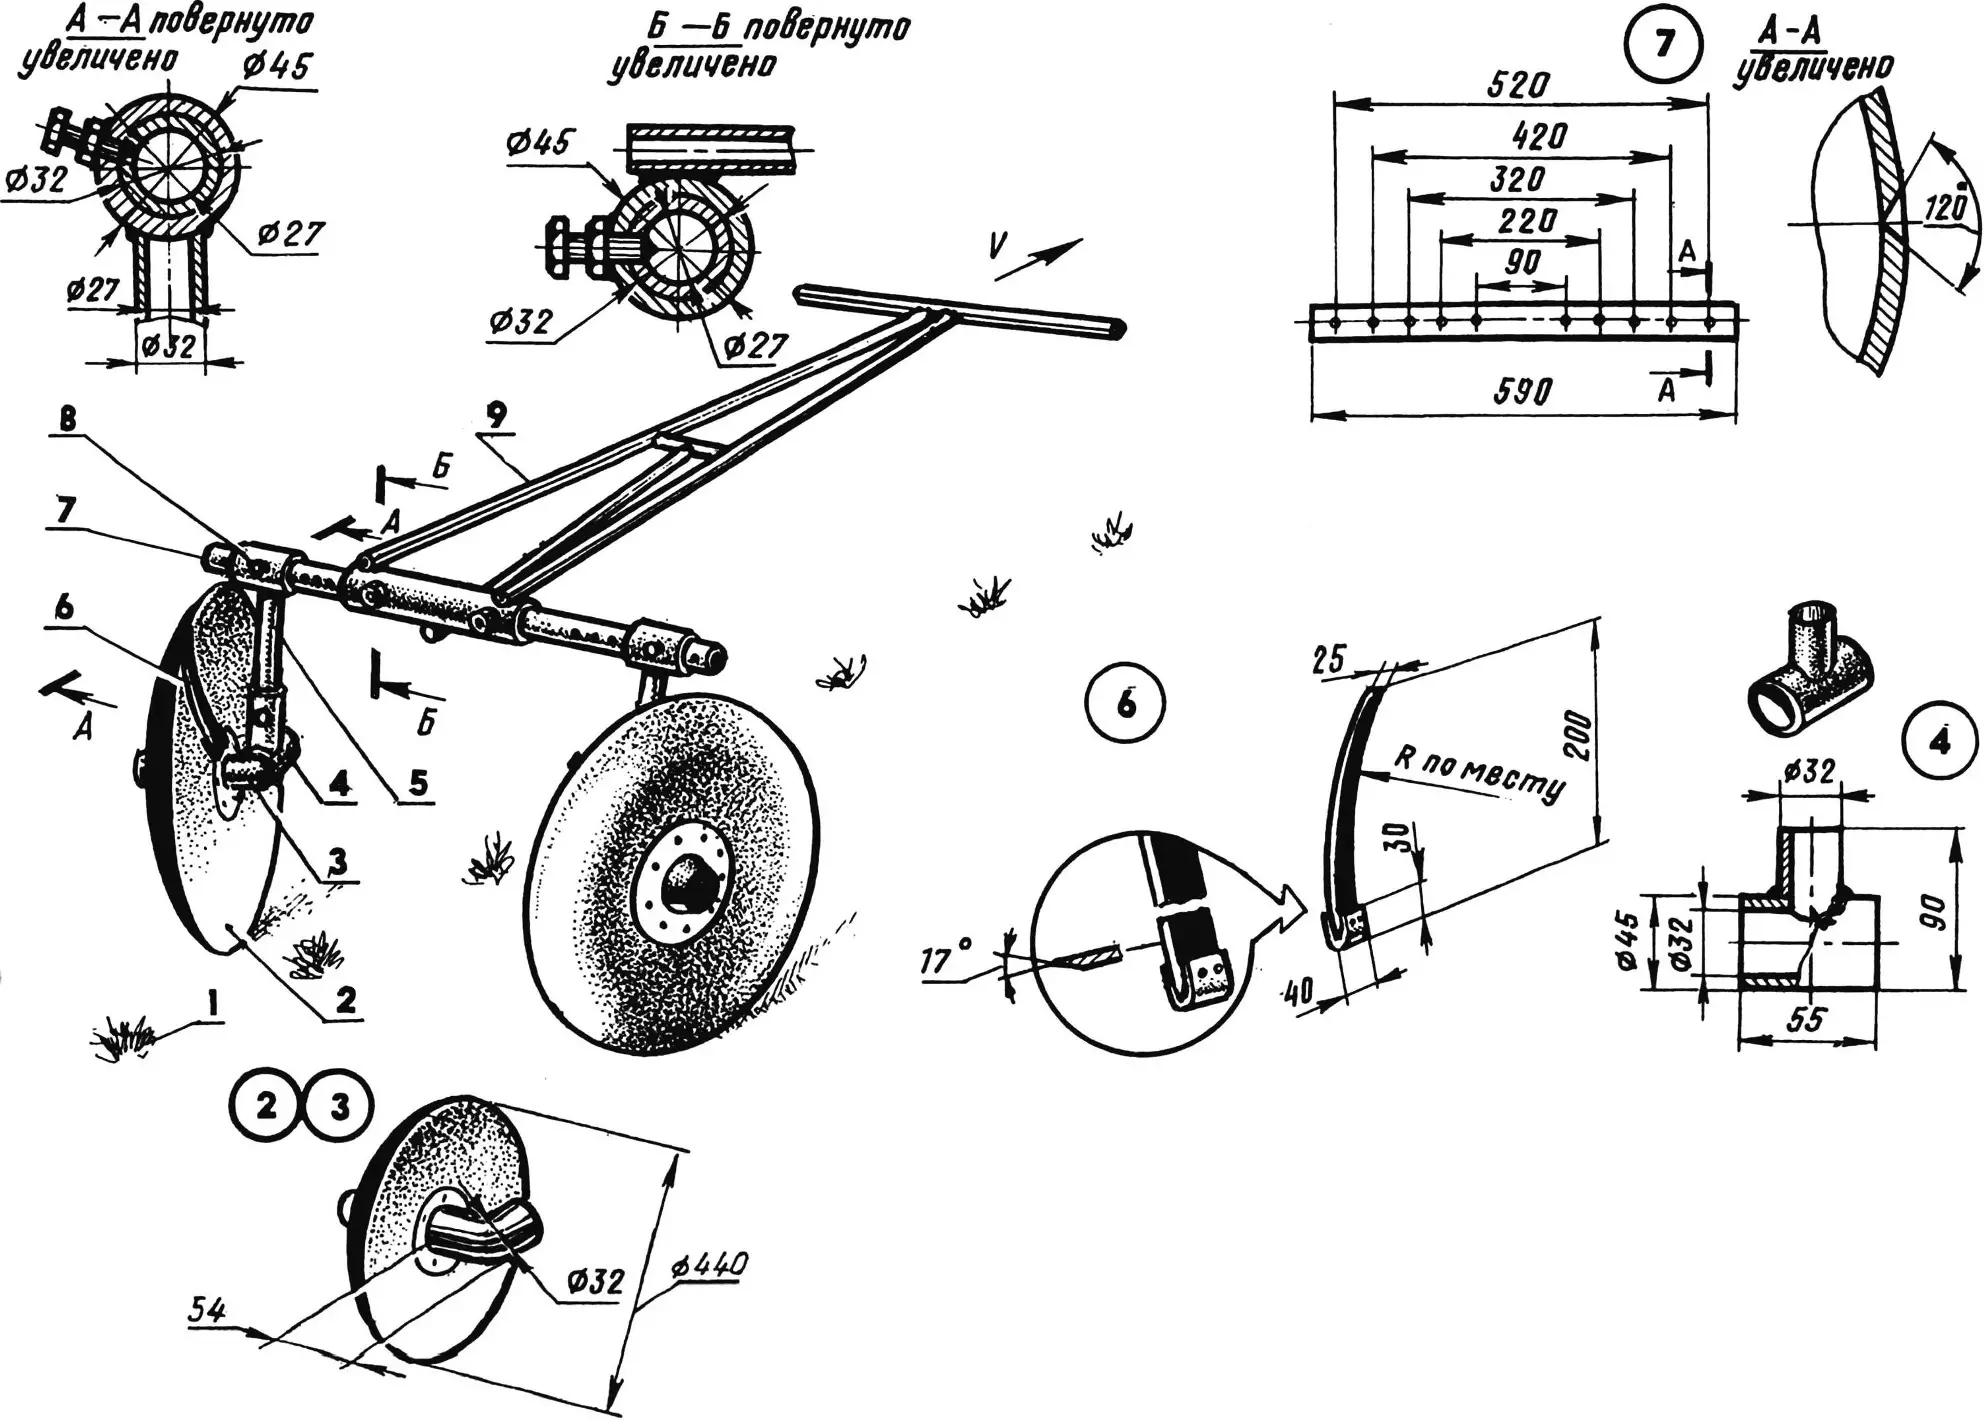
Fig. 2 shows a well-proven innovation in practice — a weeder-hiller. Two operators work with it at once. One leans on the handles so that the plowshare goes across the field with the required depth, and the other ensures the movement of the entire structure in a given direction. The basis of the homemade device, as with the tracer-potato planter, is a welded frame made of water and gas pipes.
Previously, in the weeder-hiller, I used two plowshares: one for row spacing 0.45 m wide, the other — 0.5 m. Then I switched to a small plow with end pieces that replace them, which fit tightly to the main plowshare and are fastened with two screws. When needed, the end pieces are easily removed.
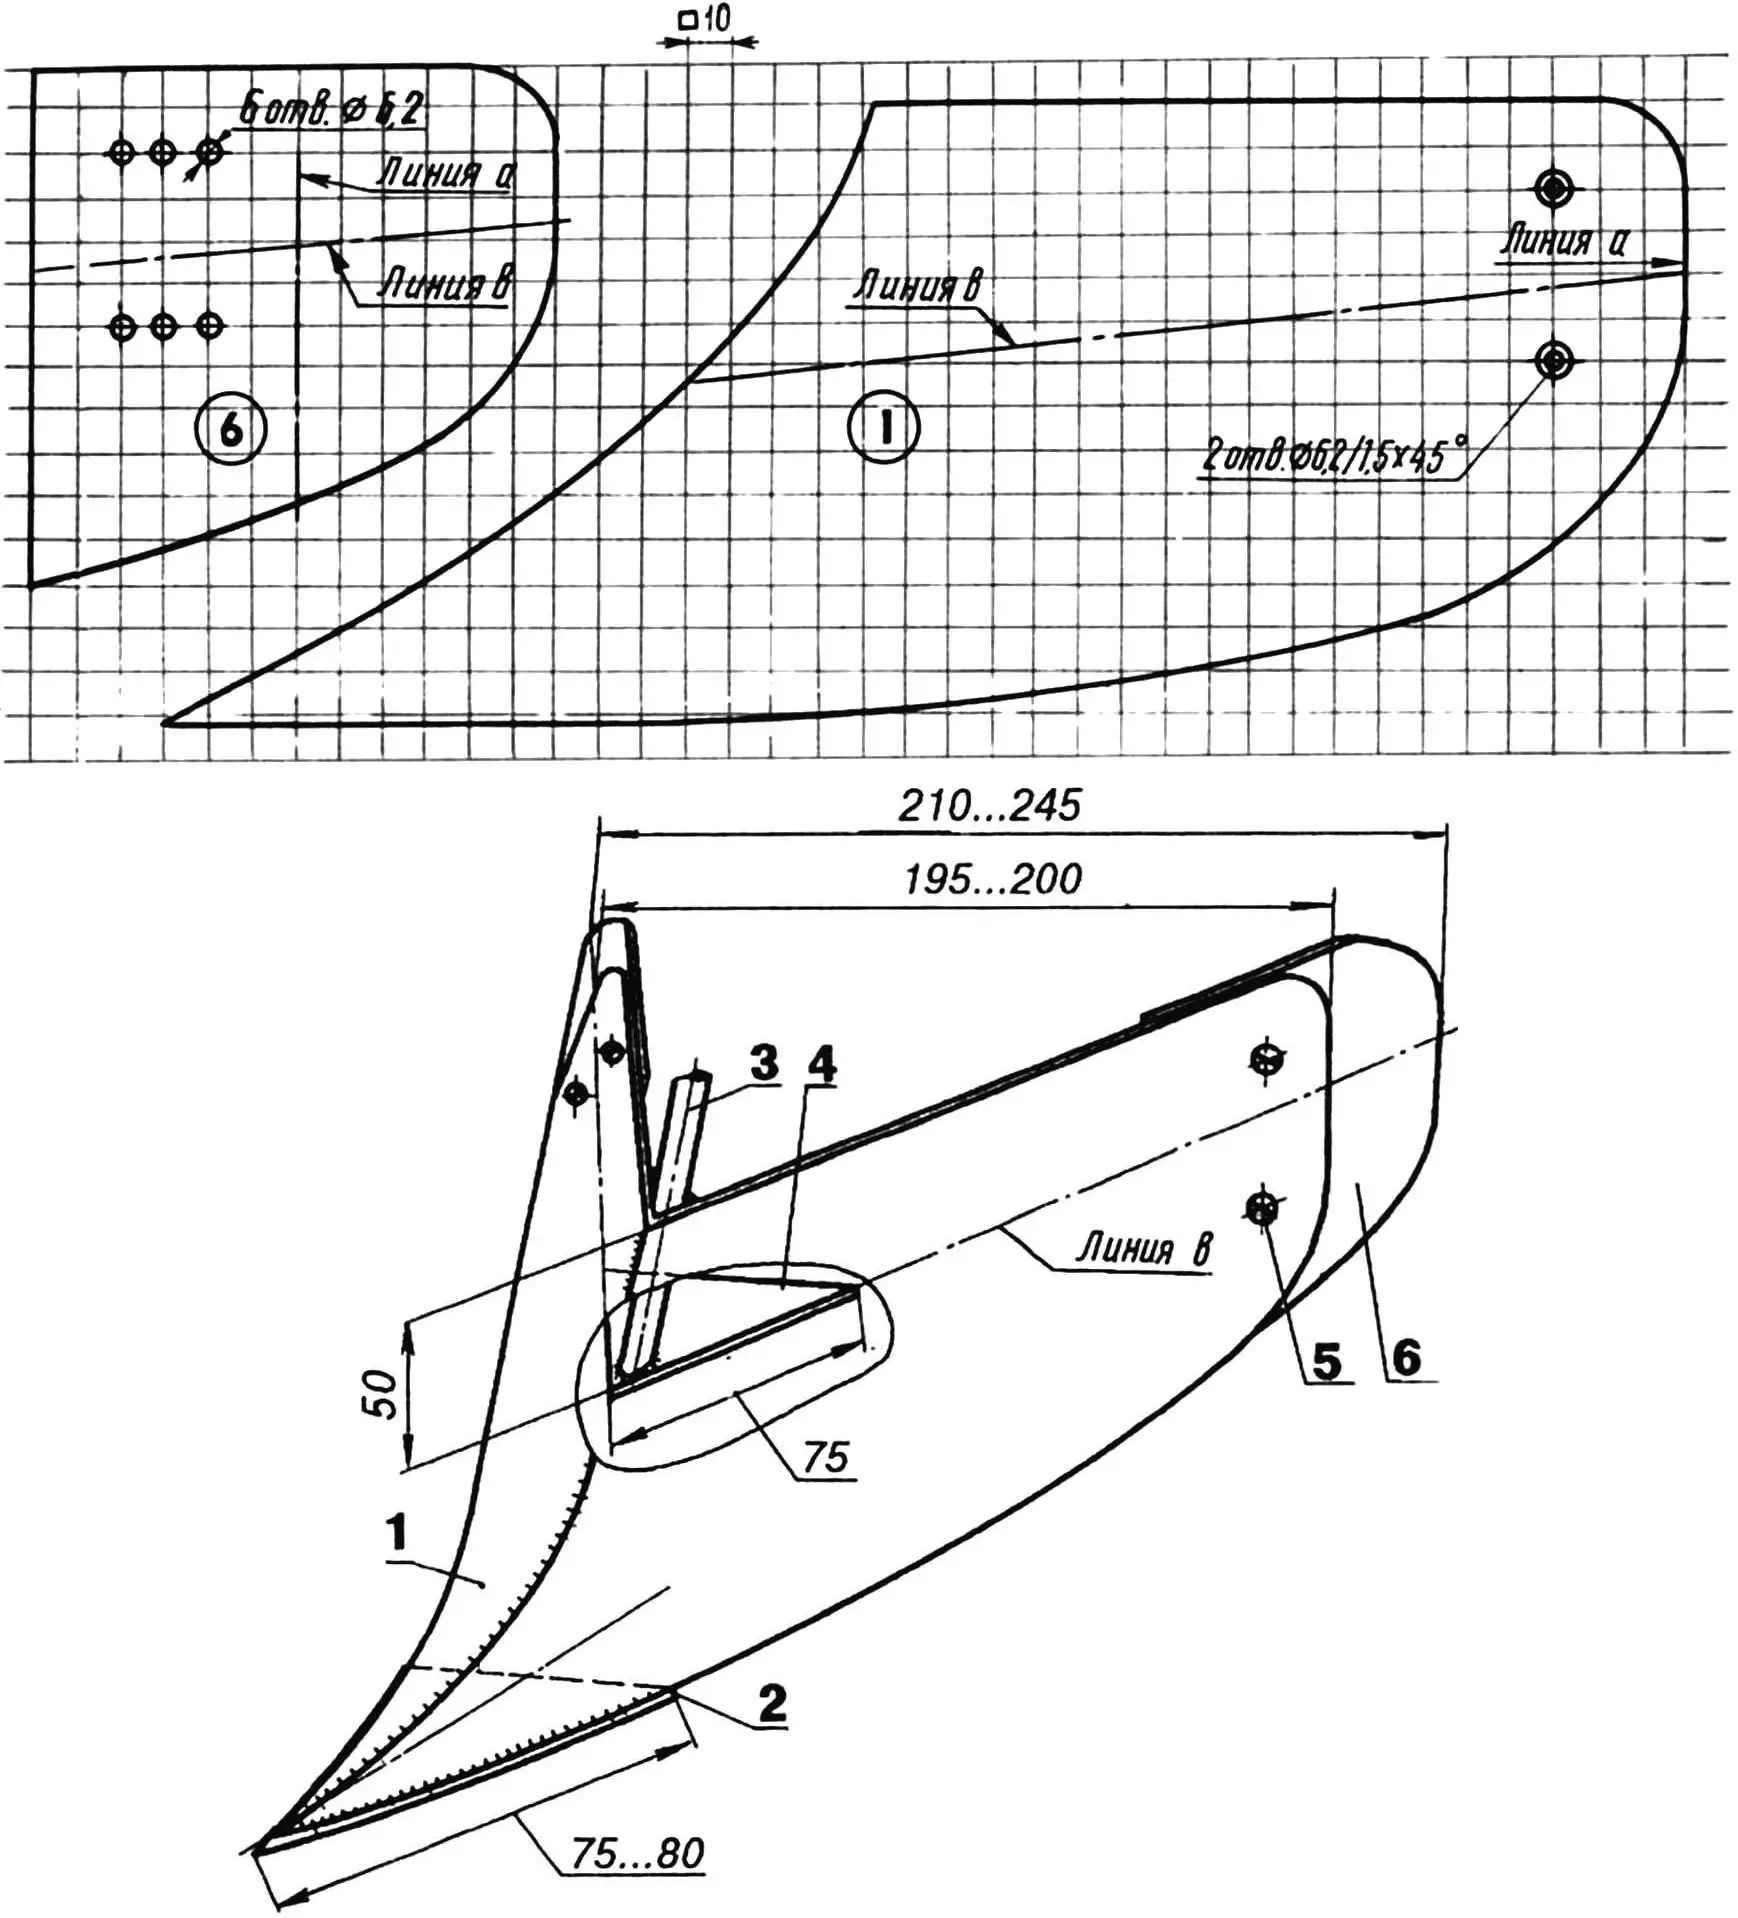
1 — plowshare (“stainless steel”, sheet s2, 2 pcs.), 2 — segment (from a mower), 3 — holder (steel rod Ø20), 4 — triangular spacer (St3, sheet s2), 5 — countersunk head screw M6, nut M6 (4 pcs.), 6 — end piece (St5, sheet s2, 2 pcs.).
The small plow is made of 2 mm sheet steel (stainless steel is better — less soil clods stick to it).
The blanks were cut according to the development, bent to the required profile and welded. In the nose — a segment from a mower, very wear-resistant. The working edge is sharpened at an angle to the horizon characteristic of tillage tools.
The feature of the small plow attachment: in the holder — opposite the bolts and strictly along the axis — a groove is cut, helping to maintain the working position of the small plow when changing the depth of its penetration. Initially, the holder was only “tacked” by welding to adjust the small plow along the horizontal and vertical axes, and then finally welded.
The 165 mm diameter wheel for the weeder-hiller was taken from a garden cart. However, experience has shown that this size is too small, a wheel with a rim diameter of, say, 250 mm would be needed with approximately the same disc width. On such a “large-wheeled” machine, you can work without an assistant — it better overcomes ruts, bumps and other obstacles.
The rod with handles in the proposed version is of a somewhat more complex design. This allows it to be adjusted to a specific operator.
The possibility of turning and folding the rod is also provided, which creates additional convenience when transporting and storing the weeder-hiller.
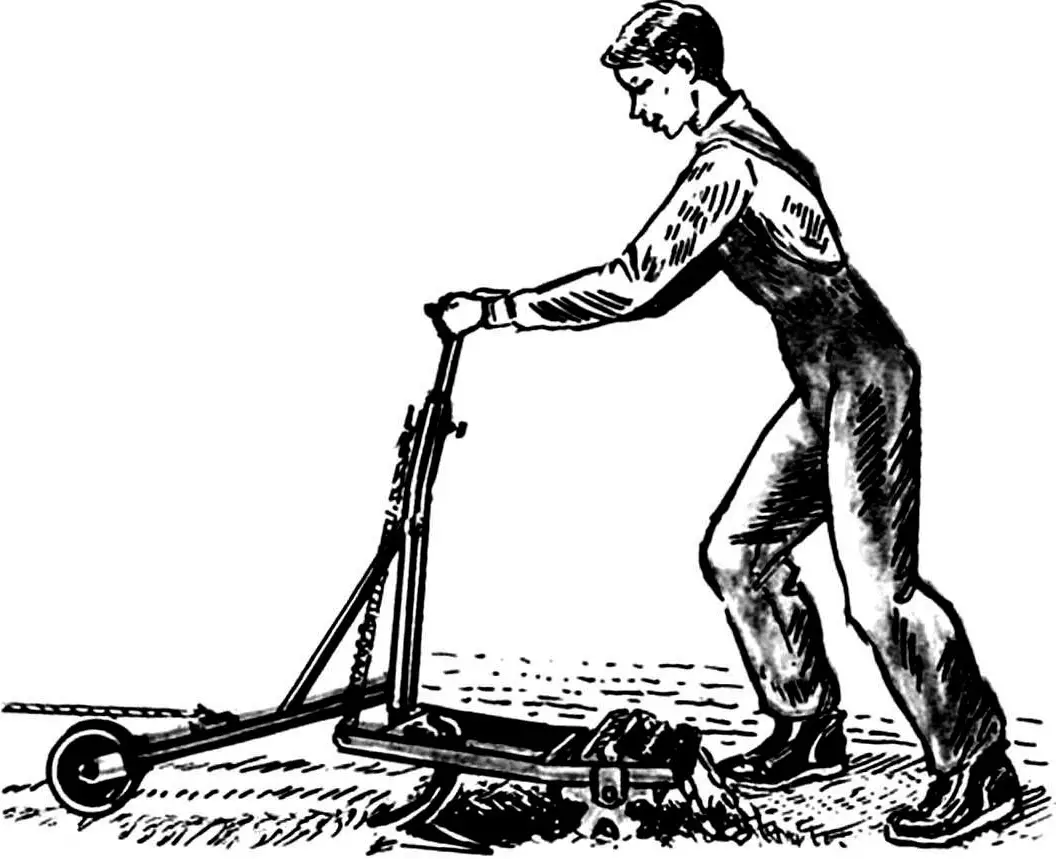
With the appearance of potato shoots and (as if competing with them) hated weeds, gardeners unanimously take up… grandfather’s hoes. The author of these lines was no exception before. But, having thoroughly calloused his hands on weeding with primitive tools, he nevertheless began to join innovative creativity. Fortunately, by chance, he acquired a good object for modernization exercises — a cultivator-weeder. Manual, of course. Domestic and quite affordable.
I immediately encountered the shortcomings inherent in this mini-equipment. First, I (like, apparently, other gardeners) was not satisfied with the small working width of the “factory” weeder. Second, the knife blade itself left much to be desired (far from optimal sharpening angle, weak steel from which it is made). Third, the “mechanics” kept “jamming”…
But there were also pluses. In particular, the presence of special braces that allow close approach to potato stems when processing row spacing.
Experimenting with purchased mini-equipment, I came to the development of my own technical solutions. As a result, a CULTIVATOR-WEEDER appeared, which has proven itself well in the cultivation of not only potatoes, but also other agricultural crops. It is more convenient to work on it together, moving along the rows at the speed of an average pedestrian. Although, if you try and push harder — the effectiveness will be even greater. And the front part of the frame will serve as a kind of beacon. More precisely — a support wheel oriented to the middle of the row spacing, since the cultivator itself, cutting into the surface layer of soil, becomes simply invisible in the resulting crumb.
There was, however, an attempt to make the cultivator blade more noticeable by additionally installing vertical end pieces. But I had to abandon such an idea soon — too much “trifles” clung to such an elaborate “hoe”.
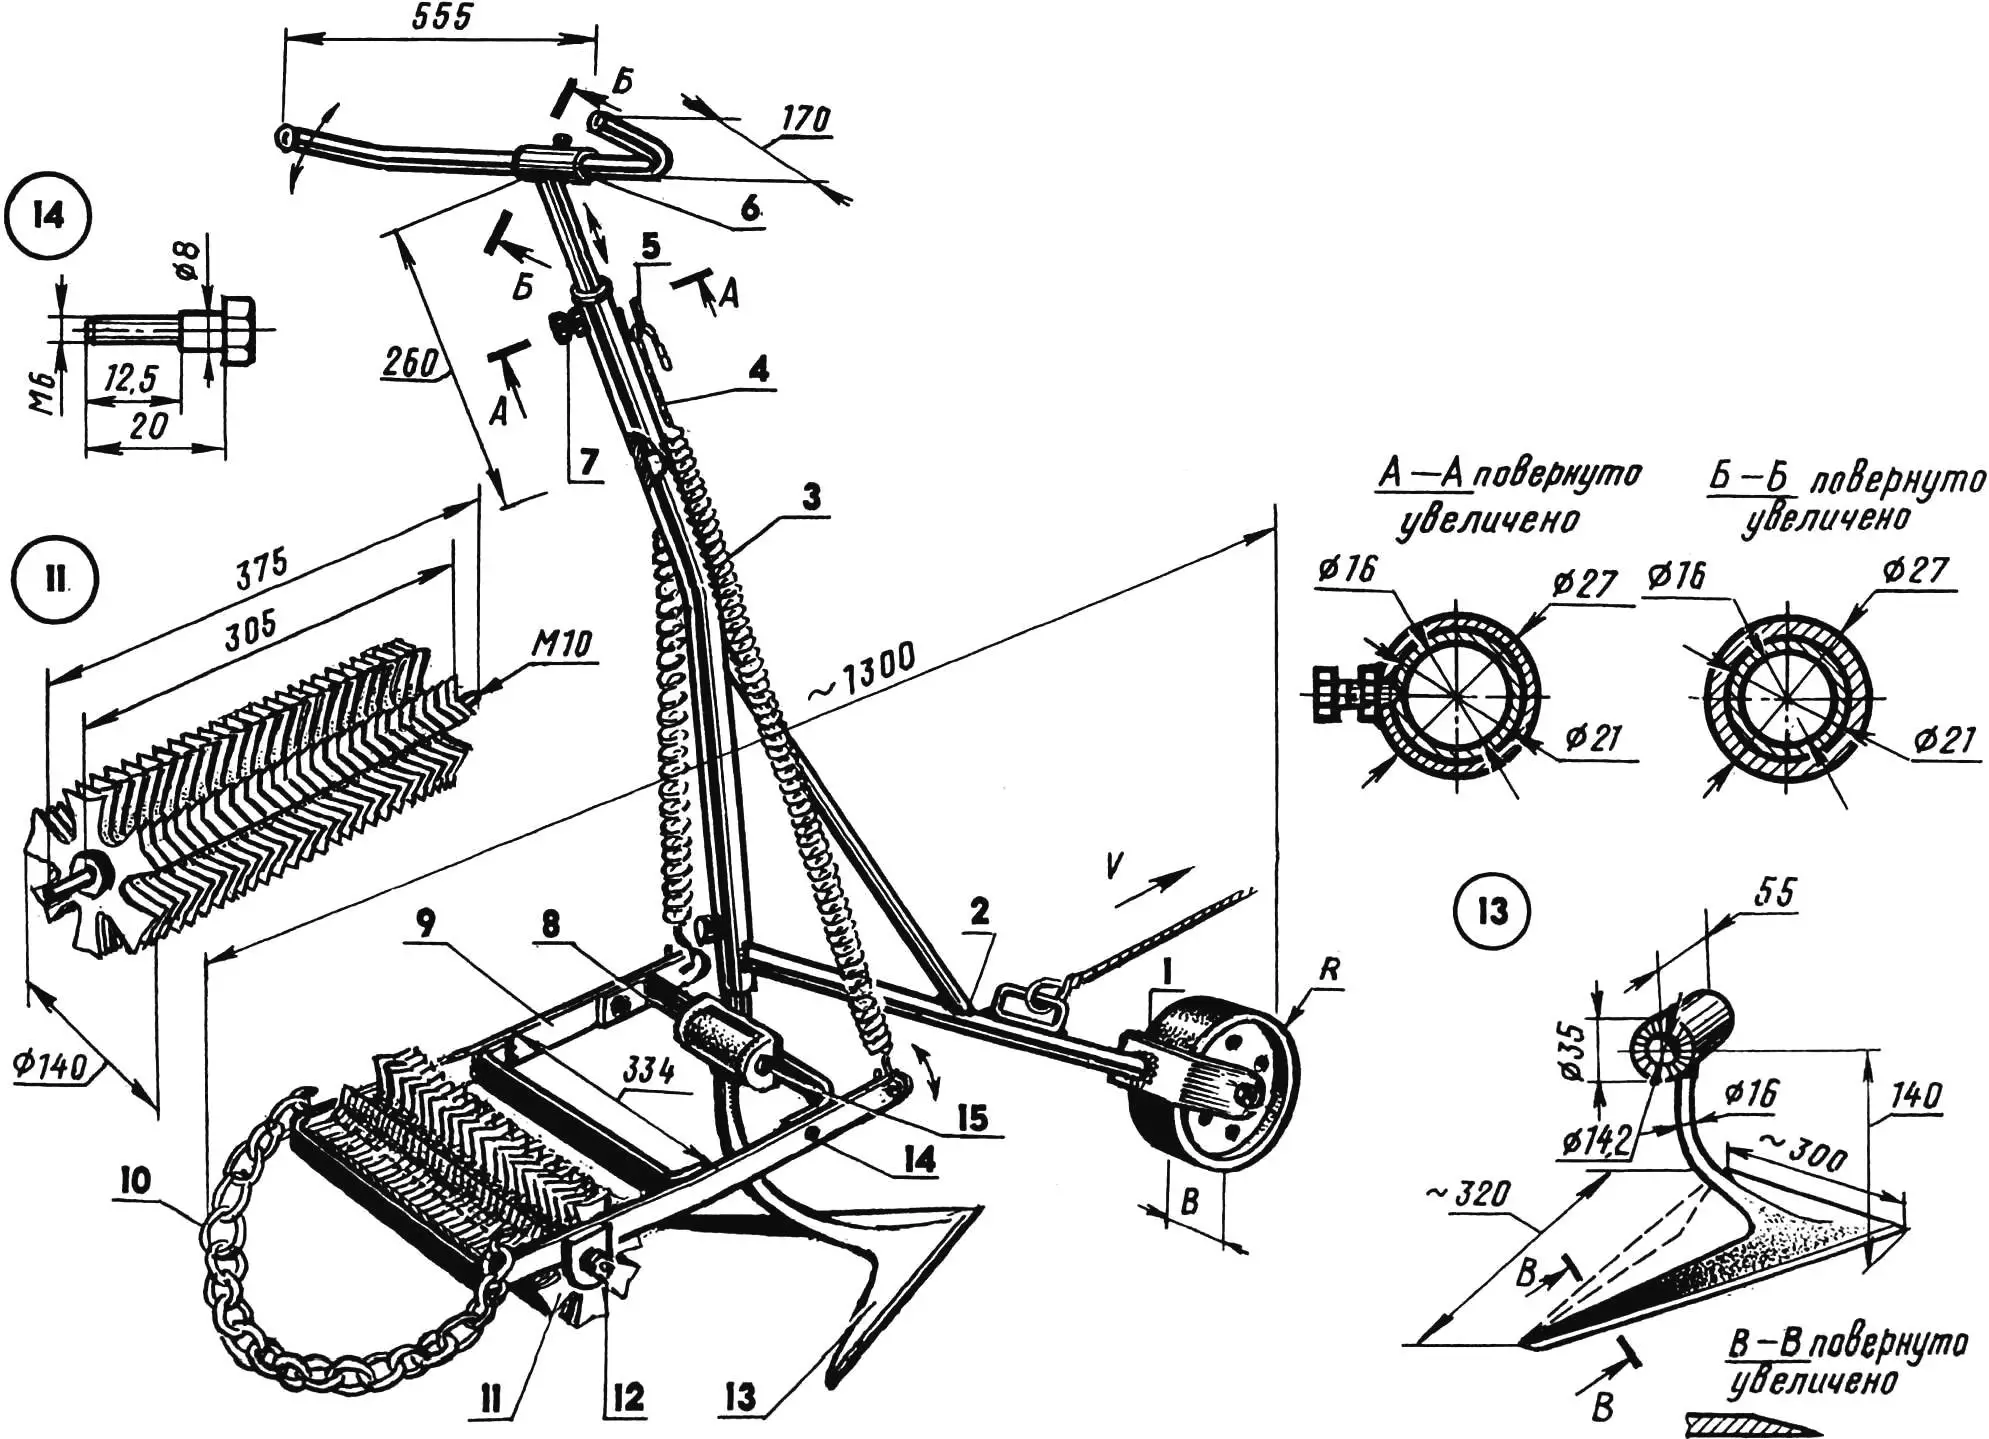
1 — wheel assembly (from garden cart), 2 — main frame, 3 — spring, 4 — chain lock, 5 — hook, 6 — U-shaped swivel handle assembly, 7 — fixing hex head screw M12 (3 pcs.), 8 — swivel bracket, 9 — weeder frame (steel strip 20×7), 10 — hanging rake (steel chain from rod Ø10), 11 — 15-star weeder-clod breaker (from agricultural machinery), 12 — nut M10 with locknut and washer (2 pcs.), 13 — swivel cultivator blade (from agricultural machinery, modified), 14 — axle-bolt with nut and washers (2 pcs.), 15 — bolt M14 with nut (2 pcs.).
The variant, the sketches of which are given in the figure, is designed for inter-row processing of potatoes with a planting width of 0.5 m. Those who are used to other seeding rates will have to make appropriate adjustments.
It is easier to take a ready-made cultivator blade (for example, from decommissioned agricultural machinery). But you can make it yourself, especially since the main dimensions are indicated on the sketch. In the upper part, the blade has a bushing with a “mouse tooth” type knurling (details on how to make it see in No. 1 of the magazine for 1993) on the ends — for fixing in the knurled cheeks of the swivel bracket and subsequent tightening with an M14 bolt with a nut. As a result, it becomes possible to easily, quickly and within wide limits change the installation angle of the cultivator.
The weeder-clod breaker is also better borrowed from agricultural machinery. Installed in the rear part of the homemade frame, it together with the cultivator (on a swivel bracket!) forms a kind of hinge, the semi-axes of which are two steel M6 bolts with nuts and washers. And for extracting mangled and half-ground weeds from the conglomerate formed in the working zone, a heavy multi-link chain is used, freely hung on end hooks. The stems-roots of weeds pulled to the surface by the rake wither and die in dry sunny weather.
The U-shaped swivel handle used in the cultivator-weeder is practically no different from the previously considered analog. Another thing is the spring introduced into this design (wound from 1.5 mm steel wire) with a chain lock and hook. Such a seemingly simple device is given a special role: to serve as both an indicator and a regulator of the load that the cultivator-weeder experiences during operation. It also performs the functions of pressing the working organs to the soil surface depending on the condition of the latter.
The load, naturally, increases when working on heavy, wet and sodded areas. Soil sticks to all structural elements, clogs the weeder drum…
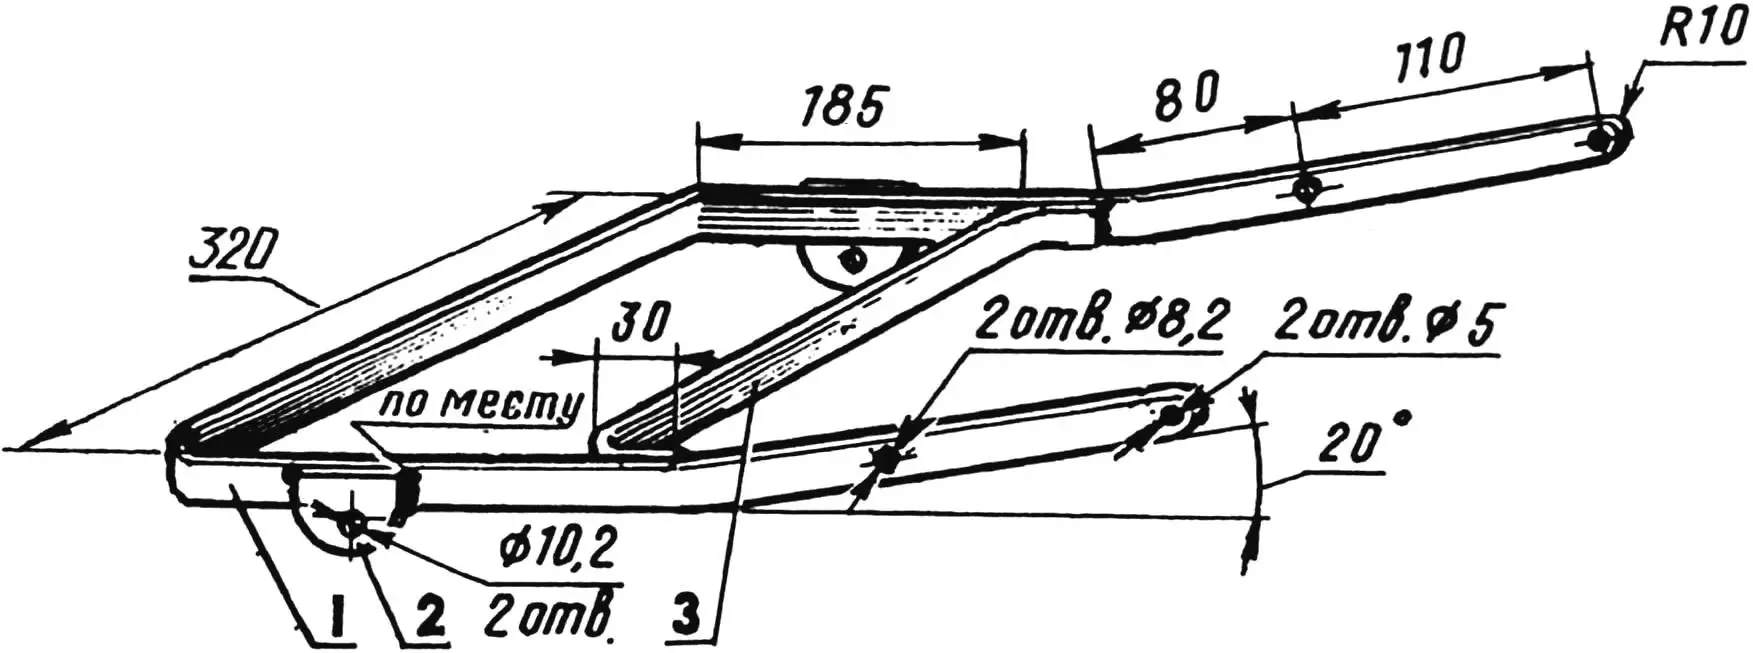
1 — base, 2 — eye (2 pcs.), 3 — crossbar.
Periodic shaking of the unit helps. To make it faster and more effective, I recommend welding small stop washers to the weeder frame crossbar (not shown conditionally in Fig. 2). Just pull the handle up, and the rear tips of the blade will rest against them. Well, a jerk will cause a shake of the structure itself, as a result of which all the stuck-on material will immediately fly off and the equipment will be ready for work again.
And one more thing. Make a long hook like a poker from 6 mm “rod”. Hang this tool on your arm during weeding so that you can quickly clean the frame or, say, the same star weeder from tangled roots and other things as needed.
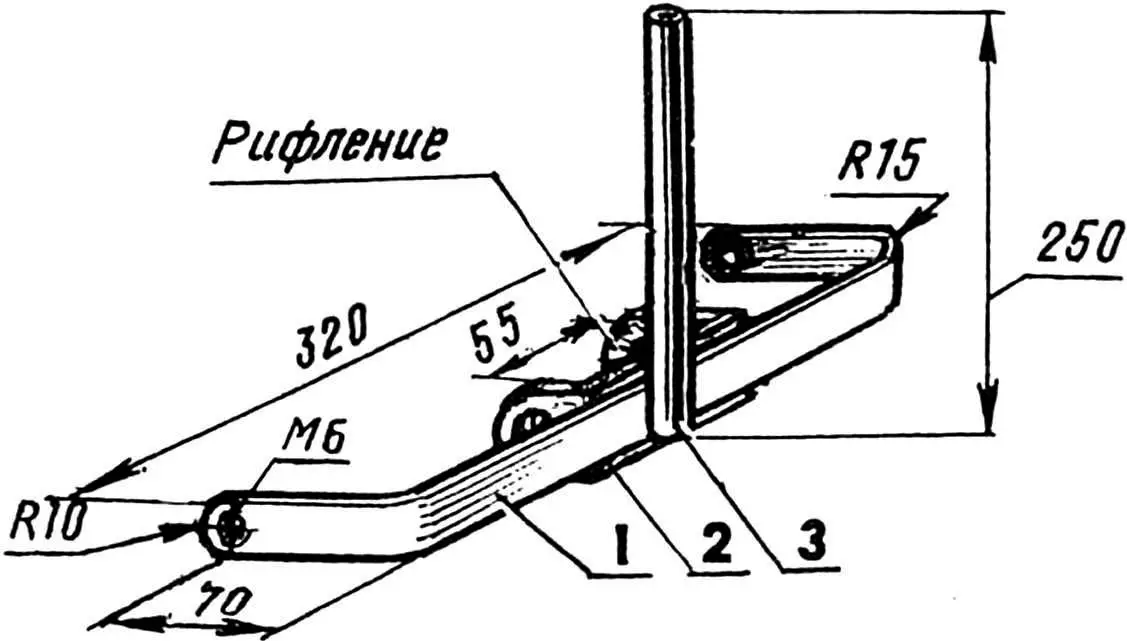
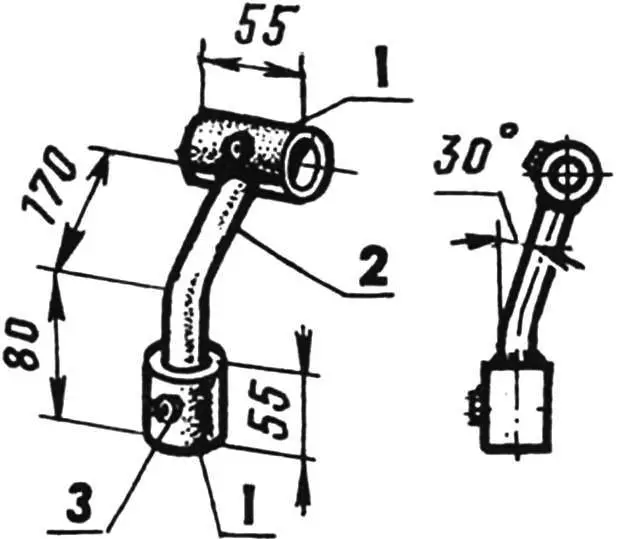
1 — bracket (steel strip 20×7), 2 — cultivator bracket (steel strip 40×7), 3 — stand (steel pipe 21×2.5).
With the mechanization of weeding, we can say, we figured it out. Next in line is hilling potato plantations. Any gardener knows not by hearsay, but from their own hard-won experience, how difficult this work is. And time to complete it, as a rule, takes a lot. You will be exhausted, even if you take a small plow-hiller as an assistant, the advantages of which are described in the previous issue of the magazine.
The situation can be improved, in particular, by using the considered small plow, if you install it instead of the cultivator blade.
But there is another, cardinal solution: to acquire more specialized equipment.
1 — stand (steel pipe 27×3, L700), 2 — brace (steel rod Ø12), 3—drawbar (steel rod Ø8), 4 — fork (St3, strip 40×7), 5 — longeron (steel pipe 27×3, L500), 6 — nut M10 (3 pcs.).
DISC HILLER will not let you down here. Like the designs considered above, this homemade unit can be operated by one operator. But it is better to work with a partner: everything goes faster and better then. Both discs (and I recommend taking them ready-made — from a potato planter or other types of agricultural machinery) with adjustments made according to the sketch (Fig. 8) move easily and smoothly, leaving behind an even row with hilled plants according to all the rules of agricultural technology.
1 — processed potato row, 2 — hiller disc assembly (from agricultural machinery, 2 pcs.), 3 — cam (from agricultural machinery, 2 pcs.), 4 — T-shaped bracket, 5 — stand, 6 — steel scraper (from agricultural machinery, 2 pcs.), 7 — bridge beam (steel pipe 32×2.5), 8 — stop bolt M10, 9 — handlebar-beam.
Having high performance data, the proposed device is quite accessible for manufacturing by any DIYer. As they say, if there is a will. The hiller is comfortable, quickly and easily disassembled for transportation and storage. And with discs (especially when they are from a serial potato planter) — no hassle. Smaller (therefore, more convenient) working diameter, hub ready for quick assembly, material of the blade resistant to the abrasive action of the soil. Well, if the disc blade becomes dull — it can always be sharpened on a grinder.
1 — bushings (steel pipe 45×6.5), 2 — crosspiece (steel pipe 32×2.5), 3 — nut M10 (2 pcs.).
I recommend equipping the hiller, as shown in Fig. 5, with two sickle-shaped scrapers. As a material for their manufacture, the blade of an old, long-served hacksaw for wood is perfect.
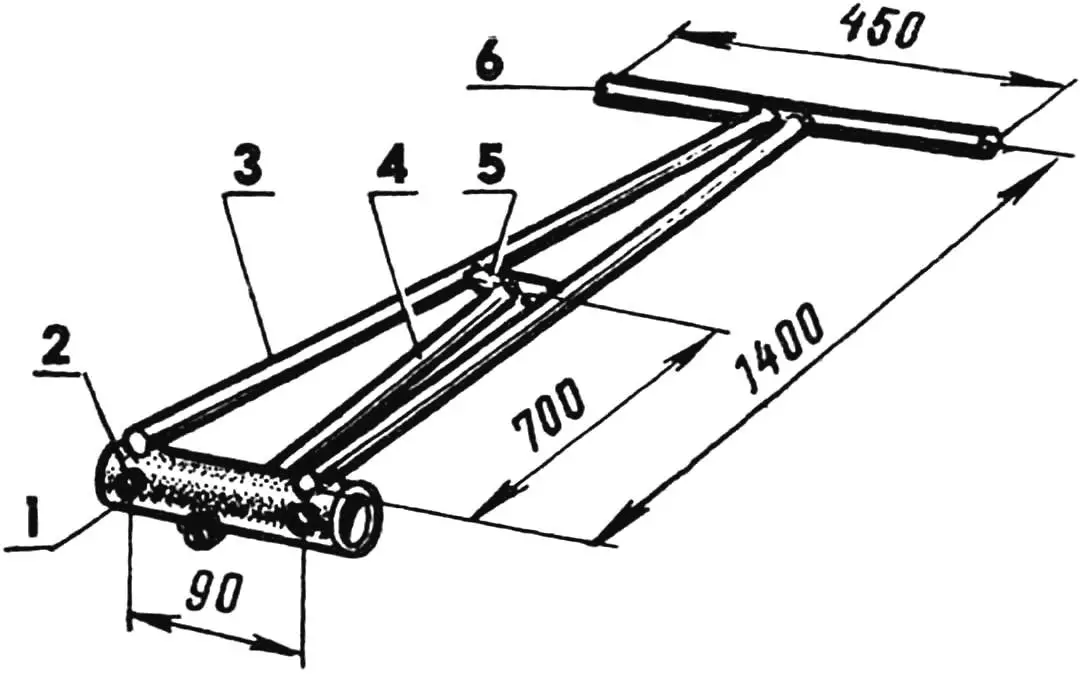
1 — bushing (steel pipe 45×6.5, L120), 2 — nut M10 (2 pcs.), 3 — longeron (steel pipe 21×2.5, L1400, 2 pcs.), 4 — brace (steel pipe 21×2.5, L700), 5 — crossbar (steel pipe 21×2.5), 6 — handle (steel pipe 21×2.5).
After the tubers ripen, it is finally time to harvest. Here, too, it makes sense to move away from the grandfather’s technology. For example, to reduce “labor costs when digging” switch to using a special shovel with a hinge that exceeds the level of the usual “stepping” platform by 60 mm. You can also successfully use devices, the description and drawings of which have been repeatedly published on the pages of “Modelist-Konstruktor” (see, in particular, No. 7’71, 8’71, 3’72, 11’73, 5’81, 7’81, 10’81, 11’82, 3’85, 9’87, 9’92, 10’92, 7’94 of the magazine).
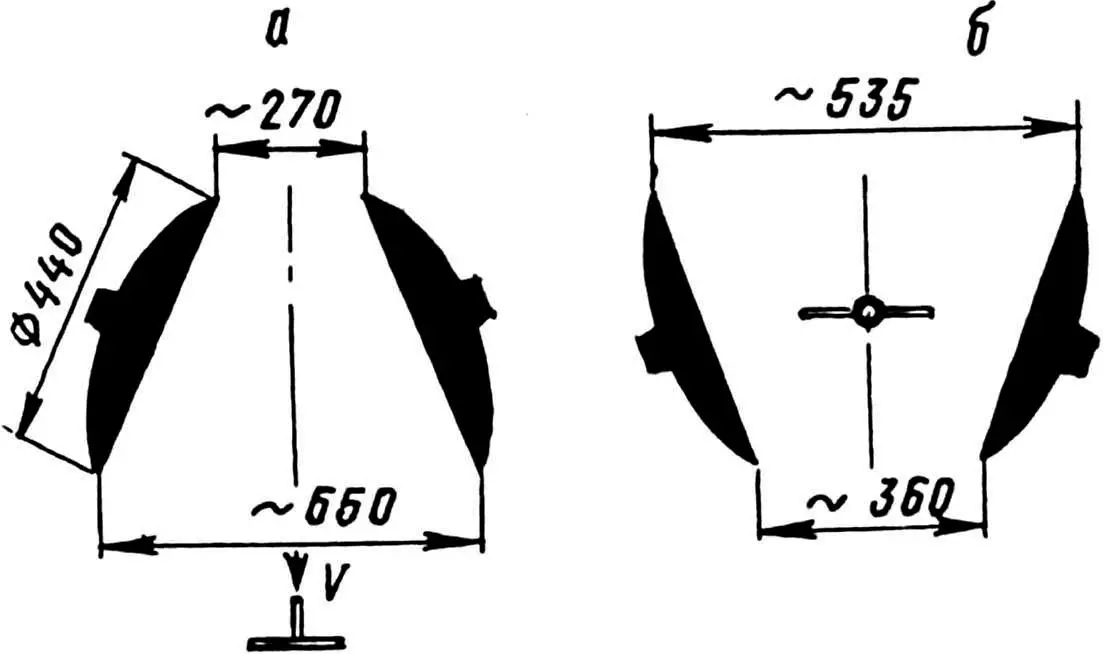
a — camber, b — toe-in.
Based on my own experience, I recommend digging ripe potatoes with a small plow with a plowshare. Last year, for example, this technology allowed to quickly and without losses harvest the entire grown crop. It was pleasant to see how after the passage of the named plow of the first row, the tubers ended up in the formed furrow one by one: clean, firm.
The plowshare during digging was installed so that its nose went at the bottom, without cutting the tubers themselves. Passes — through the row. After selecting the potatoes, the remaining rows were dug up. Moreover, the tops were mowed in advance so that nothing would interfere with the work later. And the digging itself was carried out by three people: two in front pulled the small plow by the rope, and the third pushed it from behind. The work went well. I’m sure: and you will have no worse!
«Modelist-Konstruktor» No. 8’97, M. VALUY, Chernihiv Region, Ukraine
Recommend to read
 FROM FLASHLIGHT INTO A FLOAT
Many are addicted to fishing for them this activity is a fascinating vacation. The very same UDA, rod, adise is one of the oldest fishing gear; by definition of V. I. dal's dictionary,... RESCUE DOWEL
If the drilling hole in the concrete wall towards the drill catches a very durable stone, it is even a great tool with a well-sharpened carbide-tipped is powerless: the drill leads to...
