
 Model glider Oktyabrenok (Fig. 1) simple in design. It can build every student. Needed for the production of pine slats, some plywood and tissue paper. And best of all such models to build model aircraft kit-parcel No. 15 (price 3 R 80 K.). It is possible to build a 12-15 models.
First of all, vicentita a working drawing of the model in full size: wing, stabilizer, fin. Production models start with the fuselage. Take a pine rail section 5X9 mm and a length of 700 mm. it is Possible to plane the rail pine wood: dry, nemolodoy, without knots and prelosti, with fine and straight the layers of wood.
Around mid-rail gradually tapering towards the end. The nose of the fuselage cut out with a jigsaw from plywood in the thickness of 4-5 mm. In this part cut out the hole, as shown in the figure. This hole is closed with the two sides of the side cheeks of plywood 1 mm thick or made of cardboard and is used as the camera for the shot for the alignment of the glider. The cheeks are glued or fixed with small nails.
The forward part affixed to the rack two or three nails and glue.
The wing consists of longitudinal rails (front and rear edges) and cross bars (ribs). For edges, need a pine slats cross-section of 4X4 mm (rack kit No. 15 it is necessary to process an emery paper).
Fig. 1. General view and drawings of the airframe Oktyabrenok:
A — bow-part of the model, B — camera for the fraction, In — wing mount, G — rib of the wing and device for production of ribs.
Fig. 2. General view and drawing of the bearing.
For making ribs, you need to make a simple device. Find pine Board (bars) with a width of 120 mm, a length of 300-400 and height of 30-40 mm. the Upper part of the bar prostrugivajut, and in cross-section its shape should be similar to the profile of the wing. Laterally to the bar by means of screws fasten two corner made of aluminum, as shown in the picture (they can also be made of iron or tin). One such device is enough for the entire group.
For ribs need five pine slats with a cross-section 4X2 mm, length 120mm. First, the slats have to be impregnated with water, even better to steam (to drop to 10 — 15 minutes in hot water). After that the Reiki be flexible and fit into the fixture. They can be easily bent and, when dry, retains the shape of the profile.
The front and rear edges of the wing and end plates (they are straight, but can be made in form of a profile) are interconnected with corners made of tin size 30X4 mm. the Corners are joined with edges of the wing and end plate with thread and glue.
The resulting frame is put on the drawing and with a pencil mark the locations of the ribs. In these places with a knife make a puncture and insert ribs, the ends of which are pre-focus. The joints promazhte glue.
To the front and rear edges near the middle of the rib of thread, attach strips of sheet metal the size of 30X4 mm and over the joints with glue. In the center of the edge of the wing where the fixed plates of tin, make the fracture so that the ends of the wing relative to the center was raised at an angle of 10°.
Now we have to make a “hog” for mounting the wing to the fuselage. It can be of two types. First: take a rake with a length of 160 mm and a cross section of 4X4 mm. To her thread holding the rear edge of the wing and under the front edge it is necessary to put the pine bar height 7-10 mm. the Second type is block you can put a brace of strips of thin aluminium or tinplate, pre-arching it as shown in the figure. It all attached to each other with thread and glue.
The wing is ready, now glue it in tissue paper and even better macalintal (which is embedded in the set No. 15) — in this case, the model will be more tenacious.
The stabilizer and rudder are made similar to the wing, but they do not have ribs. Section reek it is better to make thinner than the wing. The stabilizer and fin thread and glue to attach to the rack and the fuselage and pasted tissue paper or michaletos.

Fig. 3. The drawing of the screw.
The manufacturing process of the screw: A — side template, the upper template.
Now the wing with rubber bands need to be mounted on the rack and the fuselage, as close to the bow and center the model. The center of gravity should be located approximately 1/3 the width of the wing from the leading edge. Download bow camera shot (or small pieces of lead) until until the balance. If the camera is already full, and tail heavy, you need to move the wing back (so it is attached with a rubber band).
The model is ready! Safely proceed to trial. First smooth push let the glider with his hands, and if he behaves well in flight, it is possible to start model runs with the help of lifelines (thread length 30 — 50 m) with a wire ring at the end — it can be made from a paper clip. To run the model on the Leer better in low wind.
Model glider Oktyabrenok easily be converted into a plane. For this you need to make a new rack and the fuselage, the propeller and the bearing (wing, stabilizer and fin) are suitable without alteration.
Rake-the fuselage: pine cross-section of 6X10 mm and length 1000 mm. the Rear end of the rack thins out to a section of 6X6 mm. In rake front stabilizer bottom is inserted a hook wire with a thickness of 1-1,5 mm. At the front end of the rail cut out a ledge that will be worn bearing (Fig. 2).
The bearing is made of tin. Cut with scissors a breakdown of the bearing, a pair of pliers to bend the steel wire 1.5 mm bushing. Then, spam the connection, make the box and solder it. The box should be tightly worn on the front end of the rod of the fuselage.
The procedure of production screw (Fig. 3). First, fabricate the top and side templates out of plywood with a thickness of 1 mm or cardboard. Templates are made for one half of the propeller, as the blades are the same. The numbers 25, 50, 75, 100 and 120 (see Fig. ZB) indicate the distance in millimeters from the center of the screw to the appropriate section. The figures showing the width of the blade in each section, divide in half and put aside from the centerline in both directions as the blade symmetrical. Connecting the resulting points with a smooth curve, will receive a template of the screw.
The screw is made of dry lime bar size mm. 240X24X15 Outlining on the bar at the top of the template with both sides of the future shape of the screw, drill a hole for the axis. For the convenience of further processing make the three cut on both sides of the bar, as shown in the figure. With a knife carefully cut the outline of the screw, the treatment site abrade with a file. On the side pattern, draw a side view of a screw.
Carefully cut screw along the contour lines and smoothen the surface. After the blades cut with a knife, treat them with a file, glass and cloth. Treat the propeller as long as the thickness of the blades, the sleeve is equal to about 2.5 mm, decreasing towards the ends up to 1 mm. Both blades must have strictly the same shape.
The finished screw should be coated with a nitrocellulose lacquer. The front hook is made of steel wire with a diameter of 1.5 mm. Model airplane ready. Hooks hung from the rubber motor and test the model in flight.
A. ERMAKOV, honored coach of the RSFSR
Recommend to read
 WITHOUT A FUNNEL
Now in use many soft plastic bottles, cups, jars. To all the other advantages of such packaging is the fact that with its help. you can drink fluids in narrow vessels even without...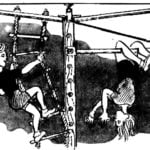 COLUMN HEALTH!
Complex sports equipment is necessary today for any home and especially that in which there are children. Ring, rope, rope ladder, horizontal bar and the Swedish wall — all this...
