
 For making models are used, the stems of cereals: oats, rye, barley, Timothy and reeds.
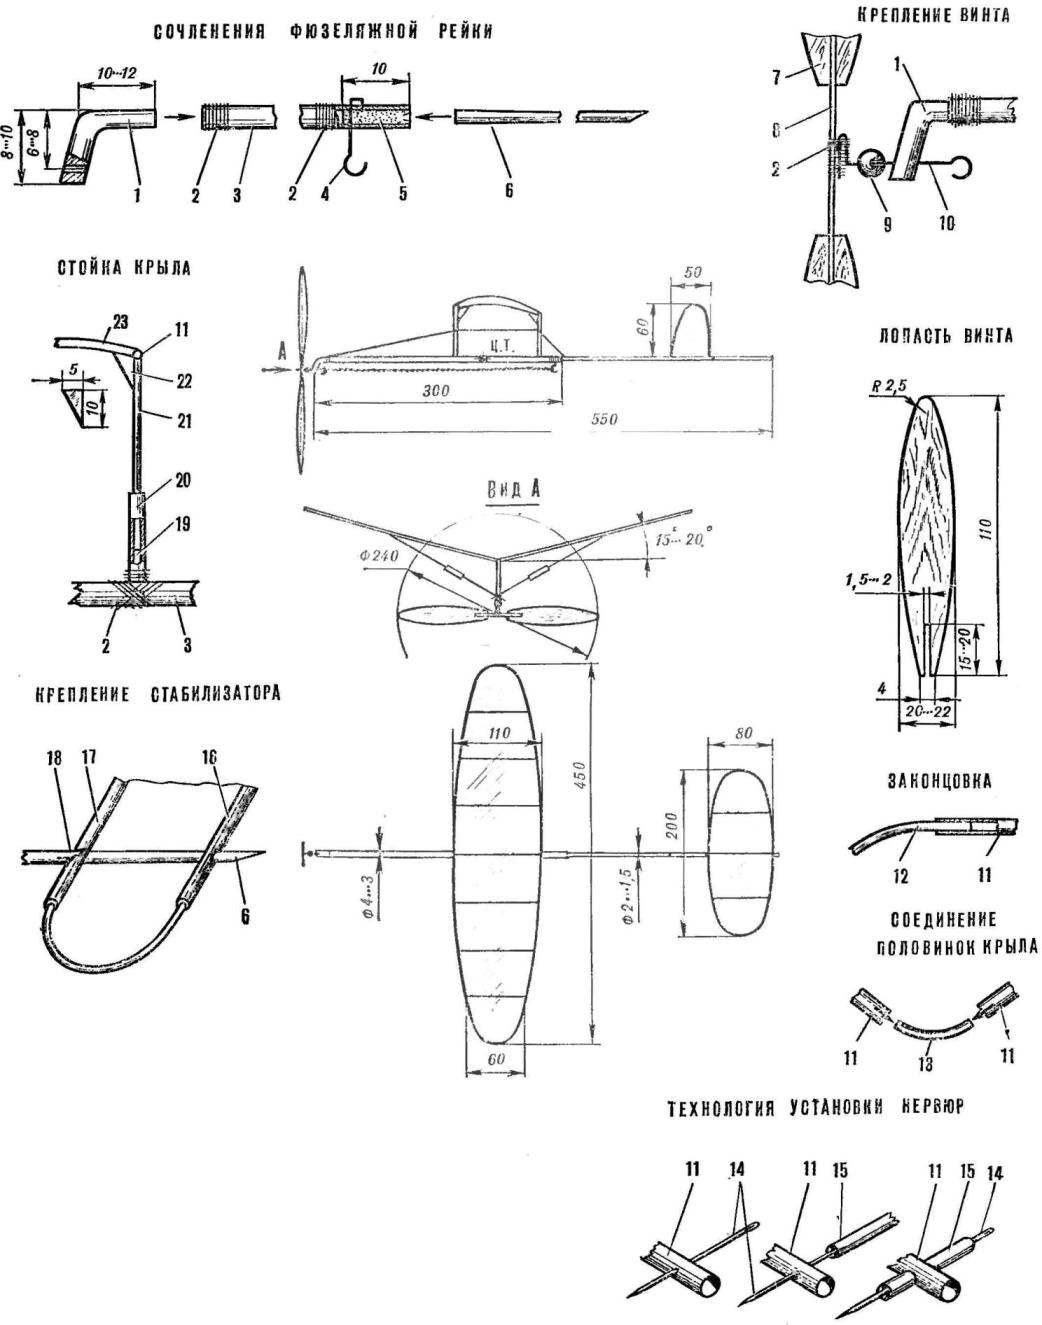
The FUSELAGE consists of two parts. The first is a stalk of straw Ø 3-4 mm, the second straw ravine Ø 1.5—2 mm. They are connected to an adapter. It can be done in different ways: at the end of the first part of the fuselage to attach the foam, and poke a hole with an awl or paste additional transition straw tube. Ravine needs to go in there with a tight fit, but the node should perform collapsible.
The PROPELLER is the most time consuming part. Manufacture it from the fake plates, polished them with sandpaper before the transmission (thickness about 0.2 mm). With a knife or jig saw to make each blade slot (as shown) and fasten them with nitrocream (Amalita) bamboo hub, Ø 1.5—2 mm, length 50-60 mm., Heat it over an electric soldering iron or a spirit lamp and screw blades in different directions at a certain angle.
Screw axis of a thin steel wire Ø 0,35—0,4 mm attach in the middle of the bamboo hub with yarn and glue. Wrap the front end of the fuselage with thread glue and insert the bearing from polyethylene or lime.
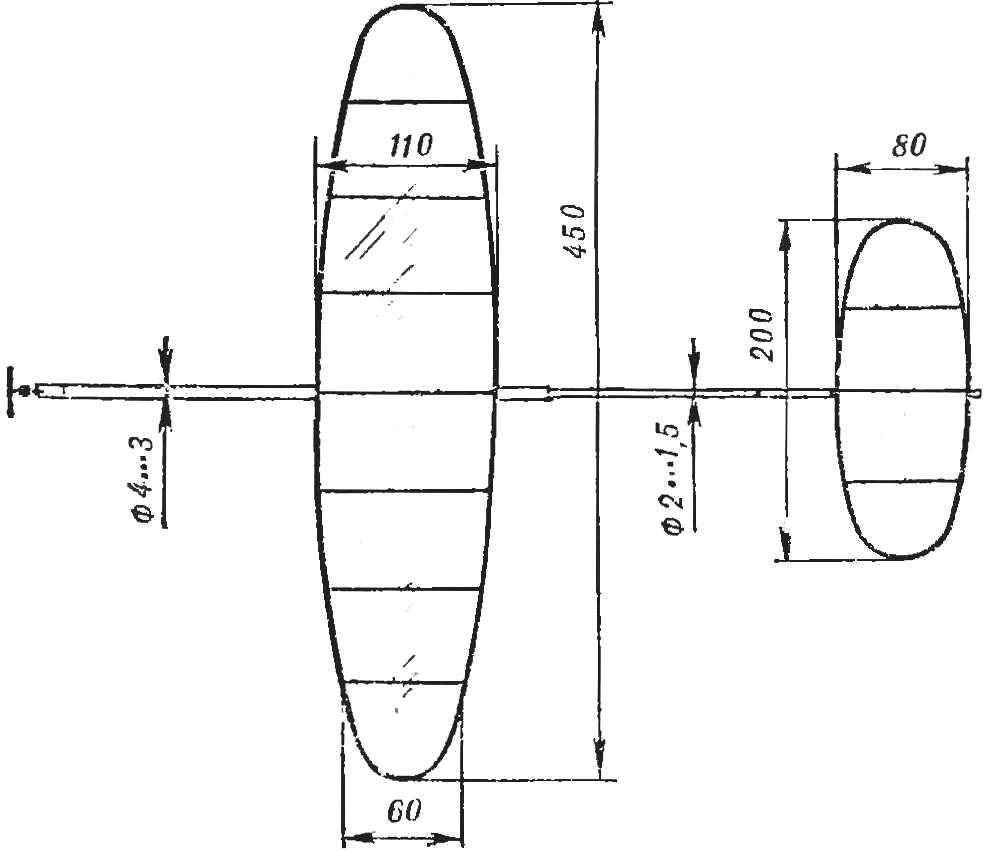
WING manufacture of straw Ø 1-1,5 mm. Thick, the ends must be pointing toward the fuselage. For curves use a thin wing stems, arching them over the soldering iron. In each half of the wing, insert the three ribs so that they go beyond the edge of the wing 15-20 mm. How to do it, shown in the figure.
The ribs Flex slightly, stick to the wing leading edges and protruding parts cut with a razor blade. With bamboo pins, curved to give the wing V-sbresny shape, glue connect one half of the wing on the other. These pins attach the Central rib, pre-arching it, and to the front and rear ends of triangular gusset plate of celluloid or film.
Model of straw:
1 — bearing (polyethylene, Linden), 2 — threads with glue, 3 — fuselage (straw Ø 3— 4 mm), 4 — hook (steel wire Ø 0,35—0,4 mm), 5 — clutch (foam), 6 — tail ravine (straw Ø 1,5—2 mm), 7 — blade screw (Linden), 8 — hub (bamboo Ø 1,5—2X60 mm), 9 — bead, 10 — axis screw (steel wire Ø 0,35—0,4 mm), 11 — edge of the wing (straw Ø 1-1,5 mm), 12 — ending, 13 — connecting rod (bamboo), 14 — needle, 15 — rib (straw), 16, 17 — rear and front edge of the stabilizer (straw Ø 1.5—2 mm), 18 — cut 19 — pin (bamboo, Ø 1.5—2 mm). 20 straw clutch, 21 — stand (bamboo, Ø 1.5—2 mm), 22 — Klondike (celluloid), 23 — the Central rib (straw).
To “scarf” glue bamboo wing stand Ø 1.5—2 mm and a length of 40 mm (front) and 35mm (rear) so that they were in the same plane. Now, puncture the front edges of the halves of the wing, a little beyond the middle of the place two brace of straws Ø 0,8—1 mm. Their free ends after the installation of wing to fuselage attach of thread and glue to the front lobby.
A wing of paste over the tissue paper. Lubricate stationery or casein glue edges and ribs and attach the paper around the perimeter with a margin of 10-15 mm After drying, a razor blade remove the excess.
The struts in the middle of the cut and cover them with clutches straws with a length of 20-25 mm. They provide an opportunity to reduce or increase the angle of attack of each half of the wing when adjusting the model.
REAR HOOK for the rubber motor — steel wire Ø 0.4 mm (paper pin).
The STABILIZER is made on the same technology as the wing. Attach it to the rear of the ravine, by inserting its pointed end into the hole in the middle of the trailing edge of the stabilizer. The front edge lock the ravine through the slits and glue. Next, proceed to fabrication of the keel. It ends taper and puncture the fuselage in front of the stabilizer, insert them and glue (similar to ribs). Stabilizer and fin can glue tissue paper.
Assemble the screw with the bearing by installing between it and the hub and the washer or bead. Put on the rubber motor of three or four strands cross-section 1 mm2. Secure the wing so that its front edge is located about 1/3 from the center of gravity. Match-mark on the fuselage. Fabricate two bamboo pins of the same diameter with racks and length of 15-20 mm and punctures the fuselage in place of the marks, insert the pins, pre-spearheaded and brushing glue their ends. Cover them with straw clutch with a length of 30-40 mm and attach to the fuselage with thread glue. The resulting posts should be in one plane with the bearing and rear hook. Then do the stretching of a thread between the fuselage and the struts, as shown in the figure. Install the wing and proceed to the adjustment of the model.
A few tips for beginners. If the model flies poorly, reinforce the rubber motor. Raising or lowering the wing for the struts, install the best angle of attack of the wing. Bending over the soldering iron at the right side of the tail of a ravine, until the model flew in a circle. The axis of the screw and washer more often oil. In the case of the shaking model test the balancing screw and the inclination of the blades. In the failure model can be easily and quickly repaired with straw couplings and glue.
Recommend to read
 JIG SAW, BUT NOT SIMPLE!
Having trouble with conventional saws to jigsaws, I decided to try a homemade option out of the wire, causing its surface subiram shallow risks. This nail file and is on the planned... An all-season luggage rack
When designing this car roof rack, the aim was to create a device that, in addition to everyday use, would suit the active outdoor enthusiast—allowing two sets of sailboards to be carried...
