The keel shape of a rectangular trapezoid with bases of 70 mm and 50 mm and a height of 70 mm fabricated from strips of the same cross section as the stabilizer. For the rigidity of glue reinforcing rail.
The toe of the fuselage made of plywood 3 mm thick with a cutout for the ballast. To wear saw out a few notches for handrail and drill a hole Ø 3 mm for pine pin. It is needed in order to attach the wing to the fuselage. Camera for ballast on the sides cover plywood with a thickness of 1 mm, and the top drill a hole Ø 3 mm. At a distance of 80 mm from the toe of the fuselage glue a small platform for the wing made of plywood with thickness of 1 mm.
The tail boom is in the form of strips 3X9 mm thick, to which is attached the nose part. On the same rack installed on top of glue the stabilizer and fin.
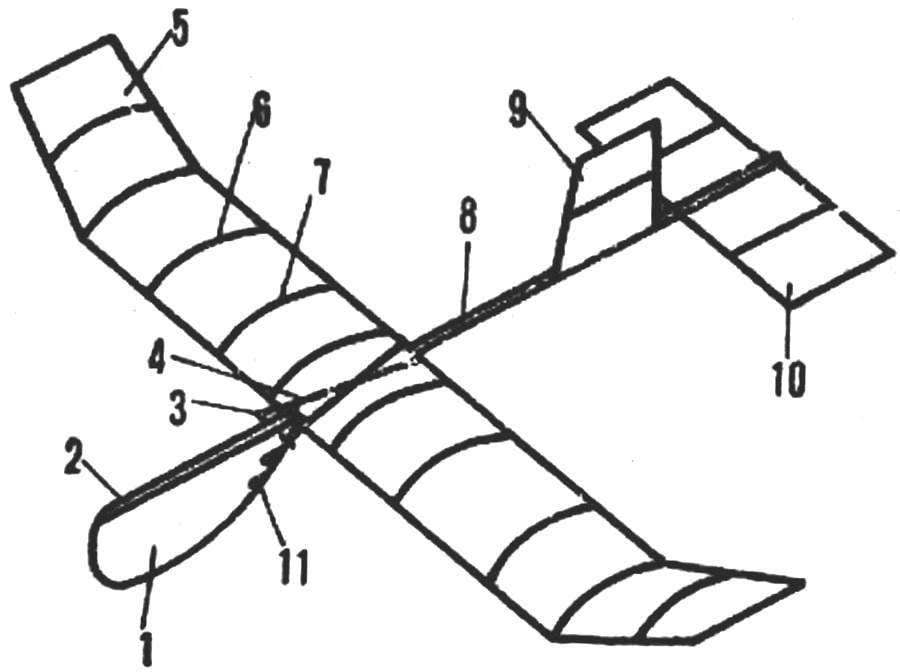
Model glider design S. Baksheyev:
1 — socks 2 — fuselage rack, 3 — pin, 4 — a platform for the wing, 5 — wing tip, 6 — wing, 7 — rib wing, the 8 — tail boom, 9 — keel, 10 — stabilizer, 11 — hook leads lifelines
To fit the model or mcalenney tissue paper or Mylar. Apply glue to the edges and ribs, put on top of the paper and press it with your fingers. Then glue the middle strip of paper. The polyester cording on the glue BF-2. On the finished joints spend hot, but not hot iron.
Adjusting the model is necessary in calm, windless weather. In the 3 mm Ø hole in the toe of the fuselage pour a shot or small pieces of lead to the center of gravity moved under the wing. Try to let the glider with it. If he quickly landed (dived), it is necessary to extract some of the goods, if, on the other hand, soared (skopiroval), and then cool down, lead must be added. A well-adjusted model should fly when running with the hands of 17-20 m.
Now try to start up a glider with a Leer. They may be of strong string or fishing line length up to 30 m with steel ring and box at the same end. A ring to hook it on the groove at the toe of the fuselage. The one who draws the rail, should run against the wind, looking glider. Another with the model in hand, runs a few meters, ensuring that the guard rails were stretched, and releases it. Model smoothly gets up high. As soon as the glider “climb” to the upper point, to weaken the guard rails, ring POPs out of groove (this can be found in the check box), and the model will start free plan.
S. BAKSHEYEV, Elektrostal
Recommend to read
 LINKAGE-“AUTOMATIC”
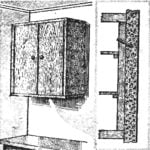
Usually to reinforce the cabinets on the stack, we Drill the horizontal holes, but if the plug is weak or loose fasteners, close to trouble: with the increase of the load the shelf can...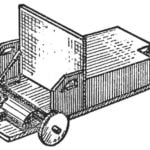 ELECTRIC CAR BATTERIES
You can make a simple model of the electric vehicle that will run on batteries. This will require: microelectrochemical PD-12A, flat battery, 4.5 V, two coils of No. 10 without thread,...
 Before starting work, carefully examine the drawing and description. Then prepare the tools: small plane, a sharpened knife, pliers or pliers and a jig saw with saws. Materials you will need: a pine rail, a small sheet of tinplate, paper, spool of white thread No. 10, plywood thickness of 1 mm and 3 mm, or micuenta tissue paper or polyester and nitrogly (it may be enamel, “AGO”, supercement, etc.).