Throwing model-polyopia su-24. The model is designed and manufactured in the laboratory aeromodelling Center for children and youth technical creativity of the city of Rybinsk for novice modelers. The prototype has become a modern supersonic bomber with variable geometry (sweep) of the wing su-24, standing in service with the Russian air force. The launch of such models always generate interest among club members, and spectators. And thanks to the simplicity of manufacturing the model of this jet was a great success at the country children’s centres.
Materials for polyopia will need are available: the sheet of foam PS-4-40 (300x210x3 mm), 3 mm plywood for the nose, model airplane rubber and PVA glue. And the tools only need a scalpel, a marker, a pencil, a ruler, scissors and pins.
Production of the model. Most of the parts cut from foam. Plywood is only nose. Handle foam best tormaresca, a cutting element which is glow or electric shock, nichrome wire.
Novice modelers it is most convenient to mark the contours of the parts pre-made templates from cardboard, but the older guys can use the method of transferring the configuration details from the drawing to the foam and plywood using carbon paper. Below the drawing is not spoiled, it makes sense to protect with plastic wrap.
Production of the model starts with the layout for 3 mm sheet foam with the size 300×210 mm outline details of the model. This work should be carried out with maximum accuracy depend on flying qualities polyopia. The bow section is marked on a sheet of 3 mm plywood. Note that for the model requires a dual set of wings and sides of fuselage and six sets of pylons suspension arms.
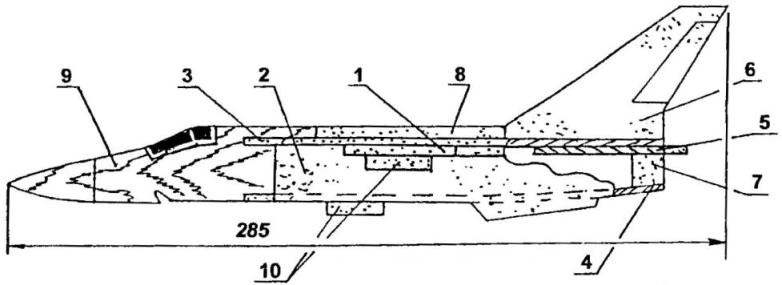
Assembly diagram throwing, model-polyopia su-24:
1 — wing; 2 — sides of the fuselage; 3 — upper part of the fuselage; 4 — lower part of the fuselage; 5— half of the stabilizer; 6— keel; 7— partition 8— gargrot; 9 — the nose of the fuselage; 10 pylons for the suspension arms (6 PCs.)
The main parts of the model (numbering of items corresponds to items in the Assembly diagram)
The next operation — cutting with a sharp scalpel by marking all the foam parts. It is desirable to use a metal ruler. Novice modelers this operation is best performed with scissors. The ends of the cut parts must be levelled with sandpaper.
The most difficult part of the model — the nose: it is cut by a fret saw from 3mm plywood and is treated with a file and sandpaper. Groove for engaging the elastic of the catapult launch models should not have sharp edges, otherwise the rubber on them will quickly ground.
Assembly of the foam parts is carried out on the PVA glue used for temporary fixation of the parts relative to each other ordinary tailor pins. It is thus first attached the stabilizer to the top fuselage. If the glue is too thick, before operation, it should be diluted with a little water for better promazyvanie surfaces.
The sides and upper part of the nacelle are connected by pins, and then the joints from the inside promazyvaetsya with glue. At the end., lower parts of the nacelle glue is applied, and they are glued between the sides with fixing them together with pins.
Next you need to select the sweep swivel (prototype) wing panels and glue them to the center section by inserting the root of the slots in the sides of the fuselage, then attach the jumper to the middle of the rear fuselage.
When the adhesive technology of the pins, which recorded the bonded parts are removed, and the nasal element of the model fit with a box fuselage and the joints neatly promazyvaetsya the inside with white glue.
In the rear part of the fuselage is glued to the keel with a time fixing it all the same pins. On top of the fuselage of the model is glued to the fairing, also cut from Styrofoam strip. Once dry glue into place in accordance with an Assembly model schema installed pylons suspension arms
Finish the model. As already mentioned, the throwing model is lokopio modern supersonic bomber, so it is advisable to paint it in accordance with the color of the prototype aircraft. We recommend you to use permanent marker-markers with which you can draw the contours of the ailerons, flaps, rudder, technological joints, air intakes, and the stars and the tail numbers.
For the greater the number of copies you can paint a model nitro enamel light blue airbrush. This is best done in special ventilated area or outdoors, away from fire. When using the airbrush, filled with nitro enamel, it is recommended to keep it at a distance of 150-200 mm from the model in order to prevent dissolution of the foam; paint it should be diluted only with acetone.
Balancing the model. On the Assembly diagram polyopia indicated the position of its center of gravity (CG), which ensures stable flight of the model having sweep wing panels 35°. When you change the sweep in the big or smaller party alignment is determined experimentally with the help of clay added to nose or tail of the aircraft.
Adjustment and running the model. Before you run with catapult model should be adjusted in planning test flights with his hands. If the model is stable plans and range should be around 10-15 m, it can launch from the catapult. Catapult is a ring of rubber thread with a diameter of 2×1 and a length of 400 mm. Linking ring, pinch the knot. With the other hand take the model for the tail and pulling her, let her go. If the model is well assembled, right after a good run she should do or loop the loop, or “Immelman-properly” and effectively to land.
Possible disadvantages of planning are eliminated by folding the rear edges of the fin and stabilizer. Changing wing sweep and the deflection angles of the edges of the tail can cause the model to perform aerobatics, such as “barrel”, “loop”, “Immelman”, “bell” and others.
The scheme of adjustment of the throwing model:
And — if we ignore the back edges of the blades of the stabilizers are folded up; B — pitch when the trailing edge of the blades of the stabilizers are folded down; In — to get rid of the left heel will help down the pulling away of the rear edge of the left console; D— in normal flight the model is stable is planning to a distance of 10-15 m; D — adjusted model can be launched with a catapult from rubber thread
The type su-24 in our laboratory was designed and manufactured throwing polyopia MiG-29, su-27, MiG-25, R-18 and R-16. They all have different size and weight, but they share a spectacular flight, attractive appearance and ease of fabrication.
For the development of design abilities of novice modelers on the basis of these models it is possible to develop experimental copies of various schemes: Buchvostau, flying wings, ducks and others.
In the competition model with models palyapayi estimated number of copies per cell, time of flight, the purity of the execution of aerobatic maneuvers and originality of the development (experimental models).
In conclusion, it should be noted that it is possible to make larger models, increasing this one and a half times the linear dimensions. You can use a 5-mm plates, harvested with the help of Thermaltake of readily available packaging foam.
Technical data model polyopia su-24
S. KOLOSKOV, teacher of additional education of the highest category TSDYUTT, R s b I n s K
Recommend to read BATHHOUSE IN CAMP Not going to tell you about what is a fascinating (though difficult) kind of leisure — Hiking. However, after a long and sometimes multi-day transition fatigue accumulates in the muscle... THE STOCK DOES NOT PULL HIS POCKET Paradoxically, but in the early 60-ies of the last century escort fleet the largest sea powers of the world — the United States of America — was in very poor condition. It is based on...

 Throwing model-polyopia su-24. The model is designed and manufactured in the laboratory aeromodelling Center for children and youth technical creativity of the city of Rybinsk for novice modelers. The prototype has become a modern supersonic bomber with variable geometry (sweep) of the wing su-24, standing in service with the Russian air force. The launch of such models always generate interest among club members, and spectators. And thanks to the simplicity of manufacturing the model of this jet was a great success at the country children’s centres.