In the future on the basis of the complex R-5M developed a large family of geophysical research rockets R-5A, R-5B, R-5V and R-5ВАО, reaching heights of up to 500 km and carrying on-Board scientific instruments for space exploration.
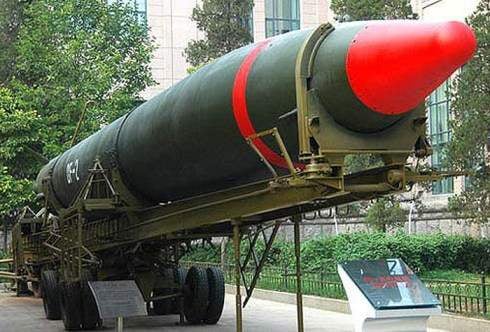
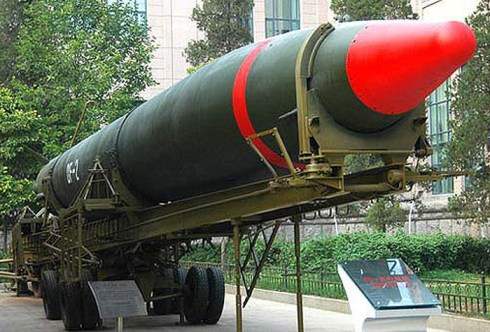
Strategic rocket R-5M (product 8К51)
Technical data of the R-5M are as follows: maximum range of 1200 km, speeds of up to 2636 m/s, starting weight – 28.6 tons, the mass of an untucked missiles – 4,39 tonnes, the weight of the warhead is about 1.3 tons.
I must say that the proposed model is a copy, in my opinion, much easier to manufacture than P-1, R-2, R-2A. And publication of this article is a tribute to the chronology of the establishment of the first domestic missile at OKB-1 headed by S. P. Korolev.
Model-a copy of the R-5M is manufactured as described earlier, in 1:25 scale. To create it needs only one mandrel for bonding the case. Its diameter is 65 mm, length about 600 mm.
Structurally, the model rocket R-5M are made of two elements – a cylindrical body and a head part consisting of the cone (fairing) and “alive”. Such a model can be recommended for the manufacture of “rocket scientists” who have some experience in design – members of the second year.
I must admit that the flight demonstrations on the model a bit. And if you cook it for competitions, the emphasis should be on precision manufacturing (number of copies per cell) and quality of finish, colour and markings.
In other words, focus on getting the maximum bench evaluation. And when flight tests is to provide a good flight, and, of course, the safety of re-entry vehicles parts two parachutes.
Manufacturing technology-models R-5M is not much different from creating a flying miniature rockets described earlier.
Conventionally, a copy of the rocket can be divided into two parts: the head (with its length of 270 mm) and main body (its length is 556 mm), the Order of production doesn’t matter and is only dictated by the environment in which to create a model.
Head part – part. Its carved out of basswood on a lathe with two elements. The first fairing. He cone. Fake billet with a diameter of 58 – 60 mm and length of 150 – 155 mm is clamped in the Chuck of the lathe and process from the inside. First, to a depth of 100 – 110 mm do drill diameter 12 – 14 mm, length 50 – 60 mm drill bit diameter 24 – 25 mm. After this long cutter chiseled inside the resulting drilling pre-turning tool holder for 11°.
Thus, easy fairing, adjusting the thickness of its walls up to 4 – 5 mm. the Free end part of the butt and outer groove with a diameter of 52 mm and a width of 15 mm. She will need to connect to another element – “ogiwara”.
After removing from the machine the received item is clamped in a Chuck workpiece other (preferably birch). Drill it through hole with a diameter of 15 to 20 mm and to a depth of 15 – 20 mm doing an internal bore with a diameter of 52 mm and “planted” in her fairing. To guarantee you in three places (around the circumference) to drip some PVA glue “Joiner”.
Giving to dry glued connection of workpieces outside. The toolholder should rotate by 11° in the opposite direction from zero. Not bringing the outer diameter to the desired (0.5 mm), the resulting cone is removed from the holder and fix to the other workpiece – diameter 69 – 70mm for the manufacture of the second element of the head part is “alive”.
The beginning, where drill hole with a diameter of 50 – 51 mm, and a free end at a depth of 10 mm do boring up to diameter 52mm, adjusting it to the size of the wide edge of the head fairing. Then paste it into “alive”. After drying, the connection handle, the outer surface of the entire head part. While avoiding excessive increase of the transverse feed of the cutter. With such a length (more than 250 mm) can “pull” the item from the holder.
Treating the fairing from the outside with a chisel, file and sandpaper, cover it with two or three coats of nitrocellulose lacquer. At the distance of 253 mm from the top make the groove width of 20 mm and a diameter of 62 – 62,1 mm for fixing fairing into the grommet of the housing when assembling the whole model. Inside face of the fixed plug (boss) with a loop.
The case of the model-copy of the R-5M glued two layers of drawing paper on the mandrel with a diameter of 65 mm. Allowing to dry the items received, process the suture and the housing with sandpaper and coated with a single layer of nitro lacquer. Thus is removed the pile of paper. Then mark pointed with a pencil the location of the welds and paste over the entire body of writing paper, causing pre-markings riveted joints with knurled – cog from the clock in increments of 2-3 mm. I Want to advise to stick the strips of paper of a width not more than 100 – 120 mm, using PVA glue. Otherwise, there are folds and irregularities.
Giving to dry the items received, treat the surface with fine emery paper and cover with two or three coats of nitrocellulose lacquer. Then glued the outer elements, pads connectors, boxes, hatches, antennas, etc. welds imitate sticker thin strips of paper (0.5 – 0.7 mm) or thread previously covering their nitrocream.
Then clamp the mandrel (building on it) in the lathe Chuck and at low speed butt casing to your desired length – 556 mm. mandrel is Placed in a moist environment – for window (between frames) or over a bucket of water and remove the housing from the mandrel. It is tough and durable.
Due to the large length of hull (and hence a large internal volume), the model is applied to the tube – ognevo, allowing you to use the boost regular you ribnogo charge mrad. Ognevoj length 385 mm glue from the paper in a single layer on the mandrel with a diameter of 20 mm. it “dress” three formers from balsa, one of them is a power (thickness 6.5 mm) and glued to the body, in its upper edge fastened coupling sleeve, carved from basswood, and glue the tether (strong thread) length 350 – 400 mm.
Stabilizers (all four) are cut from the balsa plate thickness of 6 mm, making the size of their 2 – 3 mm less than required. Then three parties (in addition to more) around Linden slats, combined in a package and processed using a loop. Then as I looked into the package, each profile and paste over writing paper, preliminary having markings riveted seams, and then coated with nitrocellulose lacquer (Amalita). After drying a big way stabilizers do (round file) concave and glue a pin of bamboo with a diameter of 2 mm and a length of 6 mm.
Marked on the rear of the hull the attachment of the stabilizers and attach them to the epoxy resin. Guide rings arch steel wire with a diameter of 0.8 mm and glue them onto the resin to the enclosure so that they are not conspicuous in a place of fastening of a box.
Model-a copy of the strategic rocket R-5M:
1 — fairing; 2 — “alive” fairing; 3 – the connecting plug; 4 – plug; 5 – loop for the suspension of a rescue system; 6 – parachute bow: 7 – parachute main body; 8 – frame; 9 – tube-ognevoj; 10 – housing; 11 – MRD; 12 – power frame; 13 – aerodynamic handlebars; 14 – the bearing; 15 – gas drive; 16 – stabilizer
All external elements of the bottom part (legs, gas rudders) are cut from basswood, painted and attached after Assembly and painting the entire model. Aerodynamic wheels make removable. They are cut from fiberglass 2 mm thick profile. In a big way glued pins (OVS wire 0.8 mm diameter), which are then inserted into holes drilled in the stabilizer.
After Assembly, the finished model of her sand and put a layer of dark paint. For this purpose, suitable Serebryanka. It shows a roughness. Then again treated with fine sandpaper and paint in the desired color. In this case, mostly khaki. But the main guide in this case is the documentation.
Before running the model it is necessary to center – locate the position of the center of gravity (CG) and center of pressure (CSD). From theory it is known that the DH should always be ahead of the TSD. In this model, ready to fly, the position of the CG must be within 25 – 30 mm, and it can be determined by placing the model on the line. Approximately can be defined and the CSD. Need of a homogeneous material to cut out the side outline of the model and find the CG of a plane figure. He will be TSD-models. In the specific case of the CG is at a distance of 280 mm from the top.
Flight weight copies of the R-5M, is equipped with two parachutes (head part and body) with a diameter of 400 and 500 mm, about 170 g.
It starts on the motor MRD 10-10-3.
V. ROZHKOV
Recommend to read Bosch 12V battery recovery Have you ever wondered what to do with an old screwdriver that is lying around idle because of a dead battery? I had a similar situation - a friend gave me his old Bosch with the comment:... SOFA-BENCH IN THE KITCHEN The idea to make on their own comfortable sofa shop for kitchen appeared after unsuccessful searches at furniture stores, which would be in place and responded to my ideas about its...